
43 posts tagged with "AWS"

View All Tags

Secure EC2 Private Subnet Access Without Bastion Hosts - Save Costs

· 5 min read

Introduction

This approach of using EC2 Endpoint compared to a Bastion host not only streamlines the connection process but also saves costs associated with maintaining a bastion host.

The Traditional Method

EC2 endpoint

Typically, to connect to an EC2 instance in a private subnet, you would use a bastion host. The process involves:

  1. Setting up a bastion host in a public subnet.
  2. Connecting to the bastion host from your local machine.
  3. Using the bastion host to access the EC2 instance in the private subnet.

While this method is effective, it can be cumbersome and costly.

The New Approach: EC2 Instance Connect Endpoint

AWS recently introduced a new service called EC2 Instance Connect Endpoint. This service allows you to connect directly to your EC2 instance in a private subnet without the need for a bastion host.

EC2 Traditional Method

Here's how to set it up:

Step-by-Step Guide

Set Up Your VPC and Subnets

EC2 setup VPC

First, create a Virtual Private Cloud (VPC) with both public and private subnets:

  1. Public Subnet: This is where you will create the EC2 Instance Connect Endpoint.
  2. Private Subnet: This is where your EC2 instance will reside.
  3. Delete Default VPC: Start by deleting the default VPC in your AWS region to avoid conflicts.
  4. Create a New VPC:
    1. Navigate to the VPC console.
    2. Choose “VPC and more” and give it a suitable name (e.g., "YouTubeDemoVPC").
    3. Create one public subnet and one private subnet.
    4. No need for an S3 gateway in this setup.

Step 2: Launching the EC2 Instance

EC2 launch instance

  1. Launch an EC2 Instance in the Private Subnet:

    1. Go to the EC2 console and launch a new instance.
    2. Choose the private subnet for your instance.
    3. Select an instance type (e.g., t-nano).
    4. Create a key pair or use an existing one for SSH access.
  2. Set Up Security Groups:

    1. Create a new security group allowing all traffic within the VPC.
    2. Ensure the security group is attached to your EC2 instance.

Step 3: Creating the EC2 Instance Endpoint

  1. Navigate to the VPC console and select “Endpoints.”

  2. Create a new endpoint and attach it to the VPC.

  3. Assign a security group to the endpoint that allows all traffic.

  4. Configure Security Groups:

    1. Ensure the public security group for the endpoint allows inbound traffic from your local IP.

Step 4: Connecting via AWS CLI

EC2 connecting

  1. Install and Configure AWS CLI:

    1. Ensure AWS CLI is installed on your local machine.
    2. Configure AWS CLI with your access keys.
  2. Connect to the EC2 Instance:

    1. Use the following command with the correct private key and endpoint details to connect to the EC2 instance.
    ssh -i <keyName>.pem <username>@<instance-id> -o ProxyCommand="aws ec2-instance-connect open-tunnel --instance-id <instance-id>" --profile <profile-name>

Step 5: Connecting via WinSCP

EC2 WinSCP

  1. Download and Install WinSCP:

    1. Install WinSCP for a graphical interface to manage files on your EC2 instance.
  2. Set Up WinSCP:

EC2 continue

  1. Open WinSCP and configure a new session.

    1. Enter the private IP of the EC2 instance.

    2. Use the private key for authentication.

    3. Set up a proxy command to use the EC2 endpoint.

      1. Click Advanced --> Connection --> Proxy --> Local and enter following command:
      aws ec2-instance-connect open-tunnel --instance-id <instance-id>
  2. Connect and Manage Files:

EC2 cont

  1. Save the session settings and connect.
    1. You should now be able to manage files on your EC2 instance via WinSCP.

Troubleshooting Common Issues

  1. Permission Denied Errors:

  2. Ensure your private key file has the correct permissions (chmod 400 your-key.pem).

  3. Verify the security group rules allow inbound traffic from your IP.

  4. Endpoint Initialization Issues:

  5. Check the VPC and subnet configurations.

  6. Ensure the endpoint is associated with the correct security group.

Benefits of Using EC2 Instance Endpoints

  1. Cost Savings: Avoid additional costs associated with running a bastion host.
  2. Simplicity: Simplify the connection process by eliminating the need for an intermediary host.
  3. Security: Maintain secure access to instances in private subnets without exposing a bastion host.

Conclusion

Using EC2 instance endpoints is a powerful and cost-effective way to manage instances in private subnets. This guide has provided a comprehensive walkthrough of setting up and connecting to an EC2 instance without a bastion host, utilizing both AWS CLI and WinSCP. Implementing this approach can streamline your workflow and reduce costs, making your cloud infrastructure more efficient and manageable.


🔚 Call to Action

Choosing the right platform depends on your organizations needs. For more insights, subscribe to our newsletter for insights on cloud computing, tips, and the latest trends in technology. or follow our video series on cloud comparisons.

Interested in having your organization setup on cloud? If yes, please contact us and we'll be more than glad to help you embark on cloud journey.

💬 Comment below:
Which tool is your favorite? What do you want us to review next?

Understanding AWS Account Migration: A Step-by-Step Guide

· 3 min read
Cloud & AI Engineering
Arina Technologies
Cloud & AI Engineering

Hello everyone! In today's blog, we'll explore how to invite an AWS management account that is already part of another organization into a new organization. This process can be a bit tricky, but we'll walk you through it step by step. Let's get started!


Why Migration Can Be Complicated

Inviting a management account that is part of an existing AWS organization into a new organization isn't straightforward. This is mainly because the management account is deeply integrated within its current organization. The process involves several steps to ensure the transition is smooth and does not disrupt existing resources.


Step-by-Step Process


1. Understanding the Current Setup


Current Setup


You have an AWS account (Account A) that you wish to invite into a new organization. However, this account is a management account and is already part of another organization.


2. Sending the Invitation


Sending the Invitation


Initially, you might think of sending an invitation to this account directly. However, if the account is already a management account within another organization, it will not receive the invitation due to existing restrictions.


3. Removing the Management Account from Its Current Organization


Management Account


To proceed, you need to remove the management account from its current organization. Here's how you can do it:

  • Access the Management Account: Log in to the management account that you want to migrate.

  • Delete the Organization: Navigate to the settings section and opt to delete the organization. This action will not impact existing resources associated with the account. For instance, EC2 instances, security groups, and elastic IPs will remain intact.

    Ensure that all critical resources are noted and checked to confirm they will remain unaffected post-deletion.


4. Deleting the Organization


Deleting the Organization Deleting the Organization


Type the organization ID when prompted and proceed to delete the organization. This step will disband the organization but will not affect the account's resources. This deletion is necessary to migrate the management account to another organization.


5. Accepting the Invitation


Accepting Invitation


Once the organization is deleted:

  • Check Invitations: Go back to the account and check for the pending invitations.
  • Accept the Invitation: You should now see the invitation from the new organization. Accept this invitation to complete the migration.

Important Considerations

  • Resource Continuity: Deleting the organization will not affect existing resources. It is crucial to verify this by checking resources like EC2 instances, security groups, etc., before and after the deletion.
  • Management Account Restrictions: Management accounts have specific restrictions that require these steps to migrate them properly. Ready to take your cloud infrastructure to the next level? Please reach out to us Contact Us

Conclusion

Migrating an AWS management account to a new organization involves a detailed process of deleting the existing organization and accepting a new invitation. While this may seem complex, following these steps ensures a smooth transition without impacting your AWS resources.

We hope this guide was helpful. Don't forget to like, subscribe, and share our channel for more insightful content on AWS management and other cloud solutions.

Simplifying AWS Notifications: A Guide to User Notifications

· 4 min read

Introduction

In cloud operations, timely notifications are crucial. Whether dealing with a security incident from AWS GuardDuty, a backup failure, or any other significant event, having a streamlined process to receive and act upon alerts is essential. Traditionally, AWS users set up notifications through complex patterns involving AWS CloudTrail, EventBridge, and Lambda. However, AWS has recently introduced a new service designed to simplify this process significantly: AWS User Notifications.

In this blog, we'll walk through the benefits of this new service and how it streamlines the notification setup process compared to the traditional methods.

The Traditional Notification Setup

Historically, setting up notifications involved several AWS services:

  1. CloudTrail : Events captured by CloudTrail.
  2. EventBridge : Rules in EventBridge to capture and process these events.
  3. Lambda : Lambda functions to parse events and send formatted notifications.
  4. SNS : For sending out emails or SMS notifications.

For instance, if AWS GuardDuty detected a potential security incident, you'd need to:

  • Create a rule in EventBridge to catch GuardDuty findings.
  • Write Lambda functions to process these events.
  • Use SNS to send notifications, often requiring custom formatting in Lambda.

While effective, this setup can be complex and involves considerable manual configuration and coding.

The New AWS User Notifications Service

AWS has introduced a more straightforward approach with the AWS User Notifications service. This new service allows you to set up notifications with minimal configuration, bypassing the need for complex EventBridge rules and Lambda functions.

Setting Up Notifications with AWS User Notifications

Here's a step-by-step guide on how to set up notifications using the new service:

  1. Access AWS User Notifications

    • Go to the AWS Management Console and search for "User Notifications."
    • Open the User Notifications configuration page.

Search

  1. Create a New Notification Configuration

    • Click “Create Notification Configuration.”
    • Provide a name for the notification, such as "GuardDuty Notification."
    • Optionally, add a description.

New Notification Configuration

  1. Choose the Notification Source

    • Select the source of your notification. For example, choose "CloudWatch" for monitoring AWS CloudWatch events.
    • Specify the type of events you want to receive notifications for, such as "GuardDuty findings."
  2. Configure Notification Details

    • Choose the AWS region you want to monitor, such as "Virginia."
    • Set up advanced filters if needed. This helps narrow down the events you want to capture, like focusing only on critical findings.
    • Decide on the aggregation period (e.g., 5 minutes, 12 hours) if you want to aggregate notifications.
  3. Specify Notification Recipients

    • Enter the email addresses or other notification channels where alerts should be sent. You can use AWS's built-in options or integrate with chat channels.
  4. Review and Create

    • Review your configuration.
    • Click "Create Notification Configuration" to finalize.

Comparing AWS User Notifications with Traditional Methods

Simplicity : User Notifications significantly reduce complexity by eliminating the need for multiple services like EventBridge and Lambda for basic notification setups. You configure everything in a single interface with minimal coding.

Customization : While traditional setups offer extensive customization through Lambda functions, User Notifications provide a more user-friendly approach with options for advanced filters and predefined notification formats.

Speed : The new service allows for quicker setup and deployment of notifications, making it easier to address urgent issues promptly without extensive configuration.

Use Cases

  1. GuardDuty Alerts : Set up notifications for any security findings immediately, ensuring you can respond to potential threats without delay.

  2. AWS Config : Receive alerts for configuration changes, focusing on non-compliant changes to avoid information overload.

  3. Backup Failures : Get notifications for failed backup jobs to ensure data protection measures are always active.

  4. Health Checks : Monitor AWS service health events to stay informed about the operational status of your AWS environment.

Conclusion

AWS User Notifications is a game-changer for simplifying the notification setup process. It reduces the complexity involved in configuring notifications and allows you to focus on addressing issues rather than managing notification infrastructure. By leveraging this new service, you can ensure that critical alerts are delivered promptly and efficiently.

For detailed guides and additional information, check out the AWS documentation and stay updated with the latest AWS features.

Feel free to reach out with any questions or comments, and don't forget to subscribe for more updates!

Expert Guide to Cloud Architecture: Tips for Aspiring Architects

· 5 min read

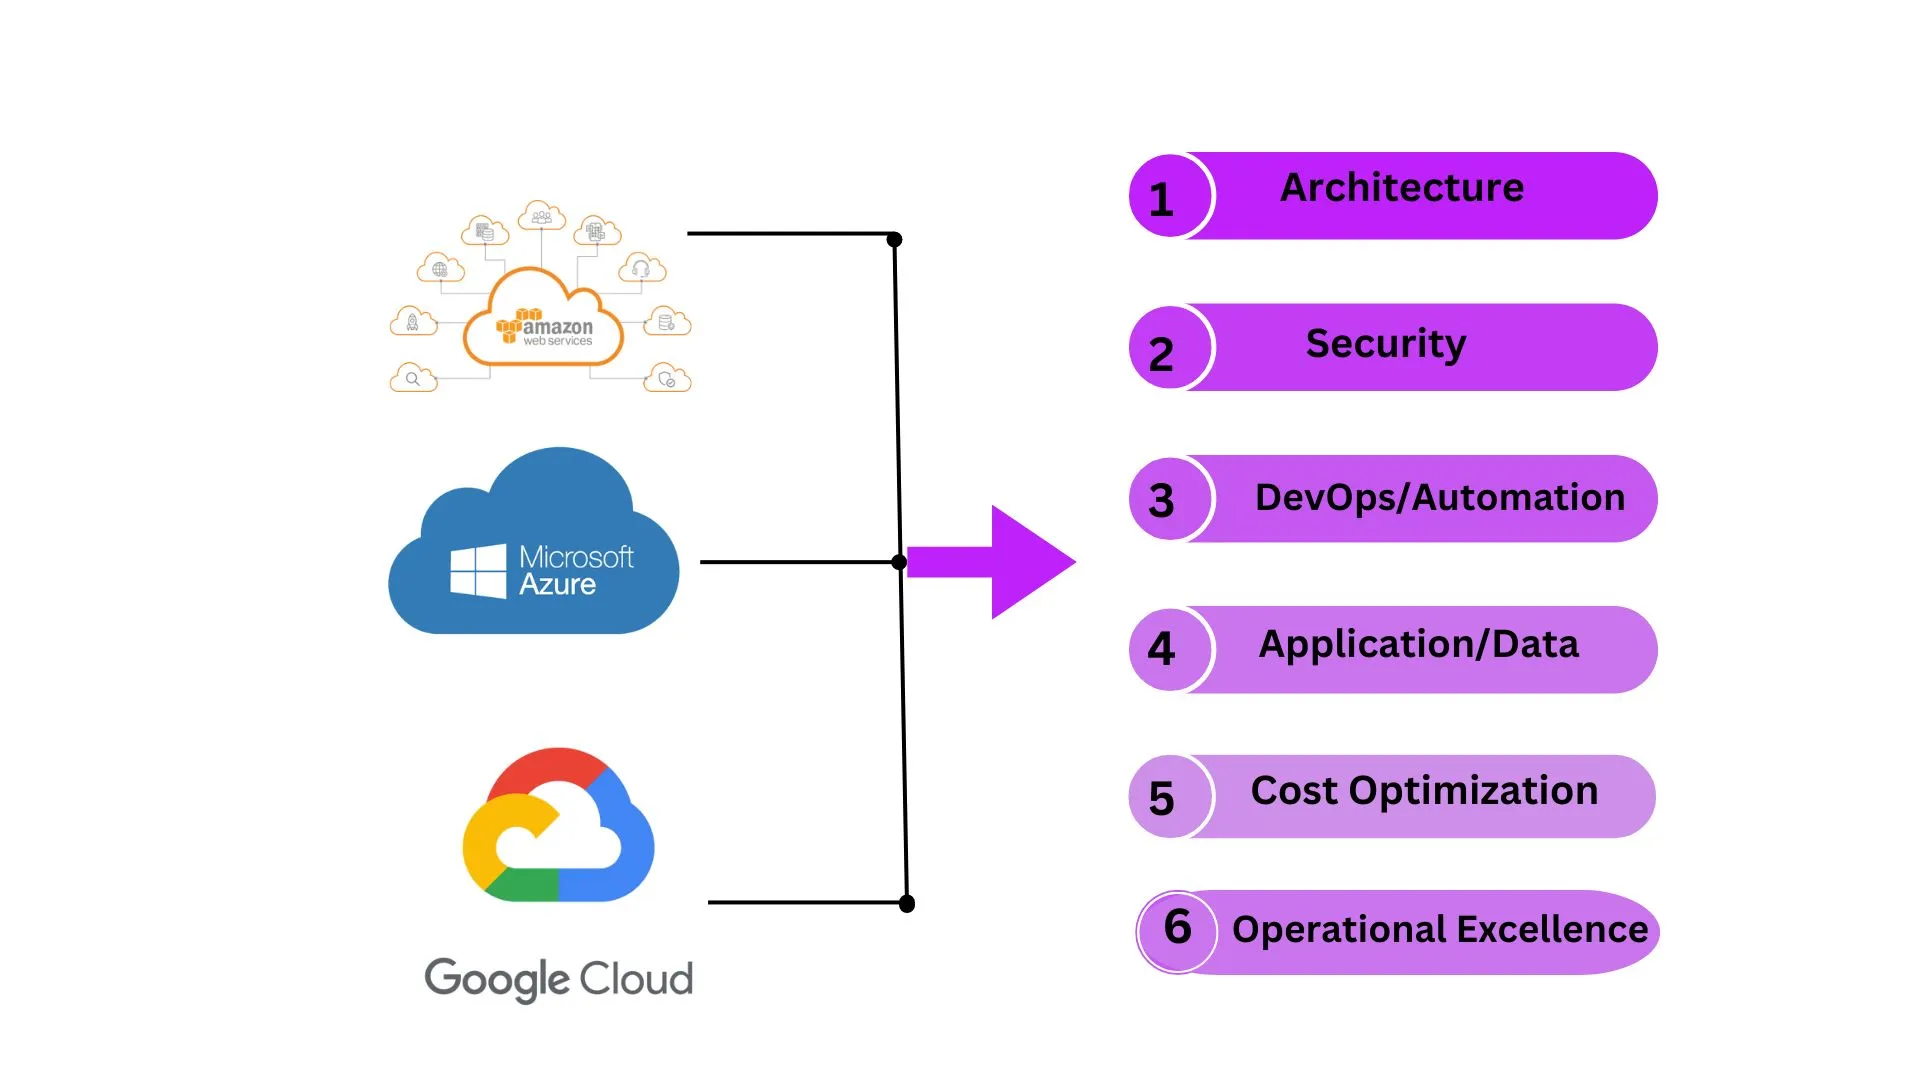
To become a good cloud architect it's important to understand the essential pillars that support a well-architected framework. This framework helps in designing, deploying, and maintaining cloud applications efficiently. Here are some of the key pillars and insights from our experience at Arena Technologies.
Cloud Architecture


1. Operational Excellence

Operational excellence involves running and monitoring systems to deliver business value and continuously improve processes and procedures. It’s crucial to have integration, security, incident monitoring, and automation in place.

Technologies to Learn:

  • Monitoring and Logging: AWS CloudWatch / Azure Monitor / Google Stackdriver
  • CI/CD: Jenkins / GitLab CI / CircleCI
  • Infrastructure as Code: Terraform / CloudFormation / ARM Templates

2. Security

Security is the foundation of any cloud architecture. It involves infrastructure security, network security, application security, and DevSecOps practices. Security should be considered from day zero, even before starting the project.

Technologies to Learn:

  • Identity and Access Management: AWS IAM / Azure AD / Google IAM
  • Key Management: AWS KMS / Azure Key Vault / Google Cloud KMS
  • Application Security: OWASP Tools / Snyk

3. Reliability

Reliability ensures a workload performs its intended function correctly and consistently. This includes planning for disaster recovery, high availability, and redundancy.

Technologies to Learn:

  • Traffic Routing: AWS Route 53 / Azure Traffic Manager / Google Cloud DNS
  • Database Redundancy: AWS RDS Multi-AZ / Azure SQL Database Geo-Replication / Google Cloud Spanner
  • Data Backup and Disaster Recovery: AWS Backup / Azure Backup / Google Cloud Backup

4. Performance Efficiency

Performance efficiency is about using IT and computing resources efficiently. This includes selecting the right instance types, optimizing storage, and ensuring that your application scales to meet demand.

Technologies to Learn:

  • Scaling Compute Resources: AWS Auto Scaling / Azure VM Scale Sets / Google Cloud Autoscaler
  • Scalable Storage Solutions: AWS S3 / Azure Blob Storage / Google Cloud Storage
  • Serverless Computing: AWS Lambda / Azure Functions / Google Cloud Functions

5. Cost Optimization

Cost optimization involves controlling where the money is being spent, selecting the most appropriate and right number of resource types, and scaling to meet business needs without overspending.

Technologies to Learn:

  • Cost Monitoring and Management: AWS Cost Explorer / Azure Cost Management / Google Cloud Pricing Calculator
  • Setting and Monitoring Budgets: AWS Budgets / Azure Budgets / Google Cloud Budgets
  • Optimizing Costs with Long-term Commitments: Spot Instances / Reserved Instances / Savings Plans

6. Sustainability

Sustainability in cloud computing involves designing solutions that reduce carbon footprint and manage resources responsibly.

Technologies to Learn:

  • Sustainability Practices: AWS Sustainability Practices / Azure Sustainability Practices / Google Sustainability Practices
  • Energy-efficient Algorithms: To optimize compute usage

Important Aspects of Cloud Architecture


Architecture

A solid architecture is crucial for any cloud setup. Unlike traditional on-premises setups, cloud architecture must be designed with scalability and efficiency in mind. Common architectural patterns include microservices, service-oriented architecture (SOA), and data pipeline architectures.

Technologies to Learn:

  • Container Orchestration: Kubernetes / Amazon EKS / Azure AKS / Google GKE
  • Container Management: AWS ECS / Azure Container Instances / Google Cloud Run
  • Service Mesh: Istio / Linkerd

Automation

Automation is essential in cloud environments. Tools like Terraform for infrastructure as code (IaC) and continuous integration/continuous deployment (CI/CD) pipelines ensure that your infrastructure and deployments are consistent, repeatable, and scalable.

Technologies to Learn:

  • Infrastructure as Code: Terraform / CloudFormation / ARM Templates
  • CI/CD Pipelines: Jenkins / GitLab CI / CircleCI
  • Configuration Management: Ansible / Chef / Puppet

Application and Data

Understanding application architecture and data management is crucial. Depending on the application type—whether it’s a web service, big data application, or something else—the architectural and technological choices will vary. It is important to choose the right databases and data management tools based on your specific needs.

Technologies to Learn:

  • Relational Databases: AWS RDS / Azure SQL Database / Google Cloud SQL
  • NoSQL Databases: AWS DynamoDB / Azure Cosmos DB / Google Cloud Firestore
  • Real-time Data Streaming: Apache Kafka / AWS Kinesis / Azure Event Hubs / Google Pub/Sub

Non-Functional Requirements

Non-functional requirements (NFRs) are often overlooked but are critical to the success of any cloud project. These include:

  • Performance: How well the system performs under load.
  • Scalability: The ability to scale up or down as needed.
  • High Availability: Ensuring the system is operational at all times.
  • Disaster Recovery: Planning for system recovery in case of failures.

Practical Tips for Aspiring Cloud Architects

  • Learn Multiple Architectural Patterns: Familiarize yourself with different architecture styles and understand when to use each.
  • Understand Security Practices: Security must be integrated into every part of your architecture.
  • Embrace Automation: Use tools like Terraform and CI/CD pipelines to automate as much as possible.
  • Focus on Cost Management: Keep an eye on costs from the beginning to avoid unexpected expenses.
  • Stay Updated: Cloud technologies evolve rapidly, so continuous learning is key.

Technologies to Learn:

  • Architectural Best Practices: AWS Well-Architected Tool / Azure Well-Architected Review / Google Cloud Architecture Framework
  • Optimizing and Improving Cloud Environments: AWS Trusted Advisor / Azure Advisor / Google Cloud Advisor

Conclusion

Being a good cloud architect requires a blend of technical knowledge, practical experience, and an understanding of the broader business context. By focusing on the pillars of a well-architected framework and considering both functional and non-functional requirements, you can design efficient, scalable, and secure cloud solutions.

Comprehensive Guide to Centralized Backups in AWS Organizations

· 4 min read

Centralized Management of AWS Services Using AWS Organizations

AWS Organizations provides a unified way to manage and govern your AWS environment as it grows. This blog post details how you can use AWS Organizations to centrally manage your services, thereby simplifying administration, improving security, and reducing operational costs.


Why Use AWS Organizations?

AWS Organizations enables centralized management of billing, control access, compliance, security, and resource sharing across AWS accounts. Instead of managing services individually in each account, AWS Organizations lets you administer them from a single location.


Advantages of Centralized Management:

a. Efficiency: Manage multiple AWS accounts from a single control point. b. Cost Savings: Reduce operational costs through centralized management. c. Enhanced Security: Apply consistent policies and compliance standards across all accounts. d. Simplified Operations: Streamline monitoring, backup, and administrative tasks.


Step-by-Step Guide to Centralized Backup Management


Backup


Managing backups across multiple AWS accounts can be complex. AWS Backup allows you to centralize and automate data protection across AWS services. Here’s how you can set up centralized backup management using AWS Organizations:


1. Setting Up AWS Organizations:

a. Create an AWS Organization: i) Navigate to the AWS Organizations console. ii) Click on "Create organization" and follow the prompts.

b. Add Accounts to Your Organization: i) Add existing accounts or create new ones. ii) Ensure all accounts you want to manage are part of the organization.


2. Enabling Centralized Backup:


Enabling


a. Navigate to AWS Backup: i) Open the AWS Backup console from the management account. ii) This is where you'll configure backup plans and policies.

b. Create a Backup Plan:


Create


i) Click on "Create backup plan." ii) Define your backup rules (e.g., frequency, retention period).

  • Specify the resources to back up (e.g., EC2 instances, RDS databases).

c. Assign the Backup Plan: i) Use tags to assign resources to the backup plan. ii) For instance, tag all EC2 instances you want to back up with Backup:Production.


3. Delegating Administration:


Delegating


a. Create a Delegated Administrator Account: i) Designate one account as the delegated administrator. ii) This account will handle backup management for all other accounts.

b. Set Up Cross-Account Roles: i) Create IAM roles in each member account. ii) Assign these roles the necessary permissions for backup operations. iii) Ensure the roles allow cross-account access to the delegated administrator account.


4. Configuring Backup Policies:

a. Enable Backup Policies: i) From the AWS Backup console, enable backup policies. ii) Define and apply these policies to all accounts within the organization.

b. Monitor Backups: i) Use AWS Backup's centralized dashboard to monitor the status of your backups. ii) Set up notifications for backup failures or successes.


5. Using Additional AWS Services:

AWS Organizations supports various other services that can be centrally managed. Some examples include:

  • a. AWS GuardDuty: Centralized threat detection.
  • b. AWS Config: Compliance auditing and monitoring.
  • c. AWS CloudTrail: Logging and monitoring account activity.
  • d. AWS Identity and Access Management (IAM): Centralized access control and user management.

Ready to take your cloud infrastructure to the next level? Please reach out to us Contact Us


Conclusion

Leveraging AWS Organizations can streamline the management of your AWS environment, ensuring consistent backup policies, enhancing security, and reducing operational overhead. Centralized management not only simplifies your administrative tasks but also provides a unified view of your organization's compliance and security posture.


AWS services that support Containers: Containers!=Kubernetes.

· 4 min read

When it comes to choosing the right container service for your application, AWS offers a myriad of options, each tailored to specific needs and use cases. This guide aims to provide a comprehensive overview of when and how to use various AWS container services, based on our extensive research and industry experience.

Please refer The Ultimate AWS ECS and EKS Tutorial


Understanding Containers and Their Use Cases

Containers have revolutionized the way applications are developed and deployed. They offer portability, consistency, and efficiency, making them ideal for various scenarios, from microservices architectures to machine learning orchestration. Alt text


Service Orchestration

Service orchestration involves managing and coordinating multiple services or microservices to work together seamlessly. Containers play a crucial role in this by ensuring that each service runs in its isolated environment, thereby reducing conflicts and improving scalability.

  1. Kubernetes Service

    • Pros: Fully managed, scalable, extensive community support.
    • Cons: Complex setup, significant operational overhead.
  2. Red Hat OpenShift on AWS (ROSA)

    • Overview: A third-party service similar to Kubernetes, managed by OpenShift.
    • Pros: Robust management platform, popular among enterprise clients.
    • Cons: Similar complexity to Kubernetes.
  3. AWS Elastic Container Service (ECS)

    • Overview: AWS's native container orchestration service.
    • Pros: Seamless integration with AWS services, flexible deployment options (EC2, Fargate).
    • Cons: Limited to AWS ecosystem.

Machine Learning Orchestration

Deploying machine learning models in containers allows for a consistent and portable environment across different stages of the ML pipeline, from training to inference.

  1. AWS Batch
    • Overview: A native service designed for batch computing jobs, including ML training and inference.
    • Pros: Simplifies job scheduling and execution, integrates well with other AWS ML services.
    • Cons: Best suited for batch jobs, may not be ideal for real-time inference.

Web Applications.Please check out our web services Refer website solutions

Containers can also streamline the deployment and management of web applications, providing a consistent environment across development, testing, and production.

  1. AWS Elastic Beanstalk

    • Overview: A legacy service that simplifies application deployment and management.
    • Pros: Easy to use, good for traditional web applications.
    • Cons: Considered outdated, fewer modern features compared to newer services.
  2. AWS App Runner

    • Overview: A newer service that simplifies running containerized web applications and APIs.
    • Pros: Supports container deployments, integrates with AWS ECR.
    • Cons: Limited to ECR for container images, still relatively new.

Serverless Options

For applications that don't require a full-fledged orchestration setup, serverless options like AWS Lambda can be a good fit.

  1. AWS Lambda

    • Pros: Scalable, supports multiple languages, cost-effective for short-running functions.
    • Cons: Limited to 15-minute execution time, may require step functions for longer processes.
  2. Amazon EC2 vs. Amazon LightSail

    • Amazon EC2: Provides full control over virtual machines, suitable for custom setups.
    • Amazon LightSail: Simplifies VM deployment with pre-packaged software, ideal for quick deployments like WordPress.

Decision Tree for Choosing AWS Container Services

To help you choose the right service, consider the following decision tree based on your specific needs:

  1. Service Orchestration Needed?

    • Yes: Consider Kubernetes, ROSA, or ECS.
    • No: Move to the next question.
  2. Serverless Invocation?

    • Yes: If processing time < 15 minutes, use AWS Lambda. If > 15 minutes, consider App Runner.
    • No: Proceed to provisioned infrastructure options.
  3. Provisioned Infrastructure?

    • Yes: Choose between Amazon EC2 for full control or Amazon LightSail for simplified setup.
  4. Machine Learning Orchestration?

    • Yes: Use AWS Batch for batch jobs.
    • No: Skip to web application options.
  5. Web Application Deployment?

    • Yes: Use Elastic Beanstalk for legacy applications or App Runner for modern containerized applications.

Conclusion

AWS offers a robust set of services for container orchestration, machine learning, web applications, and serverless computing. Understanding the strengths and limitations of each service can help you make informed decisions and optimize your application architecture. Ready to take your cloud infrastructure to the next level? Please reach out to us Contact Us

One Bucket, One Key: Simplify Your Cloud Storage!

· 4 min read

In today's cloud-centric environment, data security is more crucial than ever. One of the common challenges faced by organizations is ensuring that sensitive data stored in AWS S3 buckets is accessible only under strict conditions. This blog post delves into a hands-on session where we set up an AWS Key Management Service (KMS) policy to restrict access to a single S3 bucket using a customer's own encryption key.

Introduction to AWS S3 and KMS

Amazon Web Services (AWS) offers robust solutions for storage and security. S3 (Simple Storage Service) provides scalable object storage, and KMS offers managed creation and control of encryption keys.

Scenario Overview

The need: A customer wants to use their own encryption key and restrict its usage to a single S3 bucket. This ensures that no other buckets can access the key.

Setting Up the KMS Key

Step 1: Creating the Key

Creating the Key

  • Navigate to the Key Management Service: Start by opening the AWS Management Console and selecting KMS.
  • Create a new key: Choose the appropriate options for your key. For simplicity, skip tagging and advanced options during this tutorial.

Step 2: Configuring Key Policies

Configuring Key Policies

  • Permission settings: Initially, you might be tempted to apply broad permissions. However, to enhance security, restrict the key’s usage to a specific IAM user and apply a policy that denies all other requests.

Crafting a Bucket Policy

Step 1: Creating the Bucket

Creating the Bucket

  • Unique bucket name: Remember, S3 bucket names need to be globally unique. Create the bucket intended for the exclusive use of the KMS key.
  • Disable bucket versioning: If not required, keep this setting disabled to manage storage costs.

Step 2: Policy Configuration

Policy Configuration

  • Deny other buckets: The crucial part of this setup involves crafting a bucket policy that uses a "Deny" statement. This statement should specify that if the bucket name doesn’t match your specific bucket, access should be denied.
  • Set conditions: Use conditions to enforce that the KMS key can only encrypt/decrypt objects when the correct S3 bucket is specified.
{
"Version": "2012-10-17",
"Id": "key-consolepolicy-3",
"Statement": [
{
"Sid": "Enable IAM User Permissions",
"Effect": "Allow",
"Principal": {
"AWS": "arn:aws:iam::<account-number>:root"
},
"Action": "kms:*",
"Resource": "*"
},
{
"Sid": "Deny access to key if the request is not for a yt-test-bucket",
"Effect": "Deny",
"Principal": {
"AWS": "*"
},
"Action": [
"kms:GenerateDataKey",
"kms:Decrypt"
],
"Resource": "*",
"Condition": {
"StringNotEquals": {
"kms:EncryptionContext:aws:s3:arn": "arn:aws:s3:::yt-s3-bucket"
}
}
}
]
}

Testing the Configuration

  • Validate with another bucket: Create an additional S3 bucket and try to use the KMS key. The attempt should fail, confirming that your policy works.
  • Verify with the correct bucket: Finally, test the key with the correct bucket to ensure that operations like uploading and downloading are seamless.

Conclusion

This setup not only strengthens your security posture but also adheres to best practices of least privilege by limiting how and where the encryption key can be used. Implementing such precise controls is critical for managing sensitive data in the cloud.


🔚 Call to Action

Choosing the right platform depends on your organizations needs. For more insights, subscribe to our newsletter for insights on cloud computing, tips, and the latest trends in technology. or follow our video series on cloud comparisons.

Interested in having your organization setup on cloud? If yes, please contact us and we'll be more than glad to help you embark on cloud journey.

💬 Comment below:
How is your experience with Mac on EC2? What do you want us to review next?

A Detailed Overview Of AWS SES and Monitoring - Part 2

· 6 min read

In our interconnected digital world, managing email efficiently and securely is a critical aspect of business operations. This post delves into a sophisticated setup using Amazon Web Services (AWS) that ensures your organization's email communication remains robust and responsive. Specifically, we will explore using AWS Simple Email Service (SES) in conjunction with Simple Notification Service (SNS) and AWS Lambda to handle email bounces and complaints effectively.

Understanding the Components

Before diving into the setup, let's understand the components involved:

  • AWS SES: An email service that enables you to send and receive emails securely.
  • AWS SNS: A flexible, fully managed pub/sub messaging and mobile notifications service for coordinating the delivery of messages to subscribing endpoints and clients.
  • AWS Lambda: A serverless compute service that runs your code in response to events and automatically manages the underlying compute resources.

Read about SES Part - 1

The Need for Handling Bounces and Complaints

Managing bounces and complaints efficiently is crucial for maintaining your organization’s email sender reputation. High rates of bounces or complaints can affect your ability to deliver emails and could lead to being blacklisted by email providers.

Step-by-Step Setup

Step 1: Configuring SES

SES

First, configure your AWS SES to handle outgoing emails. This involves:

  • Setting up verified email identities (email addresses or domains from which you'll send emails).
  • Creating configuration sets in SES to specify how emails should be handled and tracked.

Step 2: Integrating SNS for Notifications

The next step is to set up AWS SNS to receive notifications from SES. This is crucial for real-time alerts on email bounces or complaints:

  • Create an SNS topic that SES will publish to when specified events (like bounces or complaints) occur.
  • Configure your SES configuration set to send notifications to the created SNS topic.
{
"Version": "2008-10-17",
"Statement": [
{
"Effect": "Allow",
"Principal": {
"Service": "ses.amazonaws.com"
},
"Action": "SNS:Publish",
"Resource": "arn:aws:sns:us-east-1:<account number>:SES-tracking",
"Condition": {
"StringEquals": {
"AWS:SourceAccount": "<account number>"
},
"StringLike": {
"AWS:SourceArn": "arn:aws:ses:*"
}
}
}
]
}

Step 3: Using AWS Lambda for Automated Responses

With SNS in place, integrate AWS Lambda to automate responses based on the notifications:

  • Create a Lambda function that will be triggered by notifications from the SNS topic.
  • Program the Lambda function to execute actions like logging the incident, updating databases, or even triggering remedial workflows.
import boto3, os, json
from botocore.exceptions import ClientError

# Set the global variables
fromEmail= str(os.getenv('from_email','from email address'))
ccEmail = str(os.getenv('cc_email','cc email address'))
toEmail = str(os.getenv('cc_email','to email address'))

awsRegion = str(os.getenv('aws_region','us-east-1'))
# The character encoding for the email.
CHARSET = "UTF-8"

# Create a new SES resource and specify a region.
sesClient = boto3.client('ses',region_name=awsRegion)

def sendSESAlertEmail(eventData):
message = eventData['Records'][0]['Sns']['Message']
print("message = "+message)

bouceComplaintMsg = json.loads(message)
print("bouceComplaintMsg == "+str(bouceComplaintMsg))

json_formatted_str_text = pp_json(message )
if "bounce" in bouceComplaintMsg:
print("Email is bounce")

# The email body for recipients with non-HTML email clients.
BODY_TEXT = "SES: Bounce email notification" +"\r\n"+json_formatted_str_text

bounceEmailAddress = bouceComplaintMsg['bounce']['bouncedRecipients'][0]['emailAddress']
bounceReason = bouceComplaintMsg['bounce']['bouncedRecipients'][0]['diagnosticCode']
print("bounceEmailAddress == "+bounceEmailAddress)
print("bounceReason == "+bounceReason)

subject = "SES Alert: Email to "+bounceEmailAddress+" has bounced"

# The HTML body of the email.
BODY_HTML = """<html>
<head></head>
<body>
<p>Email to %(bounceEmailAddressStr)s has bounced</p>
<p>Reason: %(bounceReasonStr)s</p>
<p>Complete details:%(jsonFormattedStr)s</p>
</body>
</html>""" % { "bounceEmailAddressStr": bounceEmailAddress, "bounceReasonStr": bounceReason, "jsonFormattedStr": json_formatted_str_text}
sendSESEmail (subject, BODY_TEXT, BODY_HTML)
else:
print("Email is Complaint")

# The email body for recipients with non-HTML email clients.
BODY_TEXT = "SES: Complaint email notification" +"\r\n"+json_formatted_str_text

complaintEmailAddress = bouceComplaintMsg['complaint']['complainedRecipients'][0]['emailAddress']
complaintReason = bouceComplaintMsg['complaint']['complaintFeedbackType']
print("complaintEmailAddress == "+complaintEmailAddress)
print("complaintReason == "+complaintReason)

subject = "SES Alert: Email "+complaintEmailAddress+" has raised a Complaint"

# The HTML body of the email.
BODY_HTML = """<html>
<head></head>
<body>
<p>Email %(complaintEmailAddressStr)s has raised a Complaint</p>
<p>Reason: %(complaintReasonStr)s</p>
<p>Complete details:%(jsonFormattedStr)s</p>
</body>
</html>""" % { "complaintEmailAddressStr": complaintEmailAddress, "complaintReasonStr": complaintReason, "jsonFormattedStr": json_formatted_str_text}
sendSESEmail (subject, BODY_TEXT, BODY_HTML)


def sendSESEmail(SUBJECT, BODY_TEXT, BODY_HTML):
# Send the email.
try:
#Provide the contents of the email.
response = sesClient.send_email(
Destination={
'ToAddresses': [
toEmail,
],
'CcAddresses': [
ccEmail,
]
},
Message={
'Body': {
'Html': {
'Charset': CHARSET,
'Data': BODY_HTML,
},
'Text': {
'Charset': CHARSET,
'Data': BODY_TEXT,
},
},
'Subject': {
'Charset': CHARSET,
'Data': SUBJECT,
},
},
Source=fromEmail,
)
print("SES Email Sent.....")
# Display an error if something goes wrong. 
except ClientError as e:
print("SES Email sent! Message ID:"+ e.response['Error']['Message'])
else:
print("SES Email sent! Message ID:" + response['MessageId'])

def pp_json(json_thing, sort=True, indents=4):
if type(json_thing) is str:
print("json is a str")
return (json.dumps(json.loads(json_thing), sort_keys=sort, indent=indents).replace(' ', '&nbsp;').replace('\n', '<br>'))
else:
return (json.dumps(json_thing, sort_keys=sort, indent=indents).replace(' ', '&nbsp;').replace('\n', '<br>'))

def lambda_handler(event, context):
print(event)
sendSESAlertEmail(event)

Step 4: Testing and Validation

Send test emails

Once configured, it's important to test the setup:

  • Send test emails that will trigger bounce or complaint notifications.
  • Verify that these notifications are received by SNS and correctly trigger the Lambda function.

Step 5: Monitoring and Adjustments

AWS CloudWatch

Regularly monitor the setup through AWS CloudWatch and adjust configurations as necessary to handle any new types of email issues or to refine the process.

Advanced Considerations

Consider exploring more advanced configurations such as:

  • Setting up dedicated Lambda functions for different types of notifications.
  • Using AWS KMS (Key Management Service) for encrypting the messages that flow between your services for added security.

Please refer our Newsletter where we provide solutions to creating customer marketing newsletter.

Conclusion

This setup not only ensures that your organization responds swiftly to critical email events but also helps in maintaining a healthy email environment conducive to effective communication. Automating the handling of email bounces and complaints with AWS SES, SNS, and Lambda represents a proactive approach to infrastructure management, crucial for businesses scaling their operations.

Desirable Techniques: Understanding Modern Messaging with ActiveMQ and ActiveMQ Artemis

· 5 min read
Cloud & AI Engineering
Arina Technologies
Cloud & AI Engineering

ActiveMQ vs Artemis

What is Apache ActiveMQ?

Apache ActiveMQ is one of the oldest and most trusted open-source message brokers. Written in Java, it supports multiple protocols and client APIs and offers message persistence, delivery guarantees, and advanced routing. It’s common in enterprise environments where robustness and scalability are critical.

Introduction to Artemis

ActiveMQ Artemis is the modern successor to “ActiveMQ Classic,” originating from the HornetQ codebase. It focuses on performance and scalability with simplified clustering, advanced replication, and a streamlined configuration model.

Key Features & Comparison

For consulting or automation help, read more about our services:
Read about Arina Consulting

Both ActiveMQ and Artemis are robust, but they diverge in design and capabilities:

  1. Performance & Storage:
    ActiveMQ uses KahaDB (journal + index). Artemis uses an append-only journal and no separate index, which improves performance.

  2. Protocol Support:
    ActiveMQ supports MQTT, STOMP, OpenWire, etc. Artemis broadens protocol coverage and simplifies configuration; WebSockets are supported out of the box.

  3. Clustering & HA:
    ActiveMQ provides basic clustering. Artemis offers easier setup, automatic failover, and live-backup modes for stronger HA.

  4. Management & Configuration:
    Artemis modernizes configuration (e.g., broker.xml) and ships with better defaults and management ergonomics.

CriteriaActiveMQ ClassicArtemis
IO connectivity layerTCP (sync) and NIO (non-blocking)Netty-based NIO; one acceptor can serve multiple protocols; WebSockets out of the box
Message storeKahaDB (journal + index)Append-only journal (no index)
Paging under memory pressureCursors cache messages; falls back to store; requires journal indexJournal resides in memory; producer-side paging to sequential files; no index needed
Message addressing & routingNon-OpenWire protocols translated internally to OpenWireAnycast for point-to-point across protocols
Broker instance modelOptional separation of install/configExplicit broker instance creation
Main config filesconf/activemq.xml, JAAS in pluginsetc/broker.xml, etc/artemis.profile
Loggingetc/logging.propertiesetc/logging.properties
Foreground startbin/activemq consolebin/artemis run
Service startbin/activemq startbin/artemis-service start
JMS supportJMS 1.1JMS 2.0
Durable subscribersPer-destination durable subs may duplicate across nodesModeled as queues—avoids duplication
AuthenticationGroups via JAAS (plugins in conf/activemq.xml)Roles
Authorizationconf/activemq.xmletc/broker.xml
PoliciesDestination policies (e.g., write)Fine-grained queue policies (e.g., send)
Project statusMature, widely adoptedActive, successor to Classic
PerformanceGood, with some limitsHigh performance
PersistenceKahaDB / JDBCFast journal
ArchitectureTraditional broker; can bottleneck under very high throughputAsynchronous design aimed at high throughput
High availabilityMaster–slaveLive–backup, shared-nothing failover
ClusteringNetwork of brokersAdvanced clustering with automatic client failover
ManagementJMX; more manualImproved JMX, web console, protocol-level management
FilteringBasic selectorsAdvanced filtering; plugin support
SecurityAuthN / AuthZ supportedEnhanced features incl. SSL/TLS, JAAS
FederationCustom configNative support for geo-distributed clusters

Practical Applications

  • Choose ActiveMQ Classic if you need a proven, conservative broker compatible with legacy systems.
  • Choose Artemis for modern workloads needing higher throughput, simpler HA, cleaner config, and broader protocol handling.

Ready to take your architecture to the next level?
Contact us

Conclusion

Both brokers deliver reliable messaging. Your decision should align with current requirements and future scale. If you’re starting fresh or planning to scale aggressively, Artemis is usually the better bet.


🔚 Call to Action

Choosing the right platform depends on your organization’s needs.
Subscribe to our newsletter for cloud tips and trends, or follow our video series on cloud comparisons.
Interested in a guided setup? Contact us—we’re happy to help.

A Detailed Overview Of AWS SES and Monitoring

· 3 min read

Introduction

Welcome to our deep dive into Amazon Web Services (AWS) Simple Email Service (SES), a robust platform for handling large-scale email communications. Whether for marketing, notifications, or transactional emails, understanding how to monitor and optimize your SES setup is crucial. This post will guide you through the essentials of SES, including setup, monitoring practices, and the use of configuration sets versus identities.


Understanding AWS SES

AWS SES is an email-sending service that allows developers and businesses to send email from within their applications. It is known for its high deliverability, scalability, and cost-effectiveness. SES eliminates the operational burden of running an email server, providing a flexible and reliable way to manage email communications.


Key Features of AWS SES

High Deliverability: SES includes features that help improve the delivery rates of your emails, ensuring they reach your recipients' inboxes rather than spam folders.
Scalability: Whether sending a few emails a day or millions, SES can scale with your needs.
Cost-Effectiveness: With no upfront fees or long-term contracts, you pay only for what you use.


Monitoring Email with AWS SES

Monitoring is a critical aspect of managing SES effectively. It helps you track deliverability metrics such as bounce rates and complaint rates, which are vital for maintaining a good sender reputation.


Two Main Ways to Monitor

Identities

This method is suitable for basic needs and smaller volume senders. It involves monitoring individual email addresses or domains.


Configuration Sets

More advanced than identities, configuration sets allow for detailed tracking and are ideal for applications needing robust monitoring.


Step-by-Step Guide to Monitoring with Configuration Sets

1. Create a Configuration Set


Configuration Set


Start by naming your configuration set in the AWS console.

2. Set Event Destinations


Destinations

types of events


Choose the types of events you want to track, such as bounces, complaints, and deliveries.

3. Integration with AWS Services


Services


You can integrate your configuration sets with services like Amazon CloudWatch, Amazon Kinesis, and AWS Lambda for deeper data analysis and real-time alerts.


Practical Use Cases

Marketing Campaigns: Track open and click rates to gauge the effectiveness of your email campaigns.
Transactional Emails: Monitor delivery rates for critical transactional communications, like purchase confirmations.

Best Practices for Email Monitoring

Regular Reviews: Regularly check your metrics and adjust strategies as needed to improve email engagement.
Responsive Actions: Set up automatic responses or alerts for certain triggers, such as high bounce rates, to immediately address issues. Ready to take your cloud infrastructure to the next level? Please reach out to us Contact Us


Conclusion

AWS SES is a powerful tool for managing email communications, offering scalability, cost-efficiency, and robust monitoring capabilities. By understanding and implementing SES's features and best practices, businesses can enhance their communication strategies and maintain excellent relationships with their customers.