43 posts tagged with "AWS"

View All Tags

Azure vs AWS vs Oracle Cloud Infrastructure (OCI): Service Mapping - Part 2

· 9 min read
Cloud & AI Engineering
Arina Technologies
Cloud & AI Engineering

In today's cloud-dominated landscape, understanding how leading providers like Azure, AWS, and OCI handle various services is essential. This blog provides service comparison, highlighting key similarities and differences across these platforms. Whether you are selecting a cloud platform or optimizing your current infrastructure, this guide will help clarify how each provider operates.


Refer Azure vs AWS vs Oracle Cloud Infrastructure (OCI): Accounts, Tagging and Organization Part 1


Introduction to Service Mapping


Cloud service mapping involves understanding how providers offer comparable services under different names, features, and configurations. Here, we compare virtual machines (VMs), Kubernetes, bare-metal hosting, and serverless functions, offering a detailed breakdown of how they function in Azure, AWS, and OCI.


ServicesAmazon Web ServicesAzureOracle Cloud InfrastructureComments
Object StorageAmazon Simple Storage Service (S3)Blob StorageObject StorageObject storage manages data as discrete units (objects) with associated metadata and unique identifiers, offering scalable and durable storage for unstructured data like documents, images, and backups.
Archival StorageAmazon S3 GlacierBlob Storage (archive access tier)Archive StorageArchival storage is a cost-effective solution for storing infrequently accessed or long-term data, optimized for durability and retrieval over extended periods.
Block StorageAmazon Elastic Block Store (EBS)Managed disksBlock VolumesBlock storage provides raw storage volumes that are divided into fixed-size blocks, allowing for high-performance and flexible storage solutions, typically used for databases and virtual machines.
Shared File SystemAmazon Elastic File SystemAzure FilesFile StorageA shared file system allows multiple users or systems to access and manage the same file storage simultaneously, enabling collaborative work and data consistency across different environments.
Bulk Data TransferAWS SnowballImport/Export Azure Data BoxData Transfer ApplianceBulk data transfer refers to the process of moving large volumes of data between storage systems or locations in a single operation, often using specialized tools or services to ensure efficiency and reliability.
Hybrid Data MigrationAWS Storage GatewayStorSimpleOCIFS (Linux)Hybrid data migration involves transferring data between on-premises systems and cloud environments, leveraging both local and cloud-based resources to ensure a seamless, integrated data transition.

Virtual Machine (VM) Setup


Multi-Tenant VMs


Multi-tenant VMs allow multiple users to share physical hardware while maintaining logical isolation.


  1. AWS: EC2 instances offer scalable VMs with diverse configurations for various workloads.
  2. Azure: Virtual Machines integrate seamlessly with Azure services, offering customizable setups.
  3. OCI: Virtual Machine instances provide cost-effective compute with flexible configurations.

Steps to Create Multi-Tenant VMs:


  1. AWS: Use the EC2 dashboard, select an AMI, configure instance size, and set up networking and security groups.
  2. Azure: Go to "Create a VM," define configurations like image type, disk size, and networking.
  3. OCI: Navigate to "Compute," select a compartment, choose a shape (VM size), and configure VCN (Virtual Cloud Network).

Single-Tenant VMs


Single-tenant VMs provide dedicated physical servers, ensuring better isolation and performance.


  1. AWS: Offers Dedicated Instances for specific accounts.
  2. Azure: Provides Dedicated Hosts for isolated workloads.
  3. OCI: Dedicated VM Hosts enable running workloads on dedicated hardware.

Steps to Create Single-Tenant VMs:


  1. AWS: Select "Dedicated Instances" during the EC2 instance setup.
  2. Azure: Search for "Dedicated Hosts," specify configurations, and assign the required VMs.
  3. OCI: Create a "Dedicated Host" and configure it similarly to a regular VM.

Bare-Metal Hosting


Bare-metal instances offer direct access to physical servers, ideal for high-performance computing or specialized workloads.


  1. AWS: EC2 Bare-Metal Instances provide complete hardware control.
  2. Azure: Bare-Metal Infrastructure supports large-scale workloads like SAP HANA.
  3. OCI: Bare-Metal Instances eliminate virtualization overhead.

Setup Process:


  1. AWS: Select bare-metal instance families during EC2 setup.
  2. Azure: Request support for bare-metal instances, configure disks, and set up networking.
  3. OCI: Choose "Bare-Metal" under shapes when creating an instance.

Kubernetes Service


Kubernetes simplifies the deployment and management of containerized applications.


  1. AWS: EKS (Elastic Kubernetes Service) integrates with ECR (Elastic Container Registry) for container orchestration.
  2. Azure: AKS (Azure Kubernetes Service) pairs with Azure Container Registry for seamless deployment.
  3. OCI: Container Engine for Kubernetes and OCI Registry enable Kubernetes management and container storage.

Setting Up Kubernetes Clusters:


  1. AWS: Use the EKS dashboard, configure clusters, and integrate with IAM roles and VPCs.
  2. Azure: Navigate to AKS, create clusters, and configure networking and policies.
  3. OCI: Go to "Kubernetes Engine," select "Quick Create" or "Custom Create," and configure resources.

Serverless Functions


Serverless computing allows event-driven architecture without the need for provisioning or managing servers.


  1. AWS: AWS Lambda executes code in response to events with no infrastructure management.
  2. Azure: Azure Functions provide scalable serverless compute with integration options like private endpoints.
  3. OCI: Functions support serverless deployments with pre-configured blueprints.

Steps to Create Functions:


  1. AWS: Use the Lambda console, select "Create Function," and choose a runtime like Python 3.13.
  2. Azure: Create a Function App, select a tier, and configure networking.
  3. OCI: Navigate to "Functions," define the application, and deploy using pre-built templates.

Key Differences and Use Cases


FeatureAWSAzureOCI
VMsEC2 with flexible instance typesHighly integrated with Azure servicesCost-effective with logical compartments
Dedicated HostingDedicated Instances/Hosts for isolationDedicated Hosts for specific workloadsDedicated VM Hosts with flexibility
Bare-MetalFull hardware control for HPC workloadsIdeal for SAP HANA and similar workloadsPowerful compute with no virtualization
KubernetesEKS + ECRAKS + Azure Container RegistryContainer Engine + OCI Registry
ServerlessLambda for event-driven architectureAzure Functions with tiered pricingFunctions with blueprint integration

Conclusion


AWS, Azure, and OCI share similar service offerings but cater to different audiences and use cases:


  1. AWS is a go-to for scalability and cutting-edge updates.
  2. Azure offers tight integration with its ecosystem, ideal for enterprises using Microsoft products.
  3. OCI provides robust solutions for Oracle-heavy environments.

Understanding these nuances will help you make informed decisions for your cloud strategy. Subscribe to our blog or newsletter for more insights and updates on cloud technology.


Call to Action Choosing the right platform depends on your organizations needs. For more insights, subscribe to our newsletter for insights on cloud computing, tips, and the latest trends in technology. or follow our video series on cloud comparisons.


Interested in having your organization setup on cloud? If yes, please contact us and we'll be more than glad to help you embark on cloud journey.

Azure vs AWS vs Oracle Cloud Infrastructure (OCI): Accounts, Tagging and Organization - Part 1

· 7 min read
Cloud & AI Engineering
Arina Technologies
Cloud & AI Engineering

As businesses increasingly rely on cloud platforms, understanding how to manage accounts, tags, and resources efficiently is critical for operational success. This blog explores how three major cloud providers— Azure, AWS, and OCI — handle account management, tagging, and resource organization.


Introduction

Choosing a cloud platform often requires a detailed understanding of its account structure, tagging capabilities, and resource organization. This guide will:


  1. Compare account management across platforms.
  2. Dive into resource grouping and tagging.
  3. Highlight key differences and use cases.

ServicesAmazon Web ServicesAzureOracle Cloud InfrastructureComments
Object StorageAmazon Simple Storage Service (S3)Blob StorageObject StorageObject storage manages data as discrete units (objects) with associated metadata and unique identifiers, offering scalable and durable storage for unstructured data like documents, images, and backups.
Archival StorageAmazon S3 GlacierBlob Storage (archive access tier)Archive StorageArchival storage is a cost-effective solution for storing infrequently accessed or long-term data, optimized for durability and retrieval over extended periods.
Block StorageAmazon Elastic Block Store (EBS)Managed disksBlock VolumesBlock storage provides raw storage volumes that are divided into fixed-size blocks, allowing for high-performance and flexible storage solutions, typically used for databases and virtual machines.
Shared File SystemAmazon Elastic File SystemAzure FilesFile StorageA shared file system allows multiple users or systems to access and manage the same file storage simultaneously, enabling collaborative work and data consistency across different environments.
Bulk Data TransferAWS SnowballImport/Export Azure Data BoxData Transfer ApplianceBulk data transfer refers to the process of moving large volumes of data between storage systems or locations in a single operation, often using specialized tools or services to ensure efficiency and reliability.
Hybrid Data MigrationAWS Storage GatewayStorSimpleOCIFS (Linux)Hybrid data migration involves transferring data between on-premises systems and cloud environments, leveraging both local and cloud-based resources to ensure a seamless, integrated data transition.

Account Management

Cloud platforms organize user access and control through accounts or subscriptions. Here's how the concept varies across the three providers:


AWS:
  1. Accounts serve as isolated environments that provide credentials and settings.
  2. Managed through AWS Organizations, allowing centralized billing and policy control.

Azure:
  1. Uses Subscriptions for resource management, analogous to AWS accounts.
  2. Supports Management Groups for hierarchical organization, enabling policy application at both parent and child levels.

OCI:
  1. Employs Tenancies, acting as the root container for resources.
  2. Supports Compartments, offering logical grouping of resources within a tenancy.

Resource Organization

Efficient resource organization ensures streamlined operations and better control over costs and security.


AWS:
  1. Resources are grouped into Resource Groups.
  2. Tags can be applied to EC2 instances, RDS databases, and more, allowing logical groupings based on attributes like environment or application type.

Azure:
  1. Resource Groups organize assets by project or application.
  2. Tags provide additional metadata for billing and tracking.

OCI:
  1. Introduced the Compartment concept, similar to resource groups in AWS/Azure.
  2. Compartments are logical containers that allow tagging for organization and access control.

Tagging Resources

Tags enable adding metadata to cloud resources for better tracking and reporting.


AWS:
  1. Tags are applied directly to resources like VMs, databases, and S3 buckets.
  2. Example: Grouping EC2 instances by environment using tags such as "Environment: Production."

Azure:
  1. Tags can be added during or after resource creation.
  2. Commonly used for cost management and reporting, e.g., tagging VMs with "Department: Finance."

OCI
  1. Tags are part of resource creation in compartments.
  2. Include attributes like region, security, and virtual private cloud (VPC) settings.

Multi-Account/Subscription Management

Handling multiple accounts is a challenge for large organizations.


AWS
  1. AWS Organizations allow managing multiple accounts under a single parent account.
  2. Supports policy application through Service Control Policies (SCPs).

Azure
  1. Management Groups facilitate organizing multiple subscriptions.
  2. Policies can be applied at root or group levels.

OCI
  1. Offers central management of tenancies and compartments.
  2. Policies and billing can be aligned across multiple subscriptions.

Best Practices

  1. Use Tags Effectively:
    1. Tags are essential for billing and operational tracking.
    2. Create a consistent tagging policy (e.g., Environment: Dev/Prod).

  1. Centralized Account Management:
    1. Use AWS Organizations, Azure Management Groups, or OCI compartments for streamlined oversight.

  1. Leverage Resource Groups:
    1. Group related resources to simplify access control and cost tracking.

  1. Apply Security Best Practices:
    1. Regularly review IAM permissions and service control policies.

Conclusion

While AWS, Azure, and OCI share similar foundational concepts for account management, resource grouping, and tagging, each platform offers unique features tailored to specific use cases.


  1. AWS is ideal for scalability and detailed control.
  2. Azure simplifies management with unified billing and hierarchical structures.
  3. OCI, with its focus on Oracle database integration, suits enterprise-grade organizations.

Call to Action Choosing the right platform depends on your organizations needs. For more insights, subscribe to our newsletter for insights on cloud computing, tips, and the latest trends in technology. or follow our video series on cloud comparisons.


Interested in having your organization setup on cloud? If yes, please contact us and we'll be more than glad to help you embark on cloud journey.

Automate Your OpenSearch/Elasticsearch Backups with S3 and Lambda: A Complete Guide

· 10 min read

In the world of data management and cloud computing, ensuring data security through regular backups is crucial. OpenSearch and Elasticsearch provide robust mechanisms to back up data using snapshots, offering several approaches to cater to different operational needs. This blog post will walk you through setting up and managing snapshots using AWS, with detailed steps for both beginners and advanced users.


Introduction to Snapshots in OpenSearch and Elasticsearch


Snapshots are point-in-time backups of your OpenSearch or Elasticsearch data. By taking snapshots at regular intervals, you can ensure your data is always backed up, which is especially important in production environments. Snapshots can be scheduled to run automatically, whether hourly, daily, or at another preferred frequency, making it easy to maintain a stable backup routine.


Setting Up an OpenSearch Cluster on AWS


Before diving into snapshot creation, its essential to set up an OpenSearch cluster. Here is how:

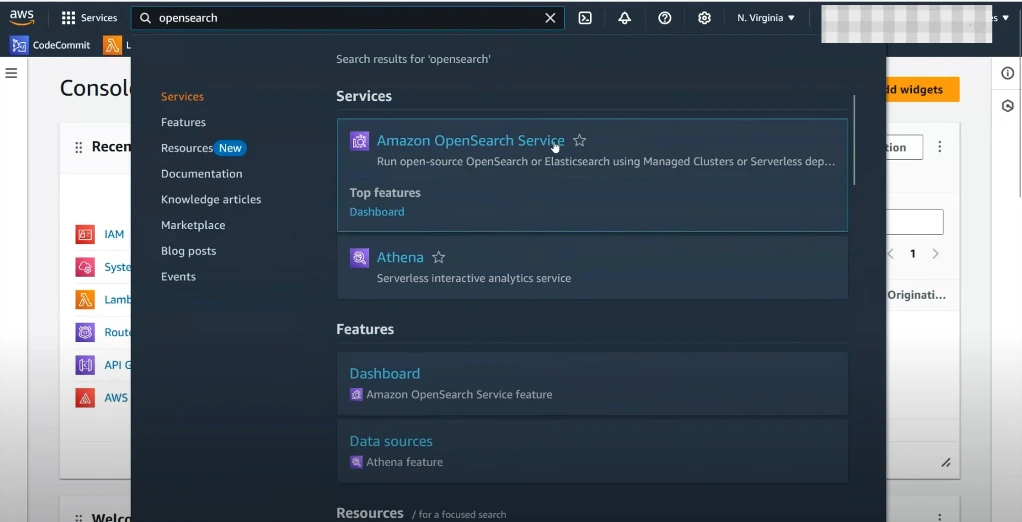
  1. AWS Console Access: Begin by logging into your AWS Console and navigating to OpenSearch.
  2. Cluster Creation: Create a new OpenSearch domain (essentially your cluster) using the "Easy Create" option. This option simplifies the setup process, especially for demonstration or learning purposes.
  3. Instance Selection: For this setup, select a lower instance size if you are only exploring OpenSearch features and dont require high memory or compute power. For this demo, an m5.large instance with minimal nodes is sufficient.

Configuring the Cluster


When configuring the cluster, adjust the settings according to your requirements:


Memory and Storage


  1. Memory and Storage: Set minimal storage (e.g., 10 GB) to avoid unnecessary costs.
  2. Node Count: Choose a single-node setup if you are only testing the system.
  3. Access Control: For simplicity, keep public access open, though in production, you should configure a VPC and control access strictly.

Snapshot Architecture: AWS Lambda and S3 Buckets


 Snapshot Architecture


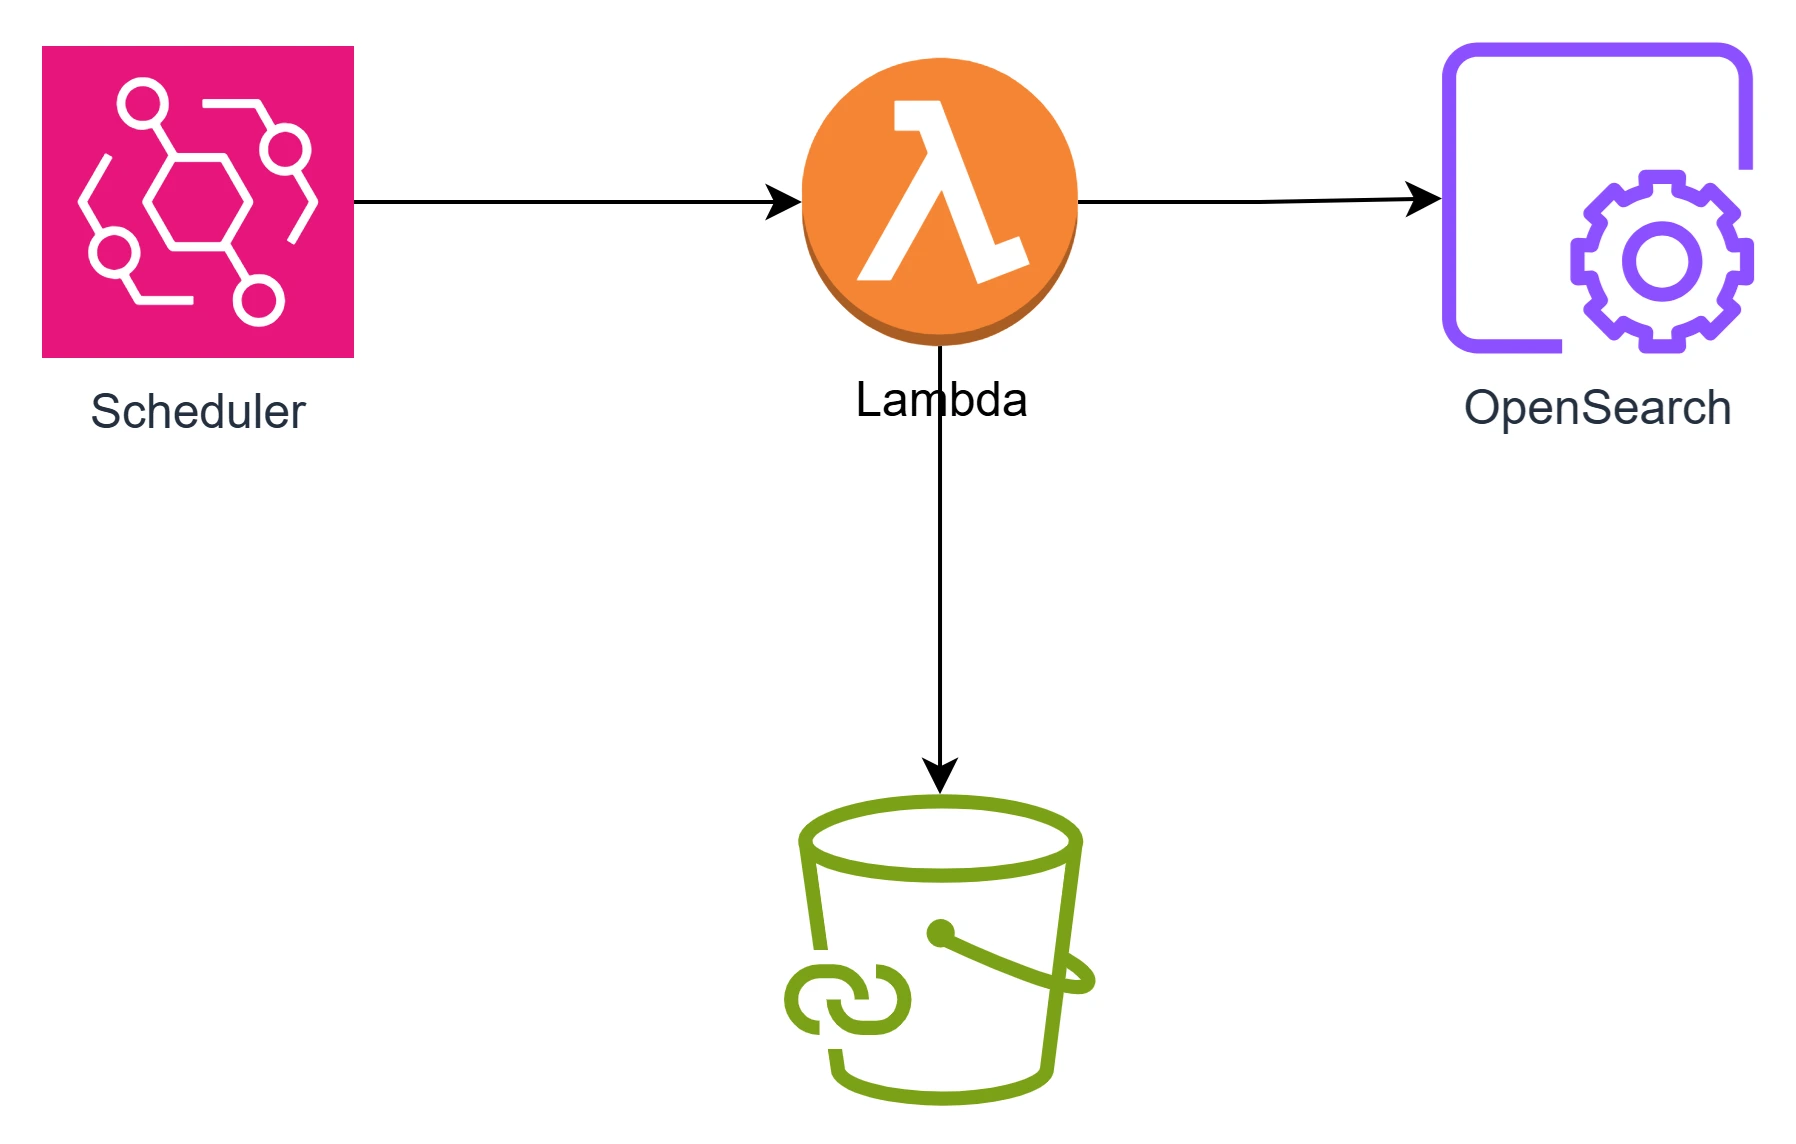
AWS provides a serverless approach to managing snapshots via Lambda and S3 buckets. Here is the basic setup:

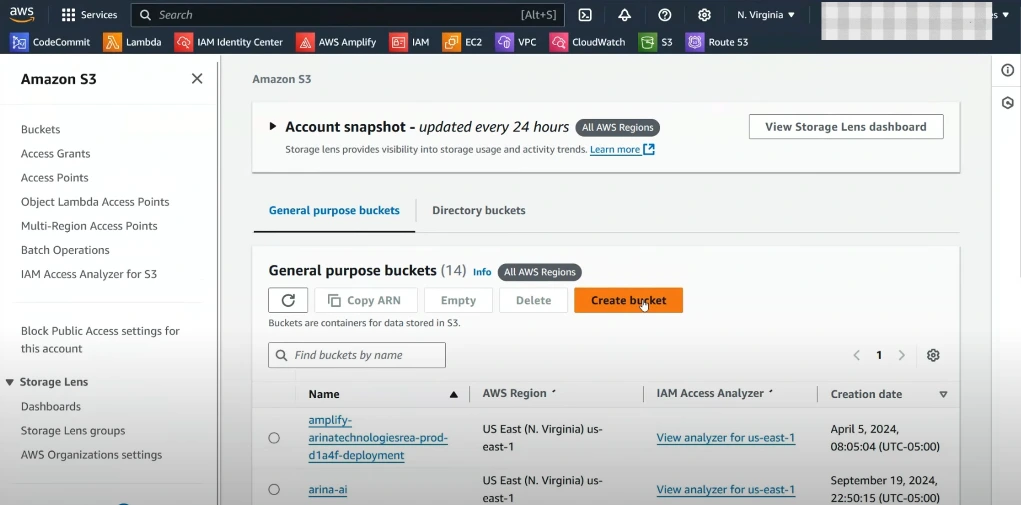
  1. Create an S3 Bucket: This bucket will store your OpenSearch snapshots.

S3 Bucket


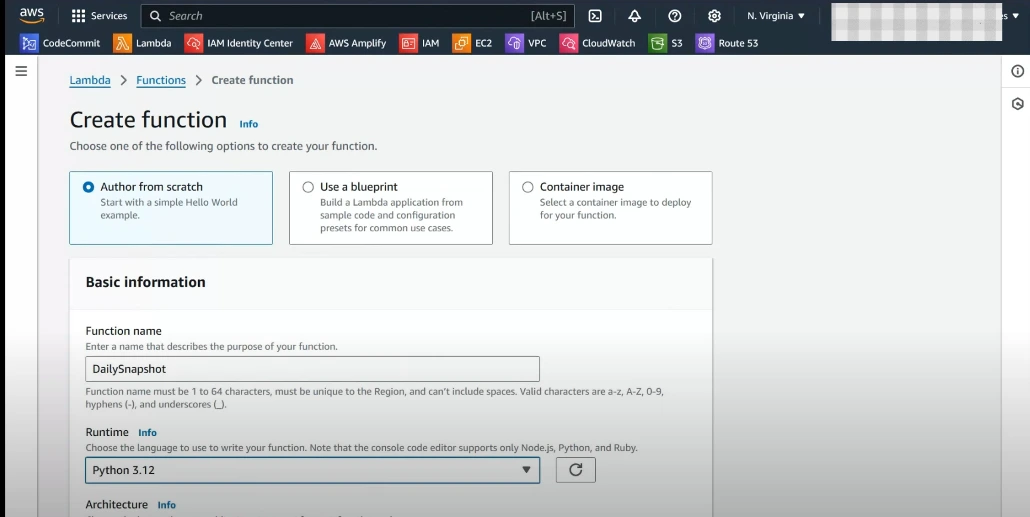
  1. Lambda Function for Snapshot Automation: Use AWS Lambda to automate the snapshot process. Configure the Lambda function to run daily or at a frequency of your choice, ensuring backups are consistent and reliable.

Lambda Function


Writing the Lambda Code


For the Lambda function, Python is a convenient choice, but you can choose other languages as well. The Lambda function will connect to OpenSearch, initiate a snapshot, and store it in the S3 bucket. Here is a simple breakdown of the code structure:

import boto3, os, time
import requests
from requests_aws4auth import AWS4Auth
from datetime import datetime
import logging

from requests.adapters import HTTPAdapter, Retry

# Set the global variables
# include https:// and trailing /
host = str(os.getenv('host'))
region = str(os.getenv('region','eu'))
s3Bucket = str(os.getenv('s3Bucket'))
s3_base_path = str(os.getenv('s3_base_path','daily'))
s3RepoName = str(os.getenv('s3RepoName'))
roleArn = str(os.getenv('roleArn'))

service = 'es'
credentials = boto3.Session().get_credentials()
awsauth = AWS4Auth(credentials.access_key, credentials.secret_key, region, service, session_token=credentials.token)

s3 = boto3.client('s3')

def lambda_handler(event, context):
datestamp = datetime.now().strftime('%Y-%m-%dt%H:%M:%S')

# Register repository
# the Elasticsearch API endpoint

path = '_snapshot/'+s3RepoName
url = host + path

snapshotName = 'snapshot-'+datestamp

# Setting for us-east-1. Comment below if another region
payload = {
"type": "s3",
"settings": {
"bucket": s3Bucket,
"base_path": s3_base_path,
"endpoint": "s3.amazonaws.com",
"role_arn": roleArn
}
}

headers = {"Content-Type": "application/json"}

r = requests.put(url, auth=awsauth, json=payload, headers=headers)

print(r.status_code)
print(r.text)

# Take snapshot - Even though this looks similar to above, but this code is required to take snapshot.
# Snapshot to take with datestamp concatanetated - this creates separate snapshots
path = '_snapshot/'+s3RepoName+'/'+snapshotName

url = host + path

string = snapshotName
bucket_name = s3Bucket


s3 = boto3.resource("s3")
s3.Bucket(bucket_name).put_object(Key=s3_path, Body=string)
print(f"Created {s3_path}")
### Text File copying ends here

while True:
response = requests.put(url, auth=awsauth)
status_code = response.status_code
print("status_code == "+str(status_code))
if status_code >= 500:
# Hope it won't 500 a little later
print("5xx thrown. Sleeping for 200 seconds.. zzzz...")
time.sleep(200)
else:
print(f"Snapshot {snapshotName} successfully taken")
break

print(r.text)
  1. Snapshot API Call: The code uses the OpenSearch API to trigger snapshot creation. You can customize the frequency to take snapshots.
  2. Error Handling: In scenarios where snapshots take long, retries and error handling are implemented in to manage API call failures.
  3. Permissions Setup: Grant your Lambda function the necessary permissions to access OpenSearch and the S3 bucket. This includes setting up roles and policies in AWS Identity and Access Management (IAM).
  4. Invocation Permissions: Lambda function will need to have role that allows access to OpenSearch domain. The role should allow Lambda to upload snapshots to s3 bucket:

{
"Effect": "Allow",
"Action": [
"s3:PutObject"
],
"Resource": [
"arn:aws:s3:::<BUCKET-NAME>/*"
]
}

Creating an AWS Lambda Layer for the Requests Library

To create a custom AWS Lambda layer specifically for the requests library, follow these steps. This guide will help you set up the requests package as a Lambda layer so it can be reused across multiple Lambda functions.

Follow these steps to create a custom AWS Lambda layer that includes the requests library.


Step 1: Prepare the Requests Dependency


Since Lambda layers require dependencies to be packaged separately, we need to install the requests library in a specific structure.


Set Up a Local Directory

Create a folder structure for installing the dependency.


mkdir requests-layer
cd requests-layer
mkdir python

Install the Requests Library

Use pip to install requests into the python folder:


pip install requests -t python/

Verify Installation

Check that the python directory contains the installed requests package:


ls python

You should see a folder named requests, confirming that the package was installed successfully.


Step 2: Create a Zip Archive of the Layer

After installing the dependencies, zip the python directory:


zip -r requests-layer.zip python

This creates a requests-layer.zip file that you will upload as a Lambda layer.


Step 3: Upload the Layer to AWS Lambda


  1. Open the AWS Lambda Console
  2. Go to the AWS Lambda Console.
  3. Create a New Layer

 New Layer


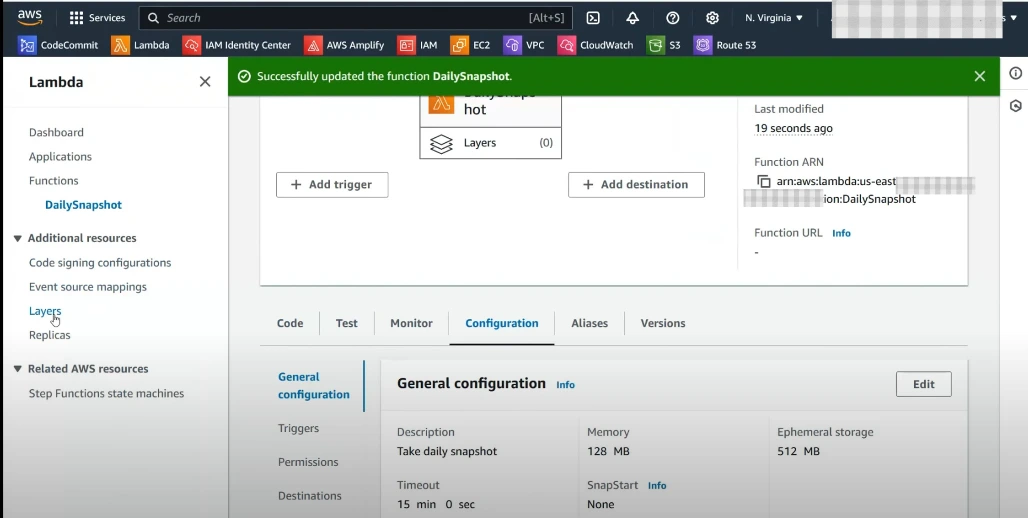
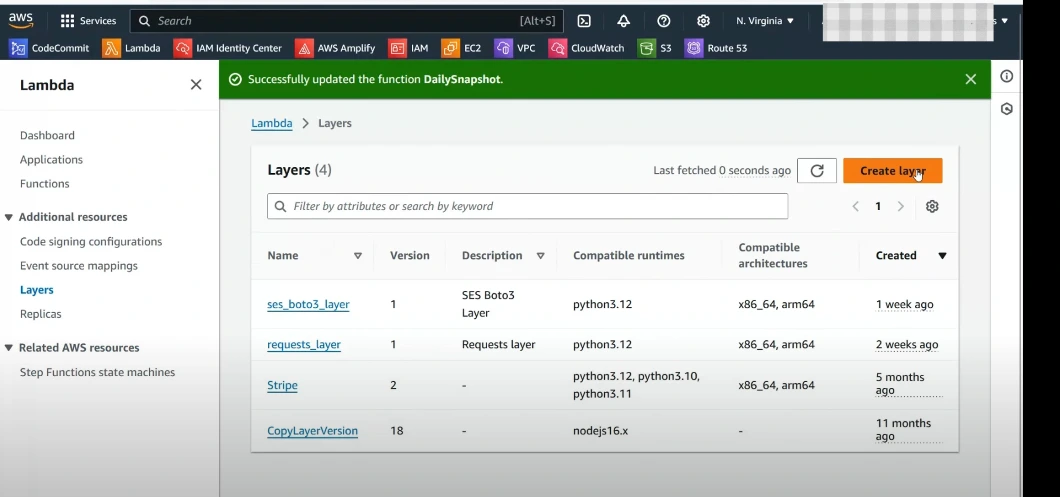
  1. Select Layers from the left-hand navigation.

layer


  1. Click Create layer.
  2. Configure the Layer
  3. Name: Provide a name like requests-layer.
  4. Description: Optionally, describe the purpose of the layer.
  5. Upload the .zip file: Choose the requests-layer.zip file you created.
  6. Compatible runtimes: Choose the runtime(s) that match your Lambda function, such as Python 3.8, Python 3.9, or Python 3.10. 11.Create the Layer
  7. Click Create to upload the layer.

Step 4: Add the Layer to Your Lambda Function


1.Open Your Lambda Function 2.In the Lambda Console, open the Lambda function where you want to use requests. 3.Add the Layer 4.In the Layers section, click Add a layer. 5.Select Custom layers and choose the requests-layer. 6.Select the specific version (if there are multiple versions). 7.Click Add.


OpenSearch Dashboard Configuration


 OpenSearch


The OpenSearch Dashboard (formerly Kibana) is your go-to for managing and monitoring OpenSearch. Here is how to set up your snapshot role in the dashboard:


  1. Access the Dashboard: Navigate to the OpenSearch Dashboard using the provided domain link.
  2. Role Setup: Go to the security settings and create a new role for managing snapshots. Grant this role permissions to access the necessary indices and S3 bucket. Following is the role that needs to be created:
Trust Policy:
{
"Version": "2012-10-17",
"Statement": [
{
"Effect": "Allow",
"Principal": {
"Service": [
"opensearch.amazonaws.com",
"es.amazonaws.com"
]
},
"Action": "sts:AssumeRole"
}
]
}

Role Policy:
{
"Version": "2012-10-17",
"Statement": [
{
"Effect": "Allow",
"Action": "s3:ListBucket",
"Resource": [
"arn:aws:s3:::BUCKET-NAME"
]
},
{
"Effect": "Allow",
"Action": [
"s3:*Object"
],
"Resource": [
"arn:aws:s3:::BUCKET-NAME/*"
]
},
{
"Sid": "ESaccess",
"Effect": "Allow",
"Action": [
"es:*"
],
"Resource": [
"arn:aws:es:eu-west-2:<ACCOUNT-NUMBER>:domain/*"
]
}
]
}

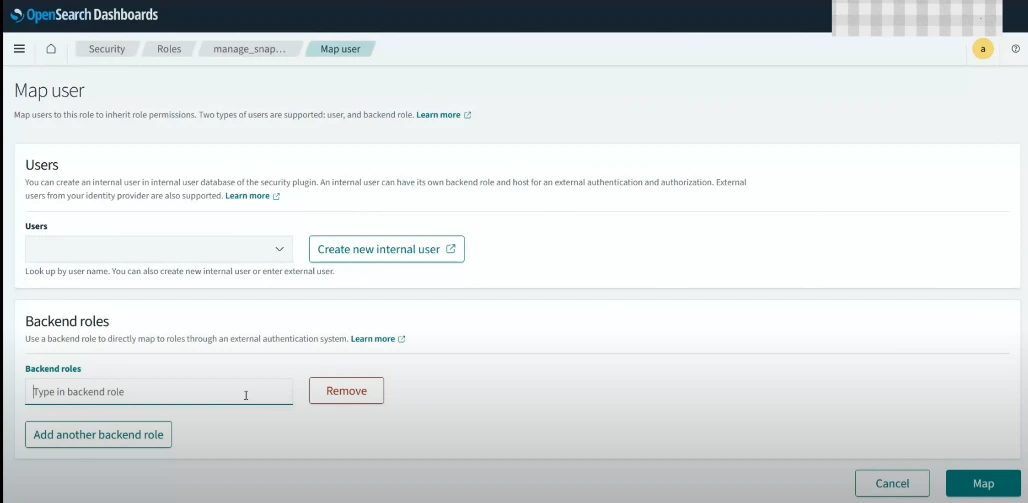
  1. Mapping the Role: Map the new role to your Lambda functions IAM role to ensure seamless access.

 Mapping the Role


Setting Up Snapshot Policies in the Dashboard


The OpenSearch Dashboard allows you to create policies for managing snapshots, making it easy to define backup schedules and retention periods. Here is how:


  1. Policy Configuration: Define your backup frequency (daily, weekly, etc.) and the retention period for each snapshot.
  2. Retention Period: Set the maximum number of snapshots to keep, ensuring that old snapshots are automatically deleted to save space.

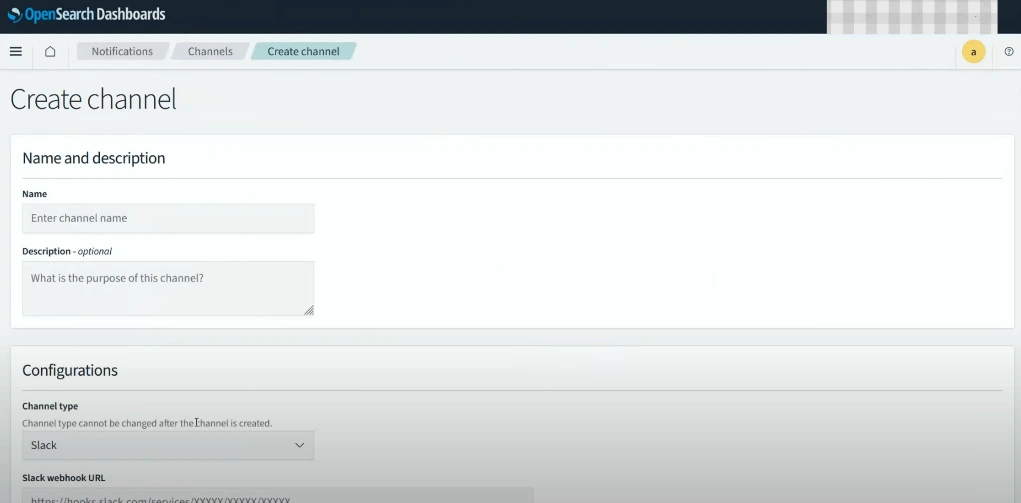
Channel


  1. Notification Channel: You can set up notifications (e.g., via Amazon SNS) to alert you if a snapshot operation fails.

Testing and Troubleshooting Your Snapshot Setup


Once your setup is complete, it is time to test it:

  1. Run a Test Snapshot: Trigger your Lambda function manually and check your S3 bucket for the snapshot data.
  2. Verify Permissions: If you encounter errors, check your IAM roles and permissions. Snapshot failures often occur due to insufficient permissions, so make sure both the OpenSearch and S3 roles are configured correctly.
  3. Monitor Logs: Use CloudWatch logs to review the execution of your Lambda function, which will help in troubleshooting any issues that arise.

Disaster Recovery and Restoring Snapshots


In the unfortunate event of data loss or a disaster, restoring your data from snapshots is straightforward. Here is a simple guide:

  1. New Cluster Setup: If your original cluster is lost, create a new OpenSearch domain.
  2. Restore Snapshot: Use the OpenSearch API to restore the snapshot from your S3 bucket.
  3. Cluster Health Check: Once restored, check the health of your cluster and validate that your data is fully recovered.

Conclusion


Using AWS Lambda and S3 for snapshot management in OpenSearch provides a scalable and cost-effective solution for data backup and recovery. By setting up automated snapshots, you can ensure that your data is consistently backed up without manual intervention. With the additional security and monitoring tools provided by AWS, maintaining the integrity and availability of your OpenSearch data becomes a manageable task.


Explore the various options within AWS and OpenSearch to find the configuration that best fits your environment. And as always, remember to test your setup thoroughly to prevent unexpected issues down the line.


For more tips on OpenSearch, AWS, and other cloud solutions, subscribe to our newsletter and stay up-to-date with the latest in cloud technology! Ready to take your cloud infrastructure to the next level? Please reach out to us

Cloud Center of Excellence: Best Practices for AWS, Azure, GCP, and Oracle Cloud

· 18 min read

In the digital age, a Center of Excellence (CoE) plays a pivotal role in guiding organizations through complex technology transformations, ensuring that they remain competitive and agile. With the expertise to foster collaboration, streamline processes, and deliver sustainable outcomes, a CoE brings together people, processes, and best practices to help businesses meet their strategic goals.


In this blog, we will explore the essentials of establishing a CoE, including definitions, focus areas, models, and practical strategies to maximize return on investment (ROI).


What is a Center of Excellence?


A Center of Excellence (CoE) is a dedicated team within an organization that promotes best practices, innovation, and knowledge-sharing around a specific area, such as cloud, enterprise architecture, or microservices. By centralizing expertise and resources, a CoE enhances efficiency, consistency, and quality across the organization, addressing challenges and promoting cross-functional collaboration.


According to Jon Strickler from Agile Elements, a CoE is "a team of people that promotes collaboration and uses best practices around a specific focus area to drive business results." This guiding principle is echoed by Mark O. George in his book The Lean Six Sigma Guide to Doing More with Less, which defines a CoE as a "team that provides leadership, evangelization, best practices, research, support, and/or training."


Why Establish a CoE?


Organizations invest in CoEs to improve efficiency, foster collaboration, and ensure that projects align with corporate strategies. By establishing a CoE, businesses can:


  1. Streamline Processes: CoEs develop standards, methodologies, and tools that reduce inefficiencies, enhancing the delivery speed and quality of technology initiatives.
  2. Enhance Learning: Through shared learning resources, training, and certifications, CoEs help team members stay current with best practices and evolving technology.
  3. Increase ROI: CoEs facilitate better resource allocation and help companies achieve economies of scale, thereby maximizing ROI.
  4. Provide Governance and Support: As an approval authority, a CoE maintains quality and compliance, ensuring that projects align with organizational values and goals.

Core Focus Areas of a CoE


CoEs can cover a variety of functions, depending on organizational needs. Typical focus areas include:


  1. Planning and Leadership: Defining the vision, strategy, and roadmap to align technology initiatives with business objectives.
  2. Guidance and Support: Creating standards, tools, and knowledge repositories to support teams throughout the project lifecycle.
  3. Learning and Development: Offering training, certifications, and mentoring to ensure continuous skill enhancement.
  4. Asset Management: Managing resources, portfolios, and service lifecycles to prevent redundancy and optimize resource utilization.
  5. Governance: Acting as the approval body for initiatives, maintaining alignment with business priorities, and coordinating across business units.

Steps to Implement a CoE


Define Clear Objectives and Roles Start by setting a clear mission and objectives that align with the organizations strategic goals. Design roles for core team members, including:


  1. Technology Governance Lead: Ensures that technology aligns with organizational goals.
  2. Architectural Standards Team: Develops and enforces standards and methodologies.
  3. Technology Champions: Subject-matter experts who provide mentorship and support.

2. Identify Success Metrics Metrics are essential for measuring a CoEs impact. Examples include:

  1. Service Metrics: Cost efficiency, development time, and defect rates.
  2. Operations Metrics: Incident response time and resolution rates.
  3. Management Metrics: Project success rates, certification levels, and adherence to standards.

3. Develop Standards and Best Practices Establish standards as a foundation for quality and efficiency. Document best practices and create reusable frameworks to ensure consistency across departments.


4. Create a Knowledge Repository A centralized knowledge hub allows easy access to documentation, tools, and other resources, promoting continuous learning and collaboration across teams.


5. Focus on Training and Certification Keeping team members updated on current best practices is crucial. Regular training and certifications validate the skills required to execute projects effectively.


Maximizing ROI with a CoE
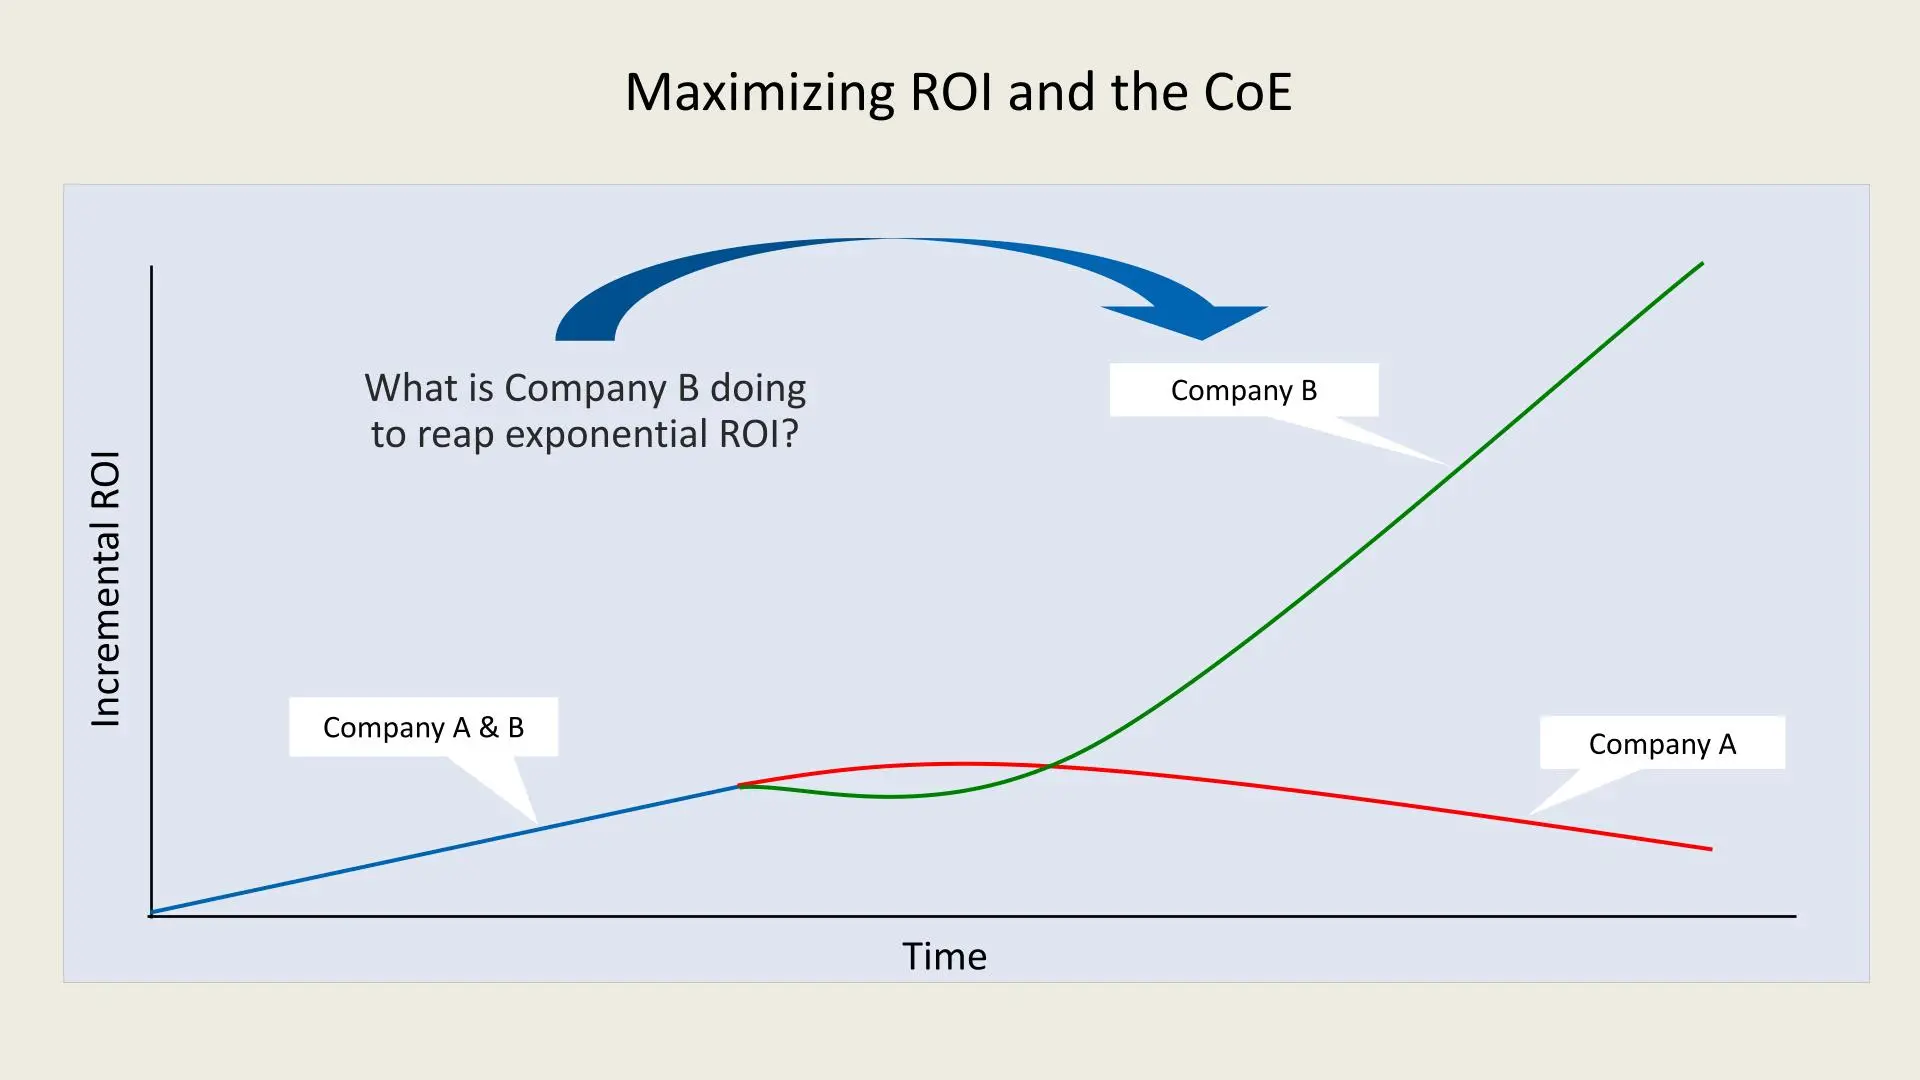

ROI with a CoE


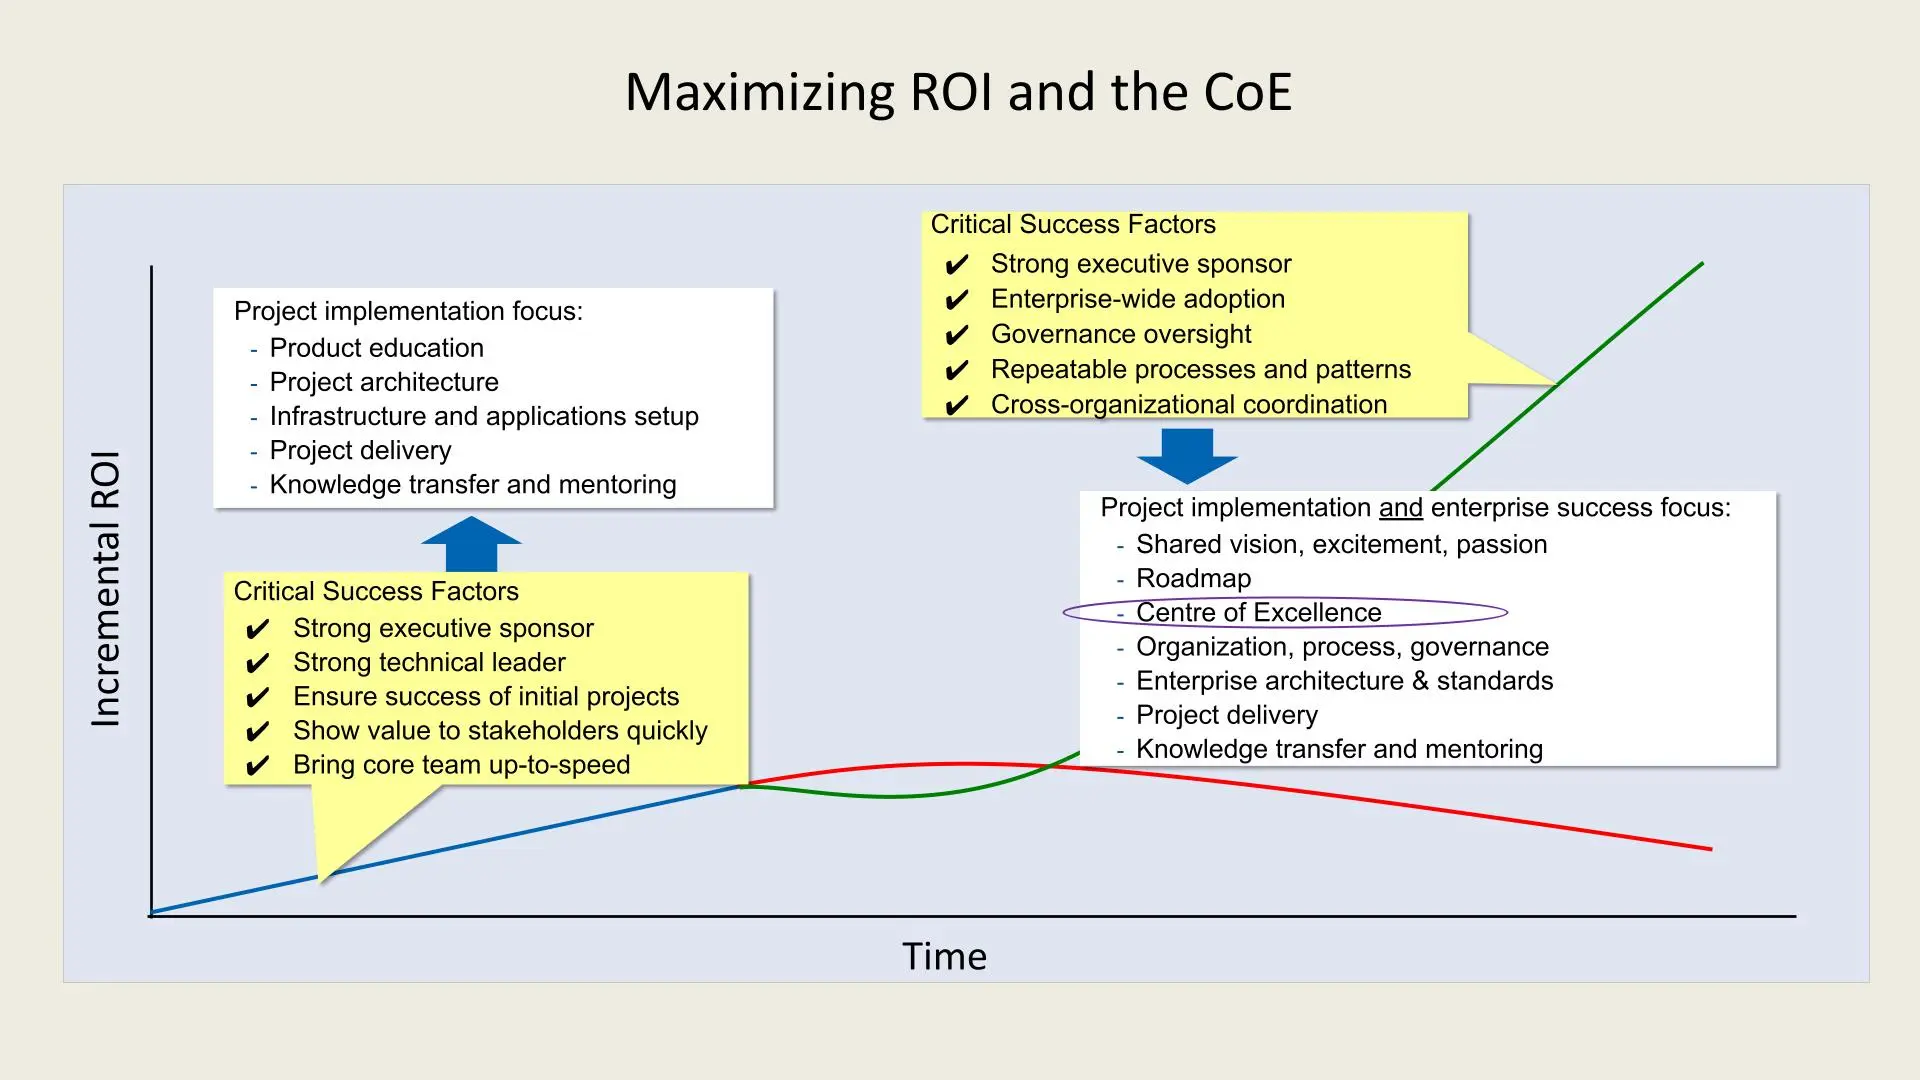
1. Project Implementation Focus:

  1. To establish a successful CoE, the initial focus must include:
  2. Product Education: Ensuring the team understands and is skilled in relevant technologies and methodologies.
  3. Project Architecture: Defining a robust architecture that can support scalability and future needs.
  4. Infrastructure and Applications Setup: Setting up reliable infrastructure and integrating applications to support organizational goals.
  5. Project Delivery: Ensuring projects are delivered on time and within budget.
  6. Knowledge Transfer and Mentoring: Facilitating the sharing of knowledge and skills across teams to build long-term capabilities.
ROI with a CoE


2. Critical Success Factors:

  1. Strong Executive Sponsor: Having a high-level executive who champions the CoE initiative is crucial for securing resources and alignment with organizational goals.
  2. Strong Technical Leader: A technically skilled leader is essential to drive the vision and make informed technical decisions.
  3. Initial Project Success: Early wins are essential to build confidence in the CoE framework and showcase its value.
  4. Value to Stakeholders: Demonstrating quick wins to stakeholders builds trust and secures continued support.
  5. Core Team Development: Bringing the core team up to speed ensures that they are equipped to handle responsibilities efficiently.

3. Scaling and Sustaining Success: Once the foundation is established, the CoE must focus on broader organizational success, including:

  1. Shared Vision and Passion: A CoE thrives when it aligns with the organization's vision and ignites excitement among team members.
  2. Roadmap Development: A clear, strategic roadmap helps the CoE stay aligned with organizational goals and adapt to changes.
  3. Cross-organizational Coordination: Ensuring collaboration and coordination across different departments fosters a cohesive approach.
  4. Governance Oversight: Governance mechanisms help standardize processes, enforce policies, and maintain quality across projects.

4. Long-term ROI Goals: A mature CoE leads to optimized processes, minimized costs, and significant ROI growth. By integrating repeatable processes, organizational knowledge, and governance, the CoE helps sustain performance improvement, which is reflected by the green curve in the chart.


Key Takeaways:

  1. Structured Approach: Company B benefits from a CoE that provides structure, standardized governance, and shared knowledge across projects, enabling it to scale efficiently.
  2. Exponential Growth: With a CoE in place, Company B experiences exponential growth in ROI as the organization matures, capturing more value from its initiatives.
  3. Sustainable Performance: A CoE helps maintain high performance by adapting to evolving business needs, ensuring continuous improvement, and maximizing the value derived from investments.

Maximizing ROI with a CoE
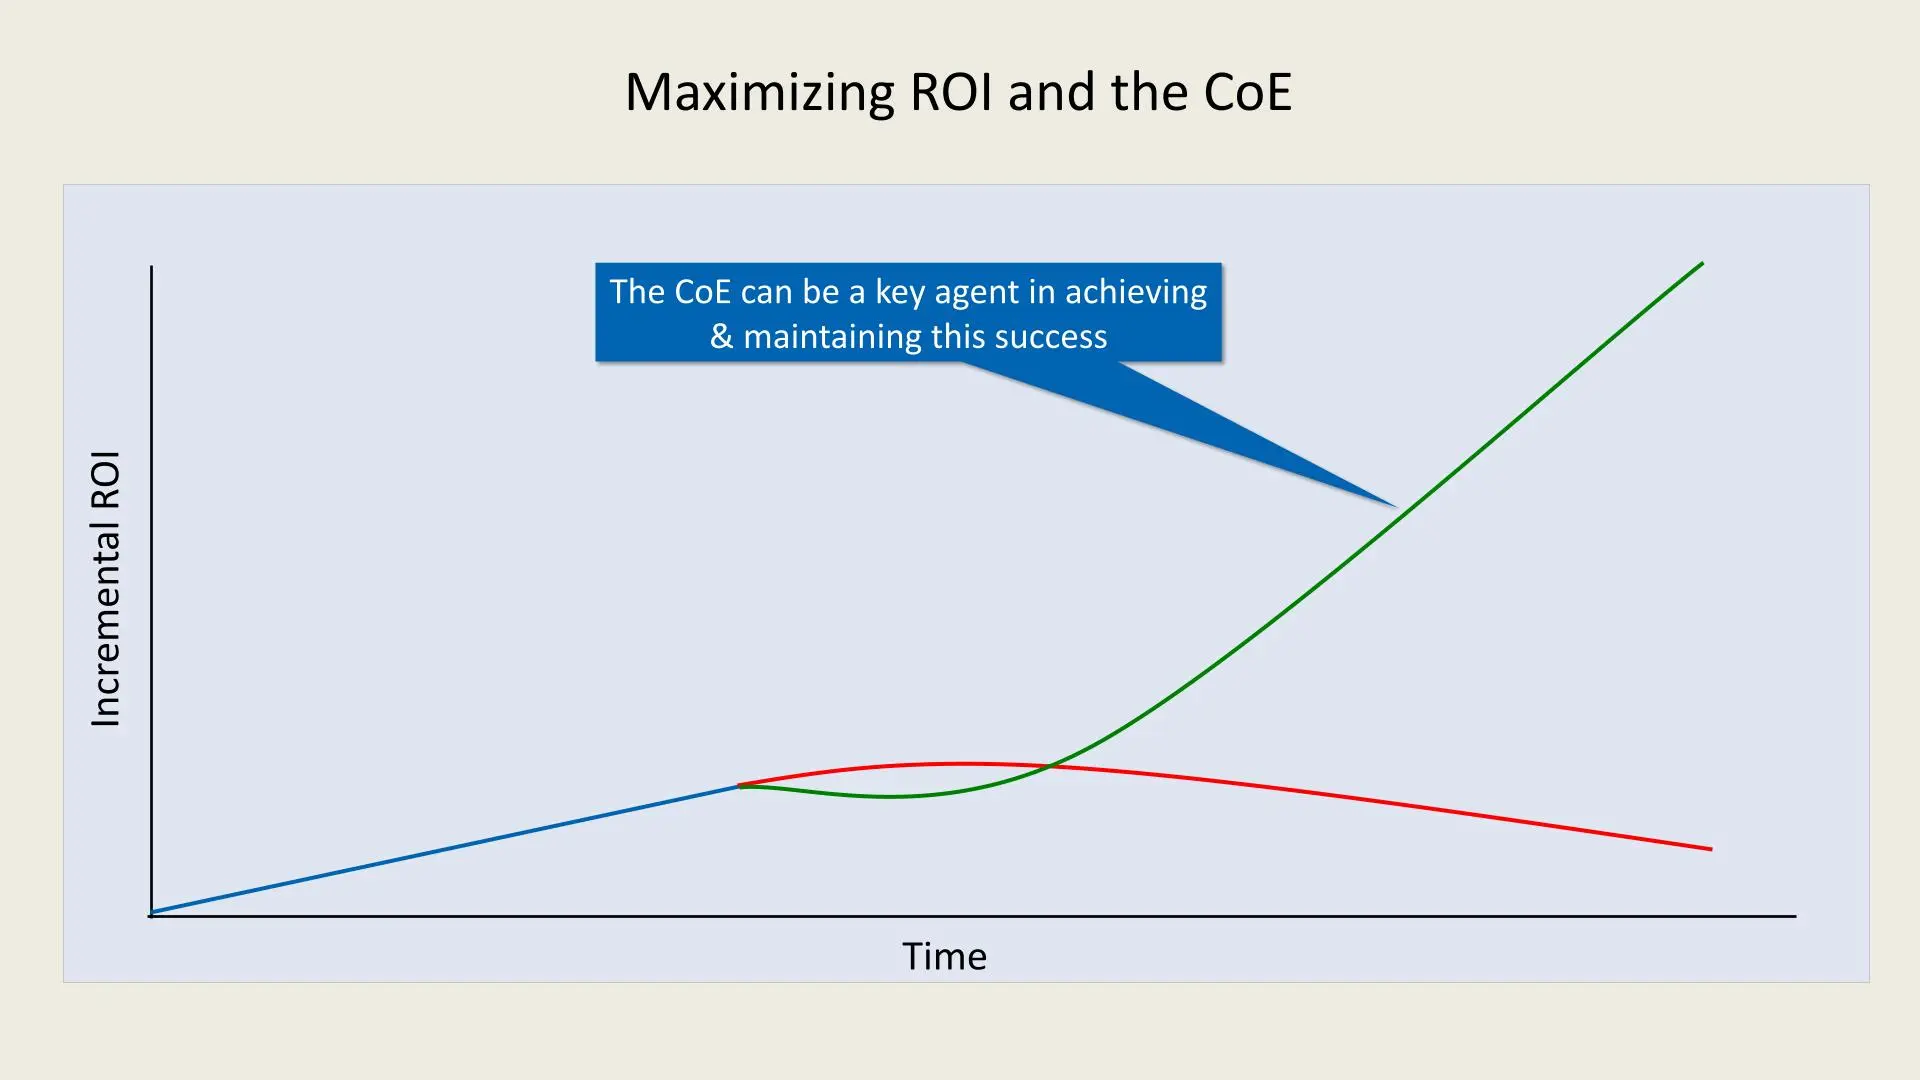

ROI with a CoE


In the chart, Company A and Company B start with similar levels of incremental ROI. However, as time progresses, the ROI for Company A plateaus and even begins to decline, as represented by the red line. This suggests that without a structured CoE, organizations may struggle to sustain growth and consistently achieve high returns due to a lack of standardized practices, governance, and strategic alignment.


On the other hand, Company B, which has implemented a CoE, follows the green line that shows exponential ROI growth. The structured and mature CoE within Company B ensures that best practices, continuous improvement, and cross-functional collaboration are maintained. This leads to sustained, repeatable performance and eventually optimal ROI.


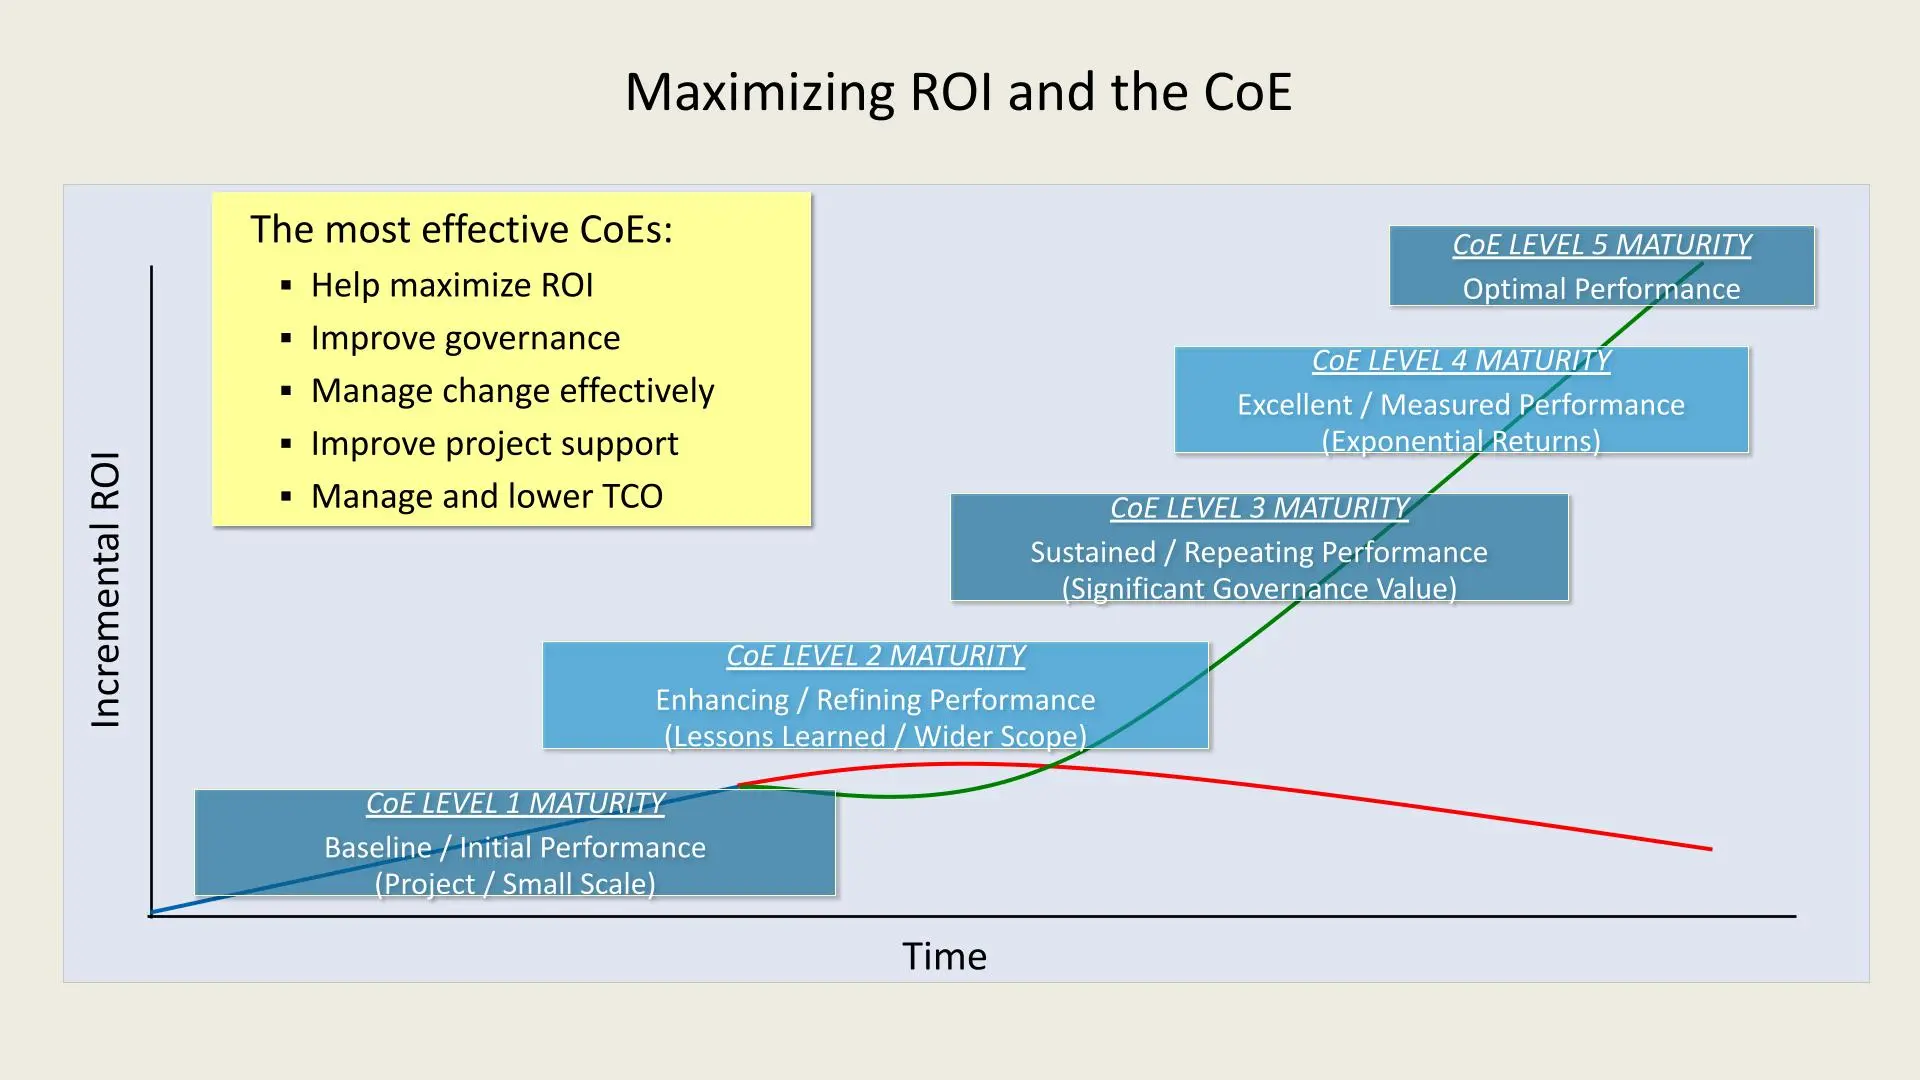
CoE Maturity Levels and Their ROI Impact

ROI with a CoE


Level 1 Maturity 1. Baseline/Initial Performance:

  1. Initial small-scale projects define this stage.
  2. ROI is relatively low as processes and standards are still under development.

Level 2 Maturity 1. Enhancing/Refining Performance:

  1. The CoE begins to refine its approach, learning from initial projects.
  2. Wider scope and incremental improvements lead to better ROI.

Level 3 Maturity 1. Sustained/Repeating Performance:

  1. At this stage, CoEs establish repeatable processes with substantial governance.
  2. This results in steady and significant improvements in ROI.

Level 4 Maturity 1. Excellent/Measured Performance:

  1. Performance becomes measurable, and returns become exponential.
  2. The CoEs processes are well-governed, supporting growth and optimizing costs.

Level 5 Maturity 1. Optimal Performance:

  1. The CoE reaches optimal performance, where ROI is maximized and sustained.
  2. Continuous improvements and strategic insights drive ongoing success.

Key Benefits of Effective CoEs


The most impactful CoEs:

  1. Maximize ROI: By implementing best practices and fostering collaboration, CoEs significantly increase ROI.
  2. Improve Governance: They establish structured processes and compliance, ensuring smoother operations.
  3. Manage Change Effectively: CoEs play a pivotal role in managing transitions and adapting to new technologies.
  4. Improve Project Support: They enhance support for various initiatives across the organization.
  5. Lower Total Cost of Ownership (TCO): By optimizing resources and eliminating redundancies, CoEs reduce operational costs.

Core Focus Areas of a CoE


  1. Planning and Leadership: Outlining a strategic roadmap, managing risks, and setting a vision.
  2. Guidance and Support: Establishing standards, tools, and methodologies.
  3. Shared Learning: Providing education, certifications, and skill development.
  4. Measurements and Asset Management: Using metrics to demonstrate CoE value and managing assets effectively.
  5. Governance: Ensuring investment in high-value projects and creating economies of scale.

The Most Valuable Functions of a Center of Excellence (CoE)

In today's rapidly evolving technology landscape, organizations are increasingly leveraging Centers of Excellence (CoEs) to drive digital transformation, manage complex projects, and foster innovation. But what functions make a CoE truly valuable? According to a Forrester survey, the highest-impact CoE functions go beyond technical training, emphasizing governance, leadership, and vision. In this post, we will break down the essential functions of a CoE and explore why they are crucial to an organizations success.


The Role of Governance in CoE Success The first step in understanding a CoE's value is to recognize its role as a governance body rather than just a training entity. According to Forrester's survey results, having a CoE correlates with higher satisfaction levels with cloud technologies and other technological initiatives. CoEs primarily provide value through leadership and governance, which guides organizations in making informed decisions and maintaining a strategic focus. Key points include:


  1. Higher Satisfaction: Organizations with CoEs report better satisfaction with their technological initiatives.
  2. Focus on Leadership: Rather than detailed technical skills, CoEs drive value by establishing a leadership framework.
  3. Governance First, Training Second: The CoE should primarily be seen as a governance body, shaping organizational policy and direction.

Key Functions of a CoE


A successful CoE is defined by several core functions that help align organizational goals, foster innovation, and ensure effective project management. Here are some of the most valuable functions, as highlighted in Forresters survey:


  1. Creating & Maintaining Vision and Plans
    CoEs provide a broad vision and ensure that all stakeholders are aligned. This includes setting a strategic direction for technology initiatives to keep everyone on track.

  2. Acting as a Governance Body
    A CoE provides approval on key decisions, giving it a strong leadership position. This approval process acts as a mentorship tool and ensures that guidance is followed effectively.

  3. Managing Patterns for Implementations
    By creating and managing implementation patterns, CoEs make it easier for teams to follow established best practices, reducing the need for reinventing solutions.

  4. Portfolio Management of Services
    CoEs organize services and tools to facilitate their use across the organization. This management helps streamline workflows, often using resources like spreadsheets, registries, and repositories.

  5. Planning for Future Technology Needs
    A CoE avoids the risk of each team working in silos by setting a long-term plan for technology evolution, ensuring cohesive growth that aligns with the organization's goals.


Centers of Excellence (CoEs) are powerful assets that can significantly enhance an organization's capability to manage and implement new technologies effectively. By focusing on governance and leadership rather than technical skills alone, CoEs bring the organization closer to achieving its strategic vision. Whether it's managing service portfolios or creating a cohesive plan for future technologies, CoEs provide indispensable guidance in today's fast-paced, tech-driven world.


Types of CoE Models


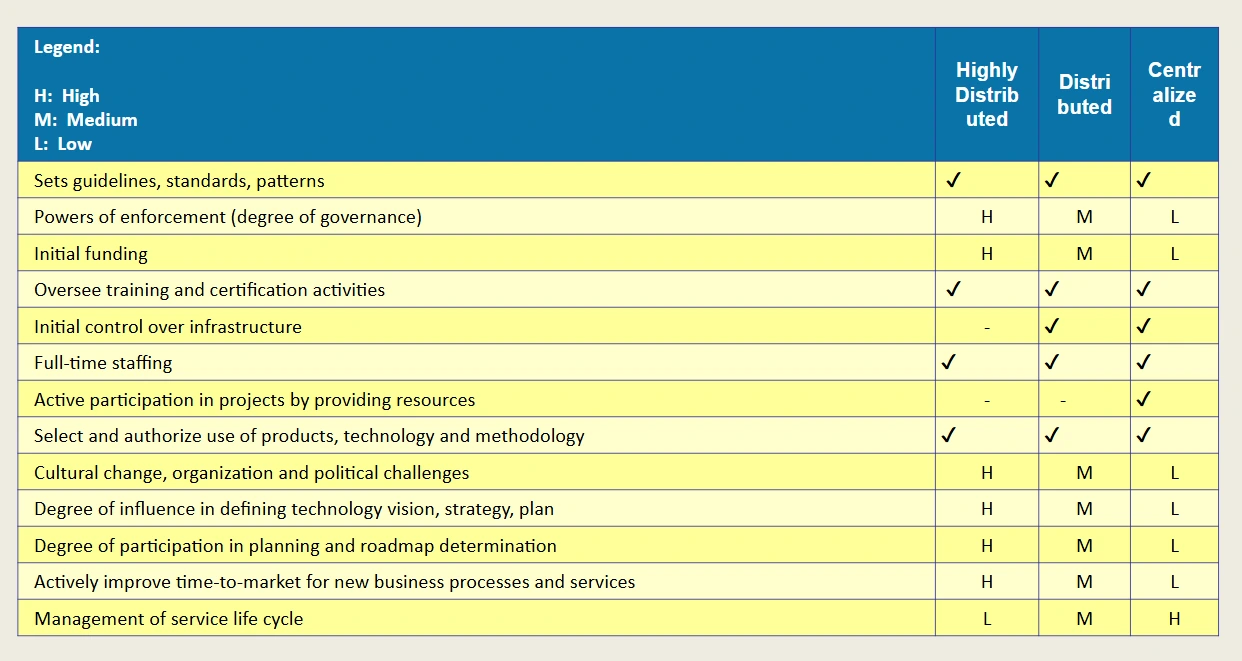
  1. Centralized Model (Service Center): Best suited for strong governance and standards.
  2. Distributed Model (Support Center): Allows for flexibility and faster adoption.
  3. Highly Distributed Model (Steering Group): Minimal staffing, ideal for independent business unit support.

The structure of a CoE varies based on organizational size and complexity. Here are three primary models:


1. Centralized Model


In this model, the CoE operates as a single, unified entity. It manages all technology-related practices and provides support to the entire organization.


Pros:

  1. Easier Governance: Centralized models streamline oversight and standardization.
  2. Simple Feedback Loops: By centralizing processes, this model enables more efficient communication and rapid issue resolution.

Cons:

  1. Limited Flexibility: The centralized model may struggle to meet the diverse needs of larger organizations.

CoE & E-Strategy


For a CoE to evolve and meet organizational goals, it must continuously:

  1. Evangelize: Promote new strategies and state-of-the-art practices.
  2. Evolve: Adapt frameworks and processes as technology and business needs change.
  3. Enforce: Ensure adherence to standards and guidelines.
  4. Escalate: Address and resolve governance challenges effectively.

2. Distributed Model


Here, each department has its own CoE, allowing teams to tailor best practices to their unique requirements.


Pros:

  1. Adaptable to Specific Needs: Each department can quickly adopt and adapt standards to suit its goals.
  2. Scalable: The distributed model grows more effectively with the organization.

Cons:

  1. Higher Complexity: Governance and coordination become challenging, especially across multiple CoEs.

3. Highly Distributed Model


In a highly distributed setup, the CoE functions as a flexible steering group, with minimal centralized authority. This model is particularly effective in global enterprises with varied business needs.


Pros:

  1. High Flexibility: This model meets the unique requirements of diverse business units.
  2. Adaptable to Large Organizations: It supports scalability and regional differences effectively.

Cons:

  1. Complex Governance: Managing coherence across different units requires robust oversight mechanisms.

Typical CoE model characteristics

ROI with a CoE


The diagram depicts the primary interactions between the Center of Excellence (CoE) and various teams:
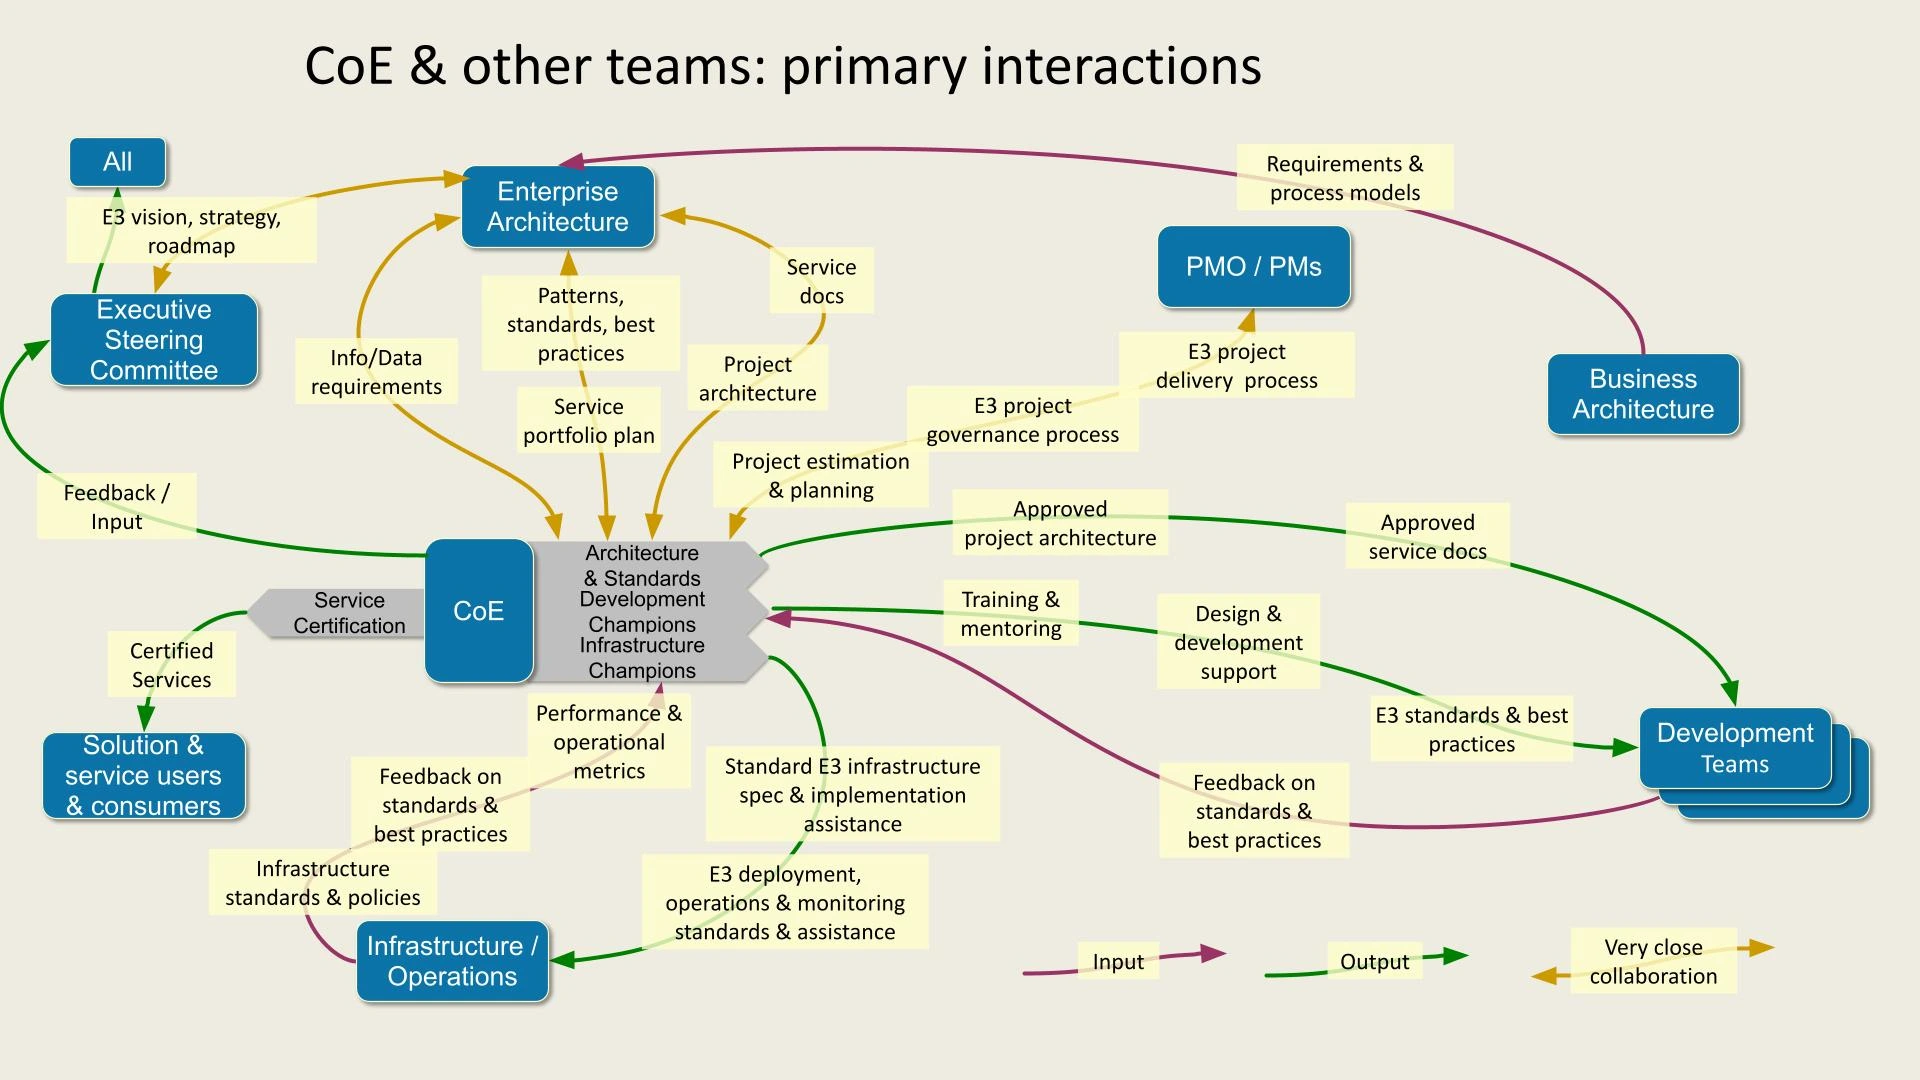

CoE


  1. Executive Steering Committee: Provides E3 vision, strategy, and roadmap, and receives feedback/input.
  2. Enterprise Architecture: Collaborates with CoE on patterns, standards, and best practices, providing project architecture and service portfolio plans.
  3. PMO/Project Managers: Oversee project governance, requirements, and process models.
  4. Business Architecture: Supplies approved service documents and E3 project delivery process support.
  5. Development Teams: Receive E3 standards, training, and approved service docs for design and development.
  6. Infrastructure/Operations: Ensures infrastructure standards, operations support, and feedback on best practices.
  7. Solution & Service Users: Receive certified services and provide input.

An example CoE (Center of Excellence) organization within an Enterprise Architecture (EA) framework:
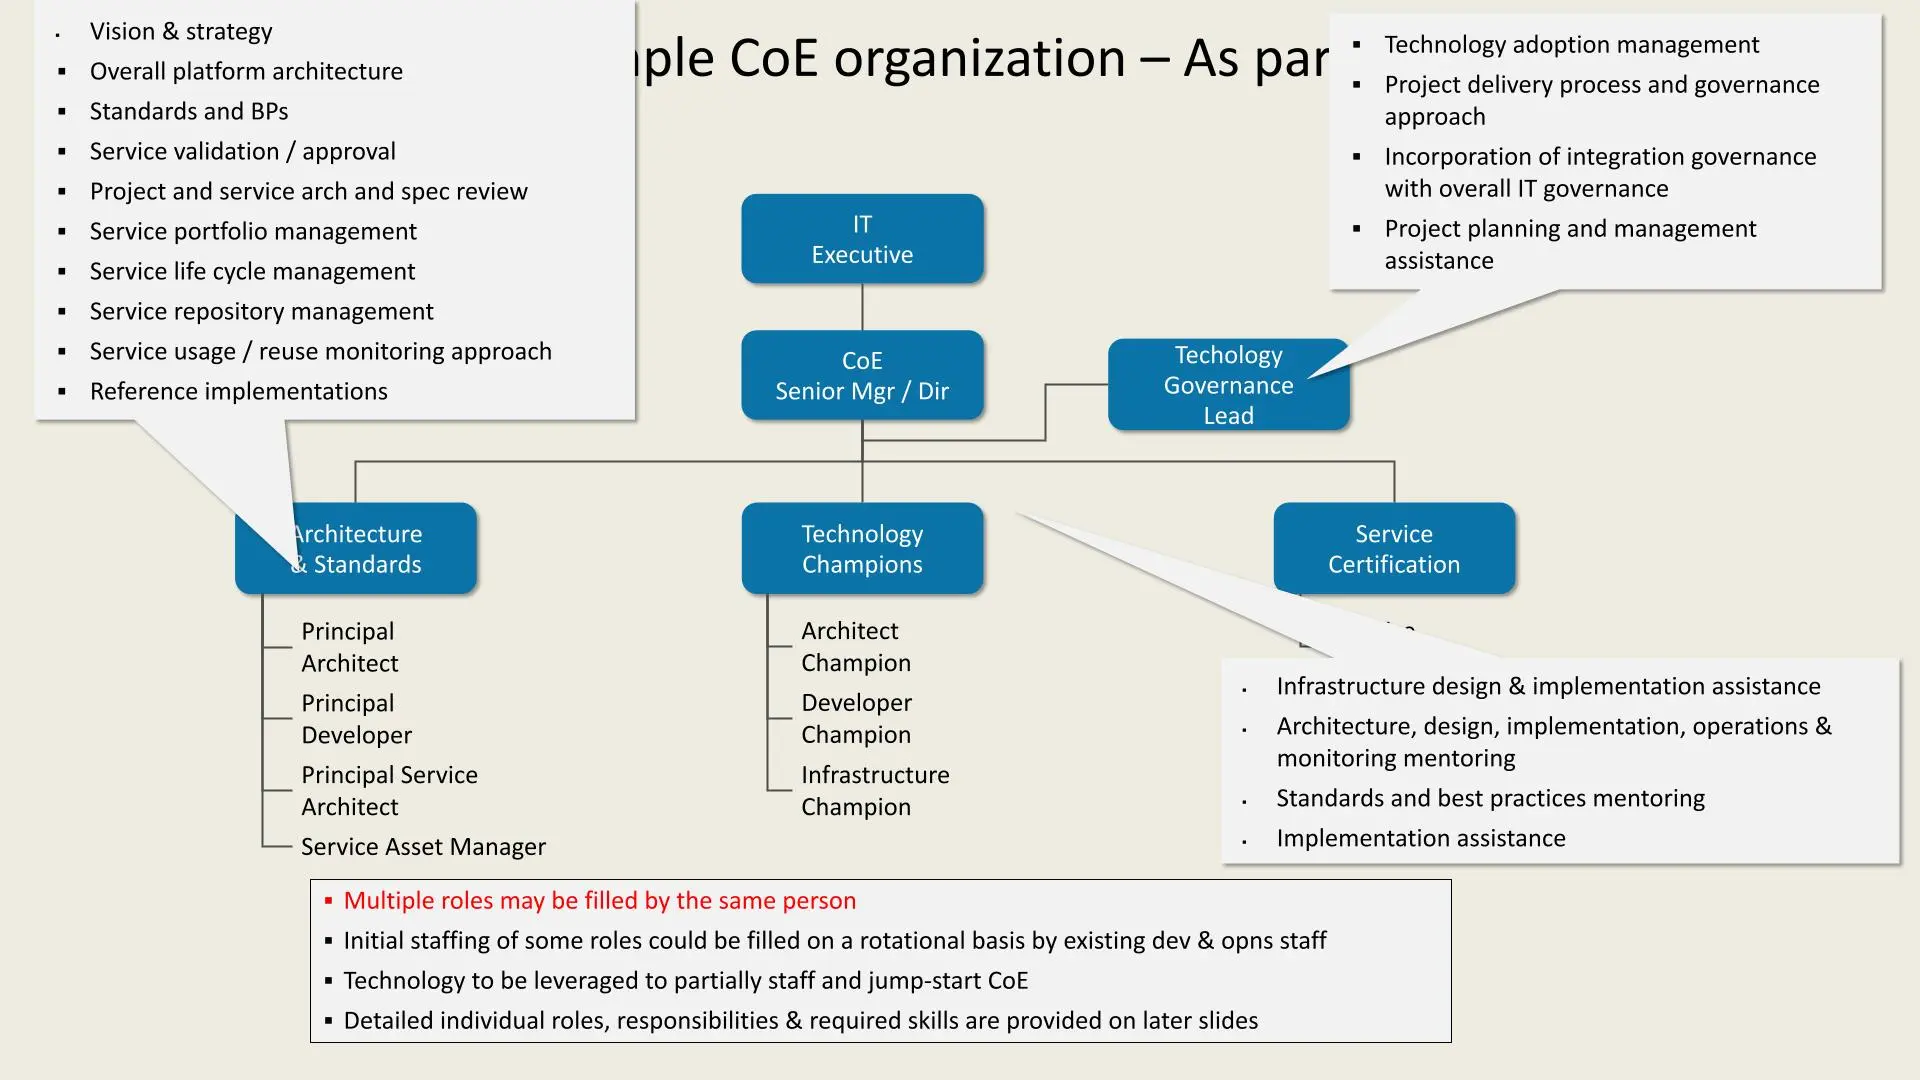

example CoE


  1. IT Executive oversees the CoE Senior Manager/Director.
  2. Technology Governance Lead handles technology adoption, project governance, and planning assistance.
  3. Architecture & Standards defines vision, platform architecture, standards, and service management. Key roles include Principal Architect, Developer, Service Architect, and Asset Manager.
  4. Technology Champions focus on specific areas: Architect Champion, Developer Champion, and Infrastructure Champion.
  5. Service Certification provides infrastructure, architecture, and implementation support, ensuring standards and best practices.

This example outlines key roles in a CoE team structure:
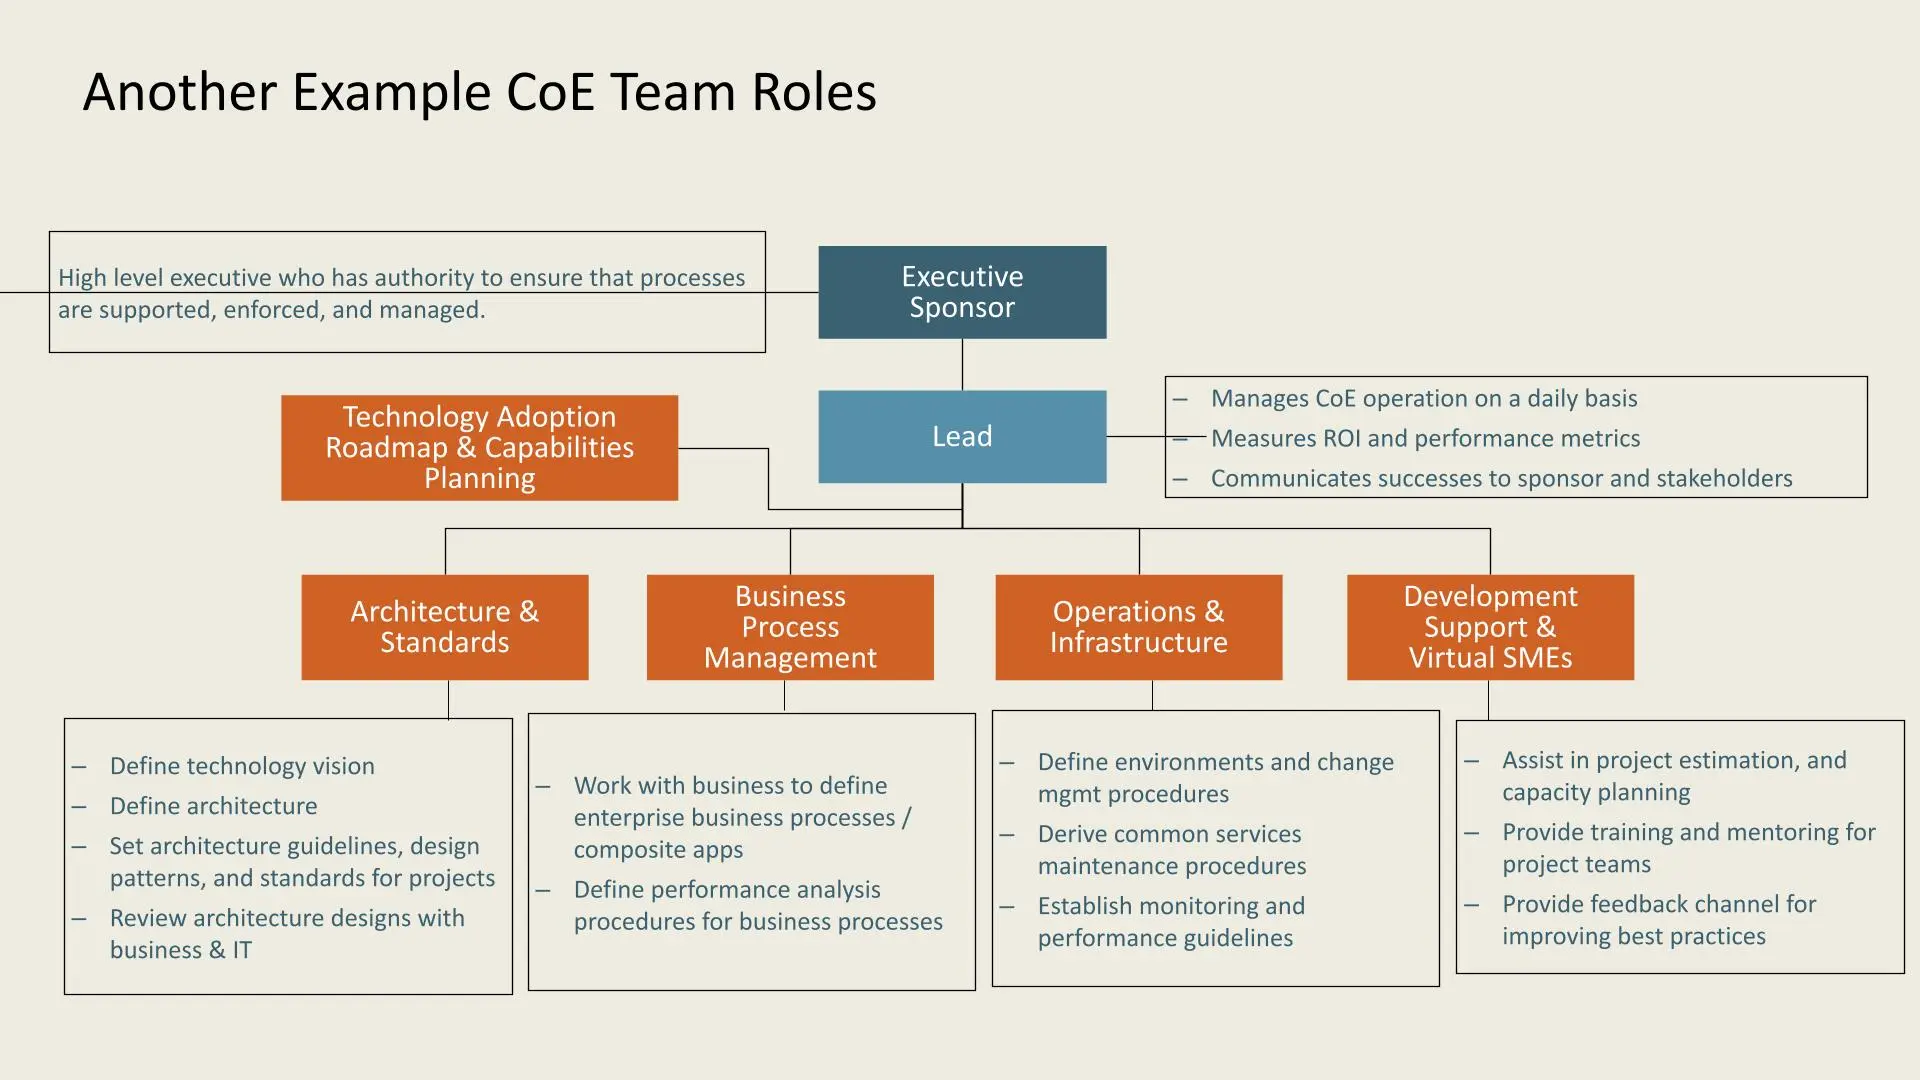

example CoE


  1. Executive Sponsor: Ensures process support, enforcement, and management.
  2. Lead: Oversees daily CoE operations, measures ROI, and communicates achievements.

**Functional areas include:


  1. Technology Adoption Roadmap & Capabilities Planning
  2. Architecture & Standards: Defines technology vision, architecture, and standards.
  3. Business Process Management: Aligns with business to define processes and performance analysis.
  4. Operations & Infrastructure: Manages environments, maintenance, and performance guidelines.
  5. Development Support & Virtual SMEs: Provides project support, training, and feedback for best practices.

Another example outlines key roles in a CoE team structure:
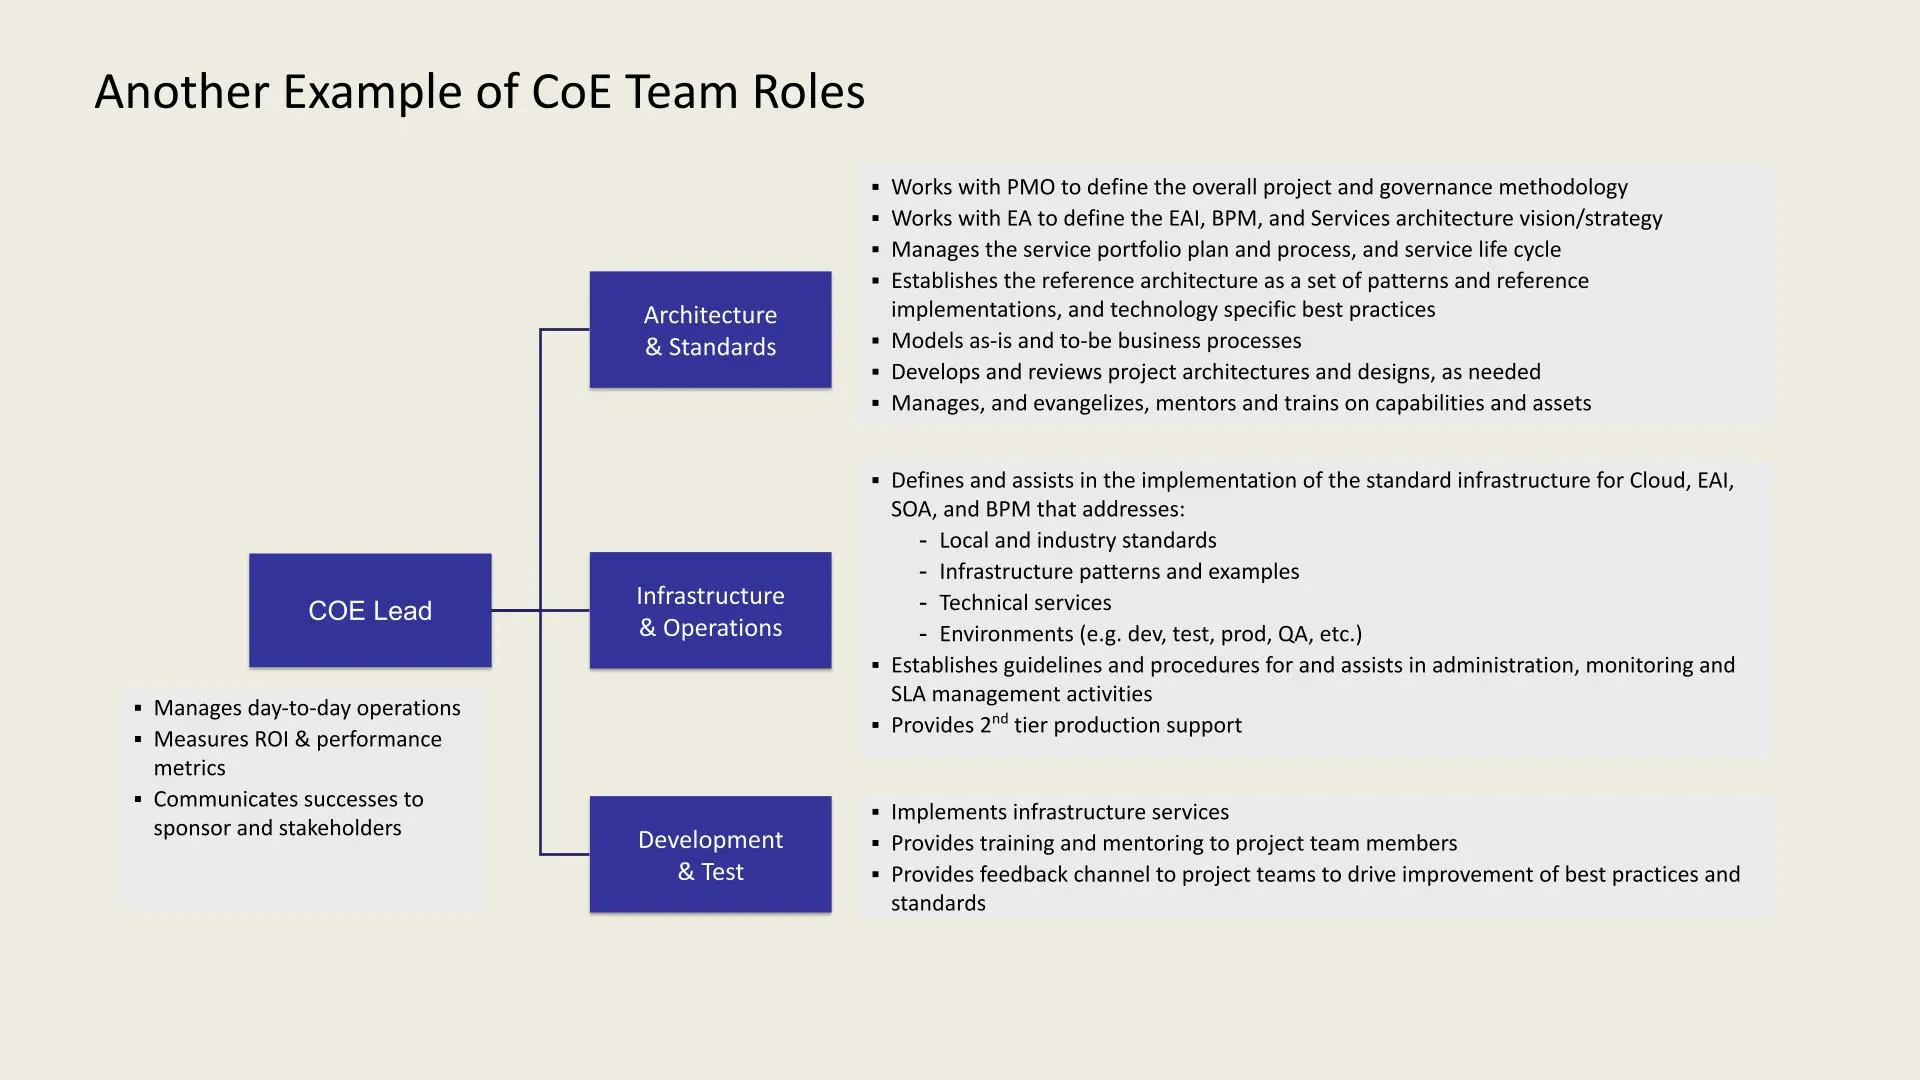

example CoE


  1. CoE Lead: Oversees daily operations, tracks ROI and performance, and communicates results to stakeholders.
  2. Architecture & Standards: Collaborates with PMO and EA, manages service portfolio, sets architecture standards, models business processes, and provides training.
  3. Infrastructure & Operations: Defines infrastructure standards, manages environments (e.g., dev, test, prod), handles administration, monitoring, SLA management, and provides second-tier support.
  4. Development & Test: Implements infrastructure services, provides team training, and facilitates feedback for standards improvement.

Another example outlines key roles in a CoE team structure:
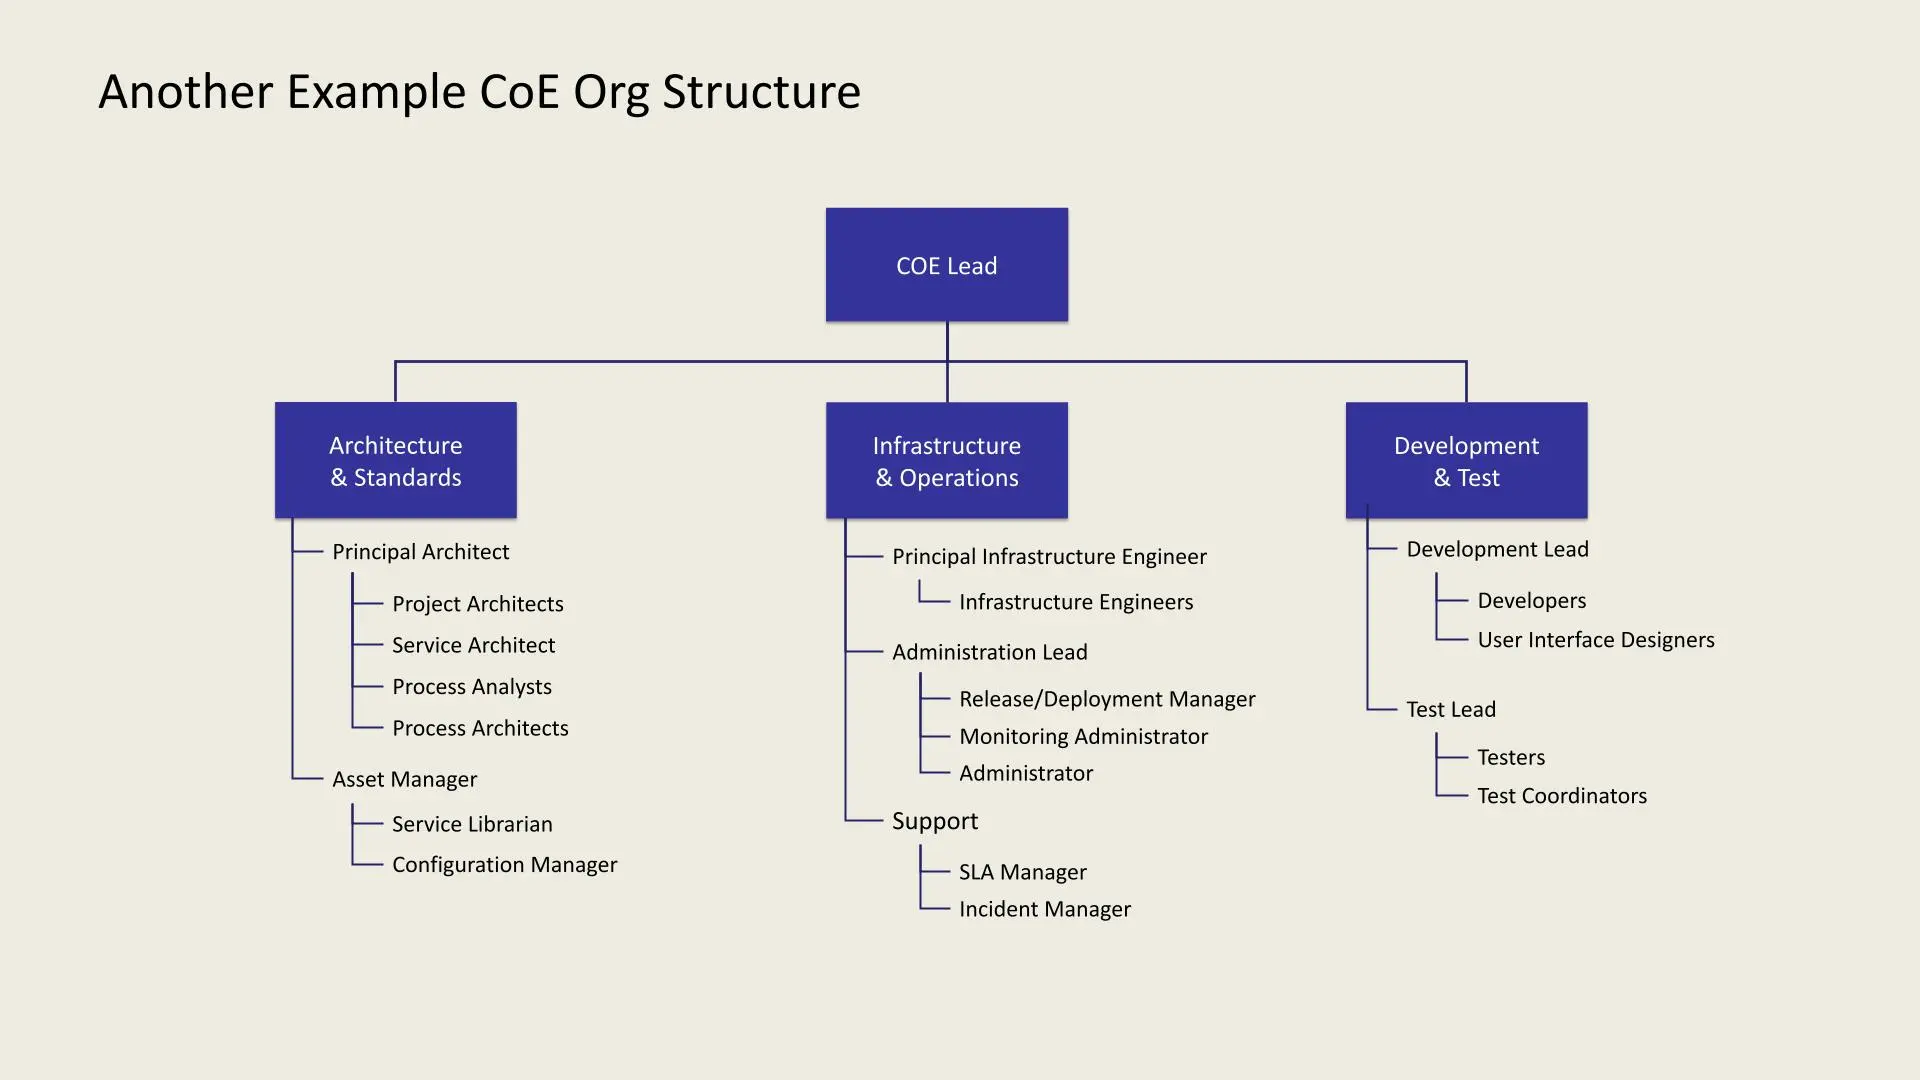

example CoE


  1. CoE Lead: Oversees all divisions.
  2. Architecture & Standards: Led by a Principal Architect, includes Project Architects, Service Architect, Process Analysts, Process Architects, Asset Manager, Service Librarian, and Configuration Manager.
  3. Infrastructure & Operations: Led by a Principal Infrastructure Engineer, includes Infrastructure Engineers, Administration Lead, Release/Deployment Manager, Monitoring Administrator, Administrator, SLA Manager, and Incident Manager.
  4. Development & Test: Led by a Development Lead and Test Lead, includes Developers, UI Designers, Testers, and Test Coordinators.

Sample IT Metrics for Evaluating Success


Service/Interface Development Metrics:

  1. Cost and time to build
  2. Cost to change
  3. Defect rate during warranty
  4. Reuse rate
  5. Demand forecast
  6. Retirement rate

Operations & Support Metrics:

  1. Incident response and resolution time
  2. Problem resolution rate
  3. Metadata quality
  4. Performance and response times
  5. Service availability
  6. First-time release accuracy

Management Metrics:

  1. Application portfolio size
  2. Number of interfaces and services
  3. Project statistics
  4. Standards exceptions
  5. Staff certification rates

The Delivery Approach involves the following steps:


example CoE.webp)


  1. Start: Kick-off with Executive Sponsor.
  2. Understand Landscape: Assess current and future state.
  3. Architecture Assessment: Create an assessment report.
  4. Identify Priorities: Define technical foundation priorities and deliverables.
  5. Develop and Execute Plan: Formulate and execute the technical foundation development plan, covering architecture, development, infrastructure, and common services.
  6. CoE Quick Start: Establish organization, process, governance, CoE definition, and evolution strategy.
  7. Follow-On Work: Conduct additional work as per the high-leThe Path: Today vs Long Term Focusvel program plan.

The Path: Today vs Long Term Focus


The Path: Today vs Long Term
FocusToday: Project FocusLong Term: Enterprise Focus
ArchitectureEnterprise and project architecture definitionEnterprise architecture definition; project architect guidance, training, review
DesignDo the designDefine/teach how to design
ImplementationDo the implementationDefine/teach how to implement
OperationAssist in new technology operationCo-develop operational best practices
Technology Best PracticesClimb the learning curveShare the knowledge (document, train)
GovernanceDetermine appropriate governanceSee that governance practices are followed
RepositoryContribute services and design patternsSee that services and design patterns are entered

Key Elements of an Effective E-Strategy


An E-Strategy is essential for leveraging technology and improving operations in todays fast-paced business environment. Here is a concise roadmap:


Evangelize

  1. Business Discovery: Work closely with stakeholders to align E-Strategy with business needs.
  2. Innovate: Define an ideal future state with next-gen tech and real-time data advantages.
  3. Proof of Concept (POC): Test ideas in a sandbox, demo successful ones, and shelve unsuccessful ones to save resources.

Common Services

  1. Standardization: Establish reusable services with thorough documentation for easier onboarding and efficient project estimates.

Evolve

  1. Adaptability: Streamline architecture, operations, and infrastructure for flexibility and quick delivery.
  2. Automation: Use dynamic profiling, scalability, and automated installation to expedite deployments.

Enforce

  1. Standards and Governance: Implement best practices, enforce guidelines, and establish a strong governance structure with sign-offs on key areas.
  2. Version Control and Bug Tracking: Maintain organized development processes to prevent errors and ensure consistency.

Escalate

  1. Project Collaboration: Negotiate with project teams, aligning their needs with CoE standards.
  2. Ownership: CoE can guide or own infrastructure activities, balancing governance with flexibility.

Additional Considerations

Evolve standards as each project progresses, making the strategy adaptable and cost-efficient while yielding ROI.


Conclusion

A Center of Excellence is an invaluable asset for organizations navigating technological transformation. By centralizing knowledge, enforcing standards, and promoting continuous learning, a CoE enables businesses to stay competitive and agile.


Choosing the right CoE model and implementing it thoughtfully allows organizations to leverage the expertise of cross-functional teams, fostering a culture of collaboration, innovation, and excellence. Whether its through a centralized, distributed, or highly distributed model, the ultimate goal is the same: to empower teams, streamline processes, and drive sustainable growth.


Please reach out to us for any of your cloud requirements

Ready to take your cloud infrastructure to the next level? Please Contact Us

Step-by-Step Guide to AWS S3 Cross-Account Replication for Enhanced Business Continuity

· 6 min read

Amazon S3 Cross-Region Replication (CRR) is essential for businesses seeking redundancy, disaster recovery, and compliance across geographical boundaries. It enables automatic, asynchronous replication of objects from one bucket to another in a different AWS region. Whether you're managing a small project or working on an enterprise-level setup, understanding the intricacies of setting up S3 replication between accounts can save time and avoid potential debugging nightmares.


Here's a step-by-step guide to help you through the process.


Step 1: Setting Up the IAM Role for Cross-Region Replication


To start, you need to create an IAM role that will have permissions in both source and destination accounts for handling replication. Follow these guidelines:


IAM Role Creation:


  1. Navigate to the IAM section in your AWS console and create a new role.

  2. Establish the following trust relationship so that Amazon S3 and Batch Operations can assume this role:

    {
    "Version": "2012-10-17",
    "Statement": [
    {
    "Effect": "Allow",
    "Principal": {
    "Service": [
    "batchoperations.s3.amazonaws.com",
    "s3.amazonaws.com"
    ]
    },
    "Action": "sts:AssumeRole"
    }
    ]
    }

  1. Add a policy to this role that permits actions related to replication, such as reading objects from the source bucket and writing them to the destination. Here is a sample policy:
    {
    "Version": "2012-10-17",
    "Statement": [
    {
    "Sid": "SourceBucketPermissions",
    "Effect": "Allow",
    "Action": [
    "s3:Get*",
    "s3:List*",
    "s3:ReplicateObject",
    "s3:ObjectOwnerOverrideToBucketOwner",
    "s3:Replicate*"
    ],
    "Resource": [
    "arn:aws:s3:::<Source-Bucket>/*",
    "arn:aws:s3:::<Source-Bucket>",
    "arn:aws:s3:::<Destination-Bucket>",
    "arn:aws:s3:::<Destination-Bucket>/*"
    ]
    }
    ]
    }

Step 2: Source and Destination Bucket Configuration


After setting up the IAM role, the next step is configuring your S3 buckets.


Source Bucket:


  1. Enable Bucket Versioning - Replication requires versioning to be enabled. You can activate this in the Properties tab of the bucket.
  2. ACL Configuration - Ensure that ACLs are disabled for smoother replication operations.
  3. Bucket Policy - Update the bucket policy to grant the IAM role access to the source bucket for replication purposes.

Destination Bucket:


  1. Similar to the source bucket, enable versioning and disable ACLs.
  2. Encryption - For simplicity, it is recommended to use SSE-S3 encryption over CMK. Custom-managed keys (CMK) might lead to issues when replicating encrypted objects between accounts.
  3. Permissions - Add the IAM role to the bucket policy to allow object replication and ownership transfer.

Step 3: Creating the Replication Rule


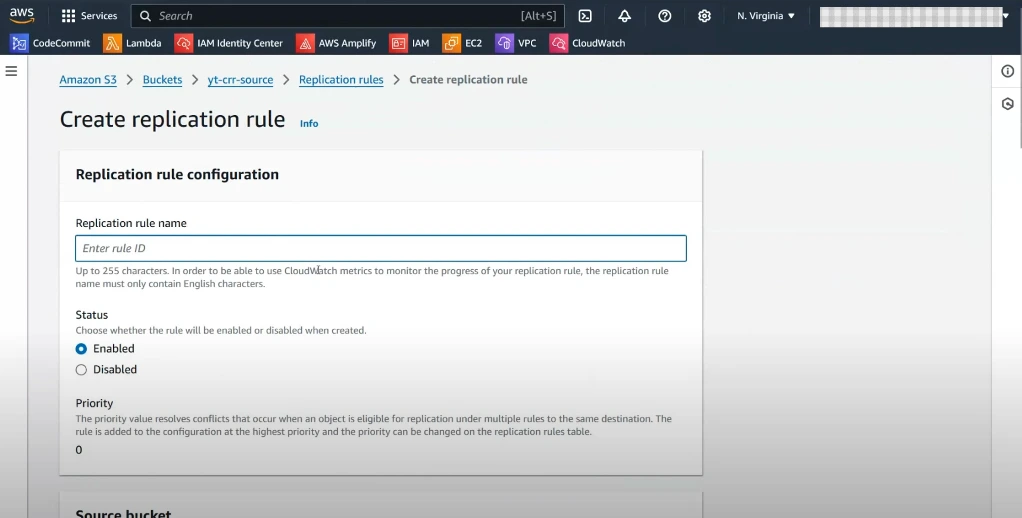
Once the IAM role and bucket configurations are set, you can create the replication rule in your source bucket as shown:


 Cross- Region Replication


  1. Go to the Management tab in the source bucket and click on Create Replication Rule.
  2. Naming - Provide a unique name for the replication rule (e.g., SourceToDestinationReplication).
  3. Scope - Define the scope of replication where you can choose to replicate all objects or only a subset based on prefix or tags.
  4. Destination Setup - Specify the destination bucket in another AWS account, and input the account ID and bucket name.
  5. Role Assignment - Link the IAM role created in Step 1 to this replication rule.
  6. Encryption - Disable the option to replicate objects encrypted with AWS KMS to avoid encryption-related issues.

Step 4: Testing the Setup


Now that you have created the replication rule, it is time to test it by uploading an object to the source bucket and checking if it replicates to the destination bucket.


  1. Upload an Object - Add a file to the source bucket.
  2. Wait for a few minutes (replication can take up to 15 minutes) and check the destination bucket to verify that the object is successfully replicated.
  3. Monitor the replication status in the AWS console for errors.

Step 5: Monitoring and Troubleshooting Replication


To ensure your replication runs smoothly, it is important to monitor its performance and resolve any issues as they arise.


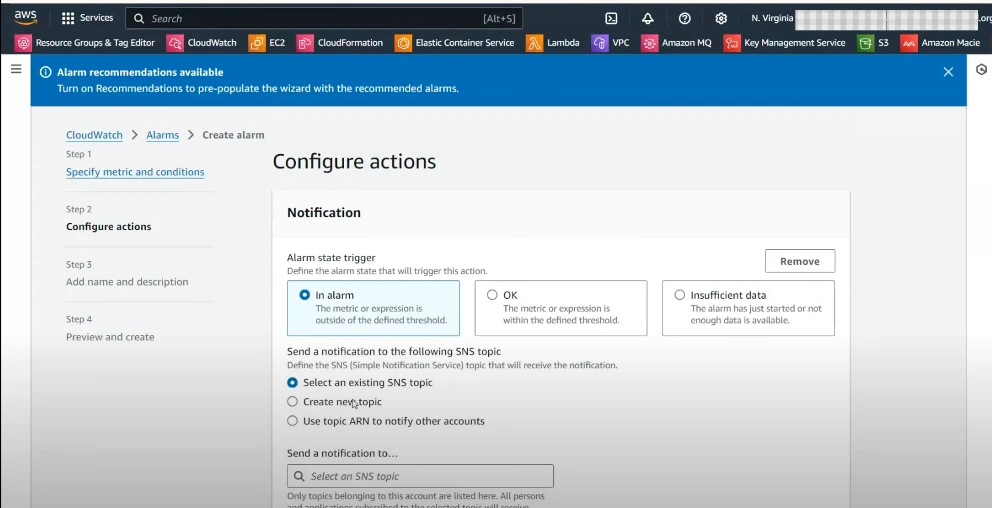
Alarms


Monitoring


  1. Use CloudWatch metrics to set up custom alarms that notify you if replication fails.
  2. Failed Replication Events - Set alarms to trigger if the number of failed replications exceeds a threshold. You can configure SNS notifications to receive alerts for failed replications.
  3. OK Status Alarms - As a best practice, configure OK status alarms to confirm that replication has resumed successfully after any issues.

Common Troubleshooting Tips


  • Ensure that encryption settings are aligned across both buckets (SSE-S3 is recommended).
  • Double-check IAM role policies and permissions for any missing actions.
  • Use CloudWatch metrics to identify patterns of failure or latency in replication operations.

Additional Considerations for Enterprise Setups


For larger, enterprise-level deployments, there are additional considerations:


  • Batch Operations - If replicating large volumes of objects, consider setting up batch operations to manage replication tasks efficiently.
  • Cost Management - Keep an eye on data transfer and storage costs, especially when replicating across regions.
  • Compliance and Governance - Ensure your replication setup adheres to your organization's compliance and data governance policies.

Please reach out to us for your enterprise cloud requirements


Conclusion


Setting up cross-region replication is a powerful tool for ensuring your data is distributed across multiple regions, enhancing durability and compliance. By following this detailed guide, you can avoid the common pitfalls and ensure a seamless replication process between S3 buckets across AWS accounts. Regular monitoring and fine-tuning your setup will keep your data transfer efficient and error-free.


Ready to take your cloud infrastructure to the next level? Please reach out to us Contact Us


Want to Learn More? Check out our other AWS tutorials and don't forget to subscribe to our newsletter for the latest cloud management tips and best practices.


Call to Action


Choosing the right platform depends on your organizations needs. For more insights, subscribe to our newsletter for insights on cloud computing, tips, and the latest trends in technology. or follow our video series on cloud comparisons.


Interested in having your organization setup on cloud? If yes, please contact us and we'll be more than glad to help you embark on cloud journey.

GuardDuty S3 Malware Scanning vs. Cloud Storage Security

· 7 min read

In today's increasingly data-driven world, securing cloud storage against malware is a critical concern. With services like AWS S3 becoming standard for businesses to store and manage large volumes of data, protecting these storage environments from malicious attacks is essential. Two prominent solutions for this purpose are


  • AWS GuardDuty Malware Protection and
  • third-party tools such as Cloud Storage Security.

In this blog, we will explore both solutions in depth, analyzing their architecture, functionality, features, costs, and which scenarios they are best suited for. This detailed comparison will help you decide which solution aligns with your cloud security needs.


1. Introduction to AWS S3 Malware Protection


As cloud adoption grows, data security has become a significant concern. Whether it's sensitive data, intellectual property, or business-critical files, S3 buckets are often targeted by cyber attackers who attempt to store or distribute malware.


AWS has introduced GuardDuty S3 Malware Protection to mitigate this risk. GuardDuty, a threat detection service, now supports S3-specific malware protection, scanning objects when they are uploaded and alerting administrators to threats. In addition to AWS's native offerings, third-party security solutions like Cloud Storage Security offer even more extensive scanning capabilities.


This blog compares these two approaches, helping you navigate their strengths and weaknesses.


2. Architecture Overview


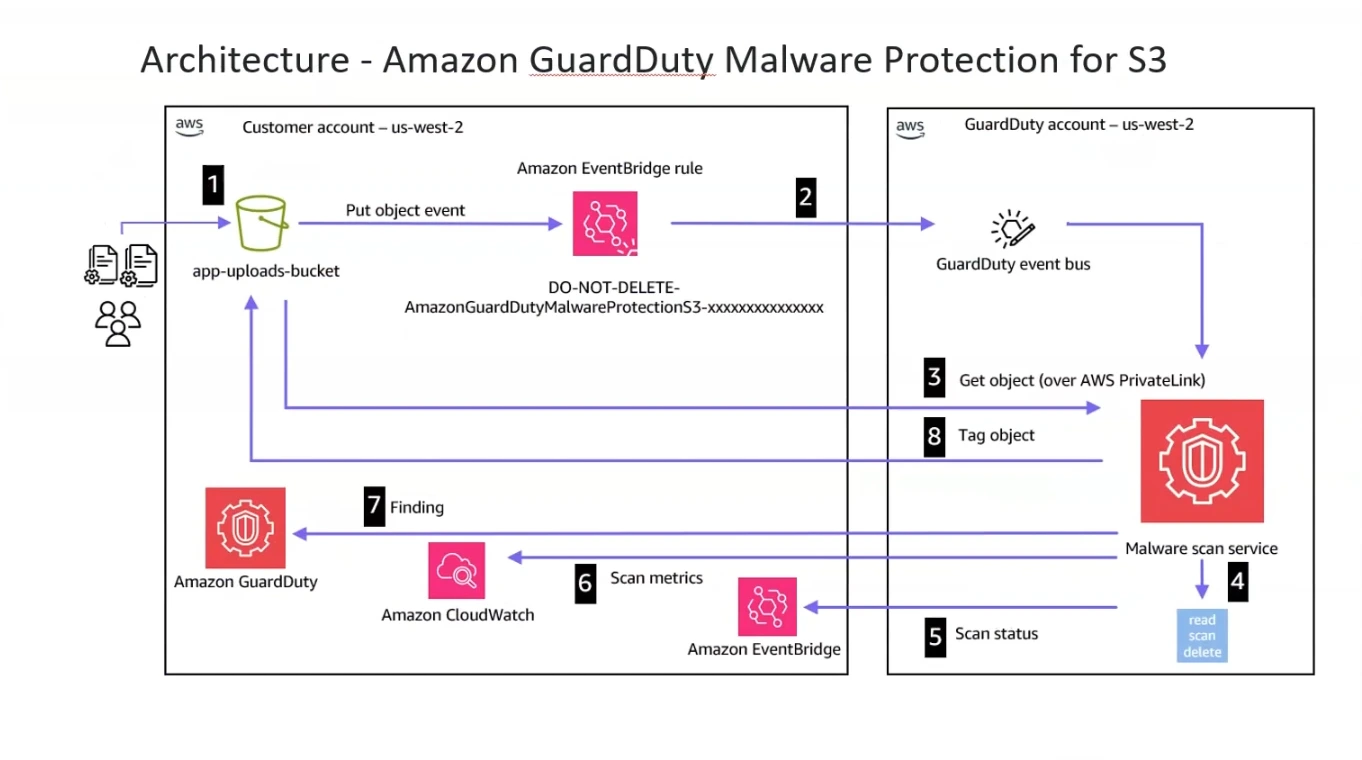
GuardDuty for Malware Protection in S3


GuardDuty


AWS GuardDuty Malware Protection is designed to detect malware in S3 objects through seamless integration with the existing AWS ecosystem. The architecture is minimalistic but effective:


  • File Upload: An object is uploaded to an S3 bucket.
  • Event Generation: The upload triggers an EventBridge event, automatically sending the object to GuardDuty for scanning.
  • Malware Detection: GuardDuty evaluates the object using BitDefender and flags any potential malware.
  • Object Tagging: After scanning, the object is tagged to indicate whether it is clean or infected, with appropriate remediation steps triggered thereafter.

This is an out-of-the-box solution that requires very little setup and is managed entirely by AWS. GuardDuty is ideal for customers looking for a simple, automated method to secure their data in S3 buckets.


Cloud Storage Security


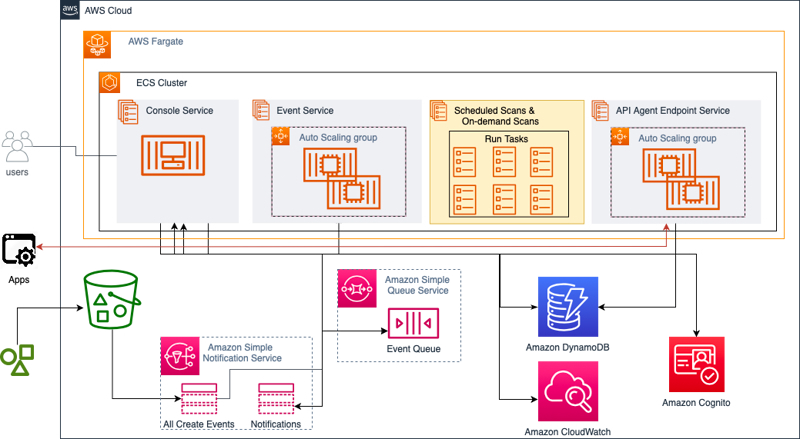
Cloud Storage Security


In comparison, Cloud Storage Security offers a more complex and customizable architecture, particularly beneficial for large enterprises or organizations with unique security needs. Cloud Storage Security utilizes AWS's Elastic Container Service (ECS) to run agents that scan the data, allowing for flexible and scalable malware protection.


Here is how it works:


  • File Upload: An object is uploaded to an S3 bucket.
  • Event Generation: The event is queued via Amazon SQS for processing.
  • Auto-Scaling with ECS: Depending on the number of objects uploaded, the system auto-scales ECS instances to manage the workload.
  • Scanning: Files are scanned using engines such as Sophos or ClamAV, and results can be stored in DynamoDB for reporting.
  • CloudWatch: Metrics and monitoring are handled via CloudWatch, ensuring detailed oversight of scanning activities and health.

This architecture provides infrastructure control and is highly scalable. However, it requires more management and configuration than GuardDuty, making it a better fit for complex, enterprise-level workloads.


3. Key Features Comparison


FeatureGuard DutyCloud Storage Security
File Size LimitsFiles up to 5GBFiles up to 5TB (Sofos) or 2GB (ClamAV)
Archive HandlingScans up to 1,000 files (5 levels deep)Unlimited files (100 levels deep with Sofos, 160 with ClamAV)
Number of Buckets ScannedUp to 25 S3 buckets per regionNo limit on number of buckets
Detection EnginesBitDefenderSofos or ClamAV
Scanning OptionsReal-time scanning when files are uploaded to S3Real-time, scheduled, and on-demand scanning

4. Cost Comparison


ServiceCost per GB Scanned ($)Cost per 1,000 Objects Scanned ($)Cost per vCPU Hour ($)Additional Features
Guard Duty Malware Protection for S30.60.215N/ABasic malware protection for small to medium workloads.
Cloud Storage Security0.8N/A0.025Deep scanning, extensive archive handling, scanning scheduling.

5. Use Cases: Which Solution is Right for You?


The choice between GuardDuty Malware Protection and Cloud Storage Security depends on your organization's specific needs.


When to Choose GuardDuty


  • Simplicity: GuardDuty is a good fit if you want a ready-made solution with minimal setup.
  • Small to Medium Workloads: If your organization deals with relatively small files (under 5GB) and does not have a massive volume of archives or objects, GuardDuty will serve you well.
  • Cost-Effective: For organizations with tight budgets that still need reliable security, GuardDuty offers an affordable option.

When to Choose Cloud Storage Security


  • Large Enterprise Needs: If your company handles a large volume of files, especially files over 5GB or complex archives with many nested files, Cloud Storage Security's ability to scale and handle deeper file structures makes it the better choice.
  • Customizability: Cloud Storage Security offers far more flexibility with detection engines and the ability to configure scans based on your needs. If your organization requires more control, this solution is ideal.
  • Scalability: In cases where you need to protect hundreds of S3 buckets across multiple regions, Cloud Storage Security's unlimited bucket support and scalability come in handy.

6. Security and Operational Considerations


Encryption Support


GuardDuty does not explicitly support scanning encrypted files without additional configuration, whereas Cloud Storage Security allows you to manage the decryption and scanning process through advanced setups with AWS KMS (Key Management Service).


Operational Overhead


GuardDuty is a fully managed service, meaning you don’t have to worry about infrastructure or maintenance. In contrast, Cloud Storage Security requires managing ECS instances, queues, and other resources, making it more complex to operate.


Performance and Speed


Both services offer fast, efficient scanning, but the auto-scaling capabilities of Cloud Storage Security ensure that even massive workloads can be handled without performance degradation. This is particularly important when dealing with spikes in file uploads or high-frequency data ingestion.


7. Conclusion: Picking the Right Solution


Both AWS GuardDuty Malware Protection and Cloud Storage Security are excellent solutions, but they cater to different types of organizations and needs.


If you need an out-of-the-box, managed solution with minimal configuration and cost, GuardDuty is the right fit, especially for small to medium businesses. However, if you require a highly scalable, customizable, and enterprise-grade solution, Cloud Storage Security provides the features and flexibility needed to secure complex and distributed infrastructures.


Ultimately, your decision should be based on the complexity of your data, the number of S3 buckets you manage, your budget, and your need for customization. Whichever you choose, both solutions offer robust protection for your cloud environment.


Call to Action: Keep following our blog for more in-depth cloud security comparisons and insights. Do not forget to subscribe to our Newsletter for updates on the latest in cloud computing and data protection!


How to Set Up AWS GuardDuty Malware/Virus Protection for S3

· 11 min read

In today's digital landscape, protecting your data from malware and other malicious threats is essential to maintaining the integrity of your organization's infrastructure and reputation. AWS GuardDuty has introduced a new feature specifically designed to detect and protect against malware in Amazon S3. In this blog, we will walk you through how to set up and use this feature to safeguard your S3 objects.


Why Use GuardDuty Malware Protection for S3?


Traditionally, malware protection for AWS services was managed using third-party tools or custom applications. While tools like SonarQube and Cloud Storage Security were effective, there was a need for a more integrated solution directly within AWS. GuardDuty's new malware protection feature for S3 fills this gap by providing comprehensive protection that integrates seamlessly into your AWS environment.


Benefits of AWS GuardDuty Malware Protection for S3


  • Integrated Threat Detection: Directly built into AWS, it eliminates the need for third-party malware protection tools.
  • Automated Threat Response: Automatically scans new objects uploaded to S3 and flags any suspicious files.
  • Centralized Management: Allows for organization-wide deployment and control, reducing the risk of human error.
  • Cost-Effective: Currently offers a 12-month free tier for scanning new files, encouraging users to adopt the service.

Getting Started with GuardDuty Malware Protection


Step 1: Enable GuardDuty in Your AWS Account


Enable GuardDuty


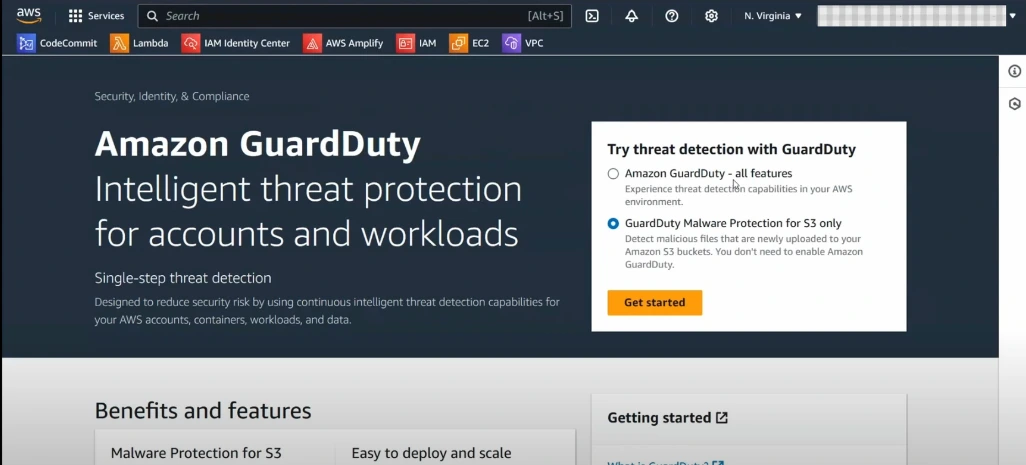
The first step is to log into your AWS account and navigate to the GuardDuty service. Since GuardDuty is region-specific, you will need to enable it for each region where you want protection. Follow these steps to enable the service:

  1. Go to the GuardDuty dashboard in your AWS console.

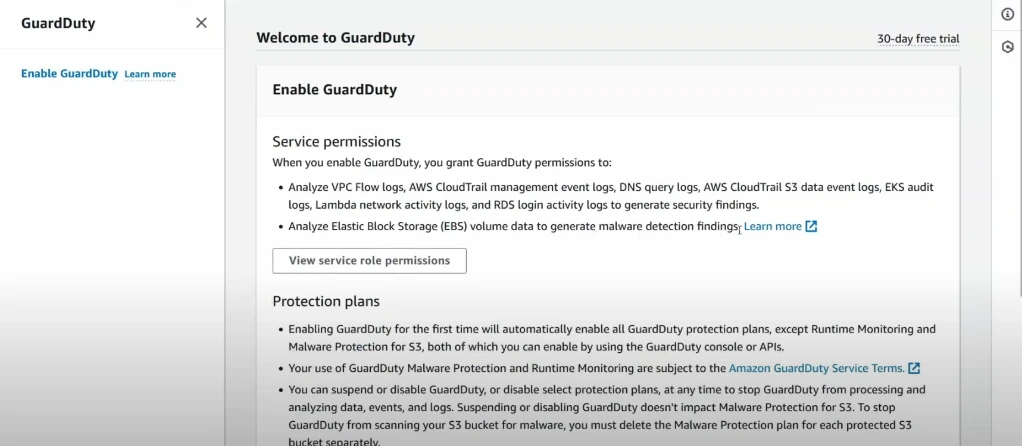
Enable GuardDuty


  1. Click on Enable GuardDuty.
  2. Choose the default settings or customize the permissions if needed.
  3. You will be offered a two-day free trial to explore the service.

Step 2: Setting Up an Organization-Wide Administrator


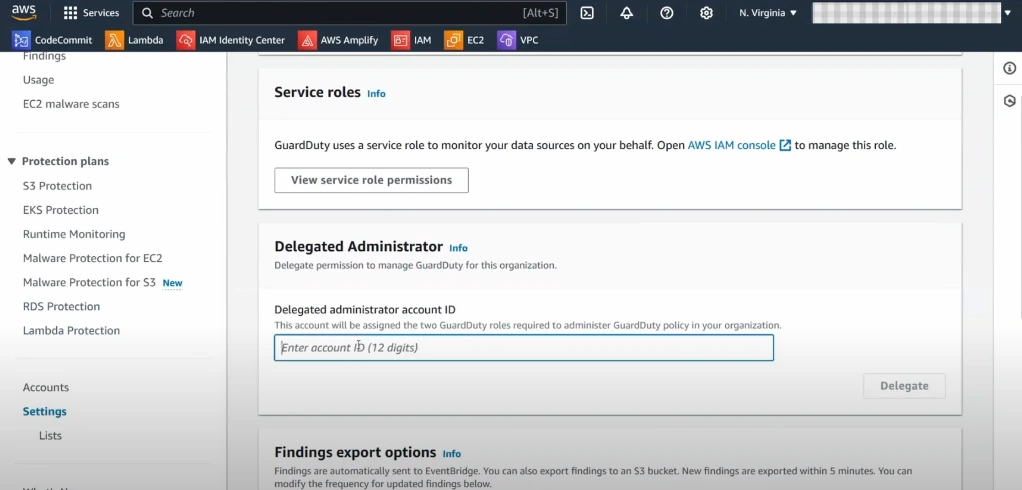
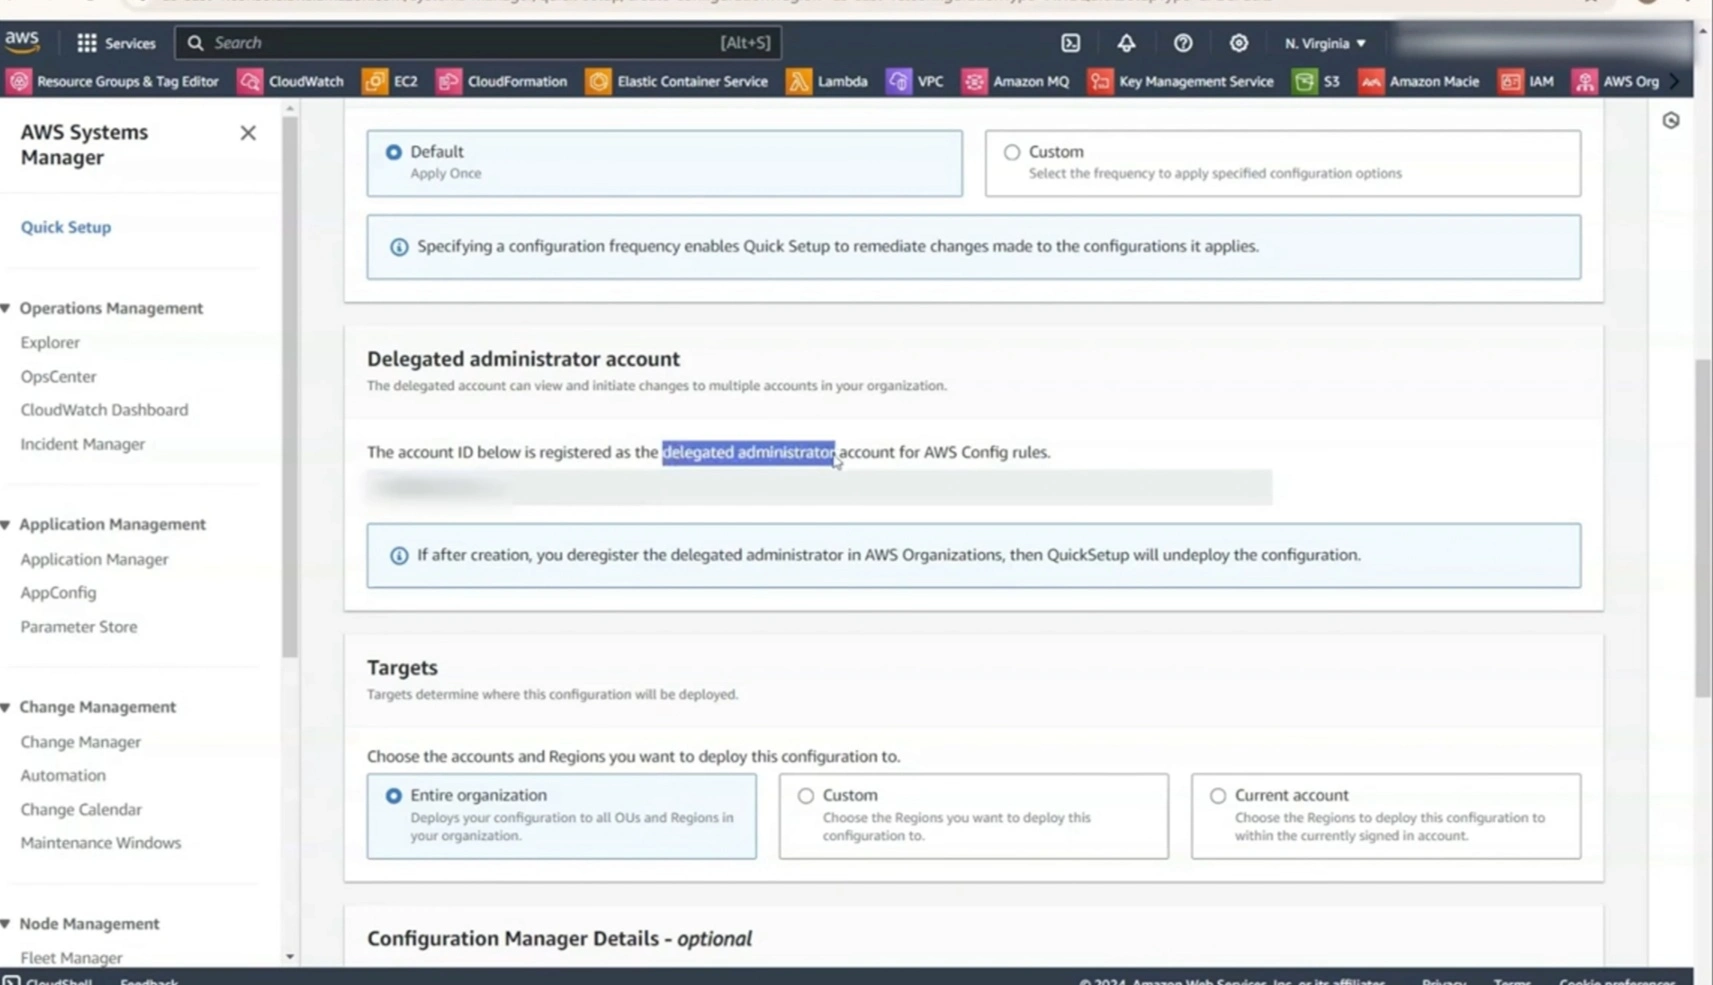
To manage GuardDuty across multiple accounts, you can set up a delegated administrator. This setup allows you to manage malware protection centrally, ensuring that any new S3 buckets created across your organization are automatically protected.

  1. Navigate to GuardDuty Settings.

Delegated Administrator


  1. Assign your AWS account as the Delegated Administrator.
  2. Ensure that all GuardDuty settings apply across the organization for a centralized approach.

Step 3: Configure EventBridge for Alerts(Optional)


When a threat is detected, you may not always have someone actively monitoring the AWS console. To ensure you receive notifications, configure AWS EventBridge to send alerts to email, SMS, Slack, or other communication tools.

  1. Open the EventBridge dashboard in your AWS console.
  2. Set up a rule to trigger alerts based on GuardDuty findings.
  3. Link this rule to your preferred notification system, such as email or a messaging app.

Here are the detailed steps for Step 4 and additional methods for ensuring malware protection when objects are uploaded to Amazon S3.


Step 4: Enable S3 Malware Protection Using AWS GuardDuty


Enabling malware protection in AWS S3 using GuardDuty involves configuring settings that automatically scan for and identify malicious files. Follow these steps to set up S3 malware protection effectively:


Enable S3 Malware


  1. Log in to AWS Console: Open the AWS Management Console and sign in with your administrator account.

  2. Navigate to GuardDuty: In the AWS Management Console, go to the Services menu and select GuardDuty under the Security, Identity, & Compliance section.

  3. Enable GuardDuty (if not already enabled):

    1. If GuardDuty is not already enabled, click on the Enable GuardDuty button.
    2. You will see a two-day free trial offered by AWS. You can start with the trial or proceed with your existing plan.

    Note S3 Malware Protection is region specific. So for each region, the service has to be enabled. And S3 Maware scanning can only scan buckets in the region and not another region.

  4. Access the GuardDuty Settings:

    1. Once GuardDuty is enabled, click on Settings in the GuardDuty dashboard.
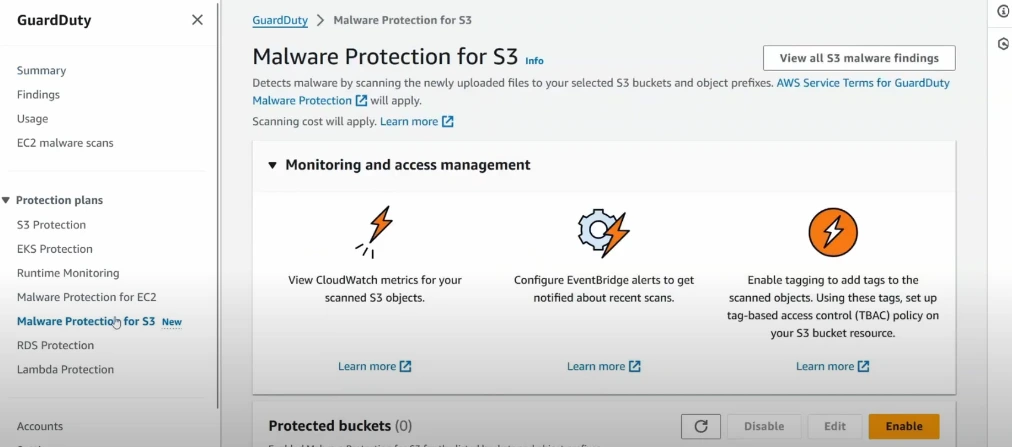
    2. Look for the section that mentions S3 Protection or Malware Protection for S3.
  5. Enable Malware Protection for S3 Buckets:

    1. Click on Enable S3 Malware Protection.
    2. You may need to specify the S3 buckets you want to protect. Select the bucket(s) where you want to enable malware protection.
    3. Ensure the S3 bucket you are protecting is in the same AWS region as the GuardDuty service.
  6. Create S3 Malware scanning role

    1. Create a role with policy similar to following:

    {
    "Version": "2012-10-17",
    "Statement": [
    {
    "Sid": "AllowManagedRuleToSendS3EventsToGuardDuty",
    "Effect": "Allow",
    "Action": [
    "events:PutRule",
    "events:DeleteRule",
    "events:PutTargets",
    "events:RemoveTargets"
    ],
    "Resource": [
    "arn:aws:events:us-east-1:<account-number>:rule/DO-NOT-DELETE-AmazonGuardDutyMalwareProtectionS3*"
    ],
    "Condition": {
    "StringLike": {
    "events:ManagedBy": "malware-protection-plan.guardduty.amazonaws.com"
    }
    }
    },
    {
    "Sid": "AllowGuardDutyToMonitorEventBridgeManagedRule",
    "Effect": "Allow",
    "Action": [
    "events:DescribeRule",
    "events:ListTargetsByRule"
    ],
    "Resource": [
    "arn:aws:events:us-east-1:<account-number>:rule/DO-NOT-DELETE-AmazonGuardDutyMalwareProtectionS3*"
    ]
    },
    {
    "Sid": "AllowPostScanTag",
    "Effect": "Allow",
    "Action": [
    "s3:PutObjectTagging",
    "s3:GetObjectTagging",
    "s3:PutObjectVersionTagging",
    "s3:GetObjectVersionTagging"
    ],
    "Resource": [
    "arn:aws:s3:::<bucket-name>/*"
    ]
    },
    {
    "Sid": "AllowEnableS3EventBridgeEvents",
    "Effect": "Allow",
    "Action": [
    "s3:PutBucketNotification",
    "s3:GetBucketNotification"
    ],
    "Resource": [
    "arn:aws:s3:::<bucket-name>"
    ]
    },
    {
    "Sid": "AllowPutValidationObject",
    "Effect": "Allow",
    "Action": [
    "s3:PutObject"
    ],
    "Resource": [
    "arn:aws:s3:::<bucket-name>/malware-protection-resource-validation-object"
    ]
    },
    {
    "Effect": "Allow",
    "Action": [
    "s3:ListBucket"
    ],
    "Resource": [
    "arn:aws:s3:::<bucket-name>"
    ]
    },
    {
    "Sid": "AllowMalwareScan",
    "Effect": "Allow",
    "Action": [
    "s3:GetObject",
    "s3:GetObjectVersion"
    ],
    "Resource": [
    "arn:aws:s3:::<bucket-name>/*"
    ]
    },
    {
    "Sid": "AllowDecryptForMalwareScan",
    "Effect": "Allow",
    "Action": [
    "kms:GenerateDataKey",
    "kms:Decrypt"
    ],
    "Resource": "arn:aws:kms:us-east-1:<account-number>:key/*",
    "Condition": {
    "StringLike": {
    "kms:ViaService": "s3.*.amazonaws.com"
    }
    }
    }
    ]
    }
    1. For each new bucket that needs to be scanned, add the bucket name following the above pattern
    2. Following should be the Role trust policy:
    {
    "Version": "2012-10-17",
    "Statement": [
    {
    "Effect": "Allow",
    "Principal": {
    "Service": "malware-protection-plan.guardduty.amazonaws.com"
    },
    "Action": "sts:AssumeRole"
    }
    ]
    }
  7. Set Up Tag-Based Access Control (Optional): To enable more detailed control over your S3 objects, configure tag-based access controls that will help you categorize and manage the scanning process.

  8. Review and Confirm the Settings:

    1. Confirm your settings by reviewing all the configurations.
    2. Click Save Changes to apply the settings.
  9. Testing the Setup:

    1. Upload a test file to your S3 bucket to see if the GuardDuty malware protection detects it.
    2. Verify that the scan results are displayed in the GuardDuty Findings dashboard, which will confirm the configuration is active.

Step 5: Test the Setup with a Sample File


Testing your setup is crucial to ensure that GuardDuty is actively scanning and detecting malware. You can use a harmless test file designed to simulate malware to see how GuardDuty responds.


EICAR


  1. Upload a benign test file from the EICAR organization, specifically designed for antivirus testing.
  2. GuardDuty should detect this file and classify it as a threat.
  3. Check the GuardDuty findings to confirm that the detection process is working as expected.

Step 6: Review GuardDuty Findings


GuardDuty Findings


The GuardDuty dashboard provides a clear view of all security findings, including details about detected threats. This is where you can monitor the state of your S3 objects and identify any security risks.

  1. Navigate to the Findings section in GuardDuty.
  2. Review each finding to understand the severity and nature of the threat.
  3. Use the information to make informed decisions about your security posture.

Step 7: Continuous Monitoring and Alerting


To ensure that you always stay on top of potential threats, configure continuous monitoring and alerts:

  1. Set up rules in EventBridge to send notifications whenever a new threat is detected.
  2. Export findings to an S3 bucket or a centralized monitoring system if needed.
  3. Regularly review your GuardDuty setup to incorporate any new AWS security features.

Best Practices for S3 Malware Protection


  • Enable GuardDuty across all regions: Malware protection needs to be enabled in every region where you store S3 data to avoid vulnerabilities.
  • Use tag-based access controls: This allows you to apply security policies more precisely to different S3 objects.
  • Centralize management: Use a delegated administrator account to manage all GuardDuty settings for better efficiency and control.
  • Test regularly: Periodically upload test files to ensure that your malware detection setup is functioning correctly.

Additional Methods for Ensuring Malware Protection on S3


Apart from using AWS GuardDuty, there are other methods to ensure that objects uploaded to S3 are scanned for malware and viruses to protect your infrastructure.


Method 1: Use AWS Lambda with Antivirus Scanning


  1. Set Up AWS Lambda Function:

    • Create an AWS Lambda function that triggers automatically whenever a new object is uploaded to the S3 bucket.
    • Configure the Lambda function to perform antivirus scanning using an open-source antivirus tool like ClamAV.
  2. Create an S3 Trigger:

    • Set up an S3 event trigger to call the Lambda function whenever a file is uploaded to the S3 bucket.
  3. Configure Antivirus Scanning Logic:

    • The Lambda function should download the object, run the ClamAV scan, and determine if the file is infected.
    • If a threat is detected, the Lambda function can delete the file or quarantine it for further analysis.
  4. Notify the Administrator:

    • Use AWS Simple Notification Service (SNS) to send an alert to the system administrator whenever malware is detected.

Method 2: Integrate with Third-Party Security Tools


  1. Choose a Third-Party Security Tool:

    • Use third-party services like Cloud Storage Security or Trend Micro Cloud One that specialize in malware detection and data protection.
  2. Set Up Integration with S3:

    • Configure the third-party service to automatically scan new objects uploaded to your S3 bucket.
    • Follow the provider's specific guidelines to integrate the service with your AWS account.
  3. Monitor and Manage Alerts:

    • Set up alerts for any suspicious activity or identified threats using the third-party tool's notification features.
    • Maintain a security dashboard to track malware detection events.

Method 3: Implement an Intrusion Detection System (IDS)


  1. Deploy an IDS Tool:

    • Use intrusion detection systems like AWS Network Firewall or Snort to monitor traffic and identify malicious activities targeting your cloud environment.
  2. Monitor S3 Traffic:

    • Configure the IDS to inspect traffic to and from your S3 buckets for signs of malware or unauthorized data transfer.
  3. Automate Responses:

    • Automate responses to potential threats detected by the IDS, such as blocking malicious IP addresses or disabling compromised user accounts.

Summary of Methods

MethodDescriptionTools Needed
AWS GuardDutyBuilt-in malware detection for S3 using GuardDuty.AWS GuardDuty, S3, IAM
AWS Lambda with ClamAVLambda triggers antivirus scans on new S3 uploads.AWS Lambda, S3, ClamAV, SNS
Third-Party Security ToolsUses external tools for malware protection.Cloud Storage Security, Trend Micro, AWS S3
Intrusion Detection SystemMonitors traffic and detects threats in real-time.AWS Network Firewall, Snort, AWS CloudTrail

These methods provide a multi-layered approach to protect your S3 buckets from malware threats, ensuring the safety of your data and maintaining your organization's security posture.


Conclusion


AWS GuardDuty's malware protection for S3 is a powerful tool to enhance your cloud security. Its seamless integration with AWS services, combined with automated threat detection and centralized management, makes it an essential part of any organization's security strategy. Set up GuardDuty today and ensure that your S3 buckets are protected from potential malware threats.


🔚 Call to Action


Choosing the right platform depends on your organizations needs. For more insights, subscribe to our newsletter for insights on cloud computing, tips, and the latest trends in technology. or follow our video series on cloud comparisons.


Interested in having your organization setup on cloud? If yes, please contact us and we'll be more than glad to help you embark on cloud journey.


💬 Comment below:
Which tool is your favorite? What do you want us to review next?

Mastering AWS Organization-Wide Config: Streamline Compliance with AWS Policies and Systems Manager

· 6 min read

Managing multiple AWS accounts within an organization can be challenging, particularly when it comes to applying consistent configurations, security policies, and compliance rules across various accounts. AWS Config is an invaluable service for monitoring and assessing how resources comply with internal best practices and AWS guidelines. However, deploying AWS Config across an organization can quickly become overwhelming when working with numerous accounts.

In this blog post, we will guide you through setting up AWS Config for your organization, ensuring a centralized configuration process. This setup eliminates the need for manual configurations in each account, streamlining management and enhancing security.


What is AWS Config?


AWS Config.webp)


AWS Config is a service that allows you to assess, audit, and evaluate the configurations of your AWS resources. It simplifies compliance auditing, security analysis, resource change tracking, and troubleshooting. AWS Config continuously monitors and records your AWS resource configurations, allowing you to compare the current state of resources against desired configurations or rules.


Why Set Up AWS Config Across an Organization?

While setting up AWS Config for individual accounts is straightforward, managing a large organization with numerous accounts can become complex. This is where AWS Config's organization-level setup comes into play. With this setup, you can ensure that the entire organization follows a standardized configuration policy, saving time and effort in managing each account manually.

Some benefits of organization-level AWS Config include:

  • Centralized control over security configurations
  • Reduced risk of configuration drift
  • Cost savings by avoiding redundant rules across accounts
  • Enhanced visibility into compliance status across all accounts

Step-by-Step Guide to Setting Up AWS Config for Your Organization


Delegated Admin Account


1. Create a Delegated Admin Account

The first step is to create a dedicated admin account. This will be the central management point for your organization. The delegated admin will handle the configuration of AWS Config across all accounts.

  • Sign in to your AWS Management Console.
  • Navigate to the AWS Config console.
  • Select the account that will act as your management account. This account will manage all configurations across the organization.

2. Access the Management Account

Once the delegated admin is defined, log into the management account.

  • Open AWS Systems Manager.

  • Quick Setup

  • Go to the Quick Setup section.

  • Conformance Packs

  • Under the configuration type, choose Conformance Packs. These packs contain sets of AWS Config rules designed for specific security and compliance purposes.

3. Deploy Conformance Packs

Conformance Packs


Conformance packs are pre-built or custom collections of AWS Config rules that ensure compliance with AWS best practices and security frameworks, such as CIS (Center for Internet Security) benchmarks or NIST (National Institute of Standards and Technology) guidelines.

  • From the conformance packs section, choose the relevant pack for your organization. For example, you can select packs for security best practices for services like EC2 and S3.
  • Customize the conformance pack to match your organizations needs. If multiple rules across different conformance packs overlap, you can create a custom pack to avoid redundancy and unnecessary costs.

4. Create Aggregators for Organization-Wide Monitoring

Create Aggregators


Once the conformance packs are deployed, you will need to create aggregators to collect compliance data from across the organization. Aggregators allow you to view resource configurations and compliance status from a single point, regardless of how many accounts you are managing.

  • In AWS Config, create an aggregator for your organization.
  • Select Organization Aggregator and specify the organizations root account.
  • Choose the regions you want to monitor, depending on where your AWS resources are deployed.

5. Monitor Compliance Across All Accounts

Compliance


After deploying the conformance packs and setting up the aggregators, you can begin monitoring the compliance status of each account.

  • In AWS Config, navigate to the Config Aggregator dashboard.
  • Here, you will see all your accounts and their compliance statuses based on the conformance packs you've deployed.
  • Identify which accounts are compliant or non-compliant. You can further drill down to see which specific resources or rules are causing compliance issues.

6. Cost Optimization with Custom Conformance Packs

Each rule evaluation within a conformance pack has associated costs. To ensure you're not overspending on redundant evaluations, its crucial to create custom conformance packs that only include necessary rules.

  • Evaluate your organizations needs and remove any redundant rules across multiple services.
  • Focus on creating conformance packs tailored to specific services your organization uses, such as EC2 or CloudFront, to avoid unnecessary charges.

7. Automate Regular Compliance Checks

You can automate the compliance evaluation process by scheduling regular checks. AWS Config allows you to set up these evaluations as per your organizations needs, ensuring that all accounts adhere to security and best practice guidelines.

  • Set up recurring evaluations based on your organizations compliance requirements.
  • Use Systems Manager to schedule and monitor these checks.

Conclusion

Setting up AWS Config across an entire organization may seem daunting, but the process is streamlined by using delegated admin accounts, conformance packs, and aggregators. By deploying custom conformance packs, you ensure that each account follows the organization's best practices, reducing both security risks and costs associated with redundant rule evaluations.


Remember, AWS Config helps centralize management, simplifies compliance, and gives you a comprehensive view of your resources across all AWS accounts. Implementing it at the organizational level empowers your team to maintain a secure and efficient cloud environment.

Refer Cloud Consulting
Ready to take your cloud infrastructure to the next level? Please reach out to us Contact Us

AWS RDS Backup Retention: How to Retain MySQL & PostgreSQL Database Data for Over 35 Days

· 6 min read

In today's fast-paced digital landscape, data is one of the most valuable assets a business can possess. Protecting this data is critical, and one of the key aspects of data protection is implementing a robust backup strategy. For those leveraging AWS Relational Database Service (RDS), this post will walk through extending the backup retention period beyond the default settings, which is crucial for organizations that require longer retention periods for compliance, disaster recovery, or data archival purposes.

Why are Backups Important?

Before diving into the technical aspects, it's essential to understand the importance of database backups. A solid backup strategy ensures your data is protected against the following:

  • Accidental deletions (caused by human error, also known as "fat-finger" mistakes)
  • Hardware failures
  • Data corruption
  • Natural disasters or regional failures

The primary goal of backups is to ensure that you can restore your database and minimize downtime when unforeseen issues arise.

AWS RDS Backup Overview

AWS RDS

AWS Relational Database Service (RDS) provides a managed database platform that takes care of routine database management tasks, including backups. RDS offers two types of backups:

  1. Automated Backups: These are managed by RDS and are automatically scheduled, providing point-in-time recovery capabilities.
  2. Manual Snapshots: You can manually create snapshots of your database at any point. Unlike automated backups, manual snapshots persist until explicitly deleted by the user.
Manual Snapshots

By default, RDS allows a maximum retention period of 35 days for automated backups. However, certain businesses may need to retain backups for six months or even longer due to compliance requirements or operational policies.

Default Retention Period in RDS

Retention Period

The default retention period for automated backups is up to 35 days. This is an important consideration when planning a backup strategy since retaining backups for longer periods will require custom configurations. This can be particularly challenging if you're using AWS services like RDS, where built-in functionalities have preset limits.

But don't worry, there's a way to configure your backups for longer retention periods without needing to create custom solutions involving complex automation or Lambda functions.

Extending Backup Retention with AWS Backup Service

To extend the retention period beyond the default 35 days in RDS, we can use AWS Backup, a centralized backup service that allows you to create, manage, and automate backups for various AWS services, including RDS. AWS Backup enables you to retain your backups for months or even years, and it provides additional features such as cross-region replication.

Step-by-Step Guide: Extending RDS Backup Retention Period

  1. Access AWS Backup Service: Begin by logging into the AWS Console and navigating to the AWS Backup Service.

  2. Create a Backup Plan: You will need to create a backup plan tailored to your organization's requirements. In this case, we'll create a plan to retain backups for more than 35 days (e.g., 90 days or longer).

    • Go to the “Backup Plans” section and create a new plan.
    • Set a name for your plan, such as “RDS_Backup_90_Day_Retention.”
    • Choose the backup frequency and retention period. For example, you can set a daily backup schedule with a 90-day retention period.
  3. Configure Continuous Backup: AWS Backup allows you to enable continuous backups for supported services like RDS. This feature ensures that your backups are constantly updated, and you can restore to any point in time.

    • Choose “Enable Continuous Backup.”
    • Set the backup policy, including the lifecycle management and retention period for your snapshots. This could be set to 90 days or even longer based on your requirements.
  4. Assign Resources: After defining the backup plan, assign the appropriate resources (in this case, your RDS databases).

    • Under “Resource Assignment,” specify the RDS instances you want to include in this backup plan.
    • Ensure that the correct region and database instances are selected.
  5. Verify Backup Job: Once your plan is in place, the system will start backing up your RDS instances according to the defined schedule and retention policy.

    • You can monitor the progress of your backup jobs in the “Backup Jobs” section. Here, you'll be able to see when jobs are completed, their size, and their retention policies.
  6. Cross-Region Replication (Optional): If you need to ensure that your backups are stored in another AWS region (for disaster recovery or compliance reasons), you can enable cross-region replication. This feature allows you to copy your backups to another AWS region, adding another layer of redundancy and protection.

  7. Security Considerations: It's important to ensure that your backups are secure. Here are a few best practices:

    • Encryption: Ensure that your RDS snapshots are encrypted using AWS-managed or customer-managed encryption keys (CMKs).
    • Access Controls: Set the appropriate AWS Identity and Access Management (IAM) policies to control who can create, delete, and restore backups.

Common Challenges and Solutions

While AWS Backup provides a comprehensive solution, there are a few limitations:

  1. Costs: If you enable continuous backups and retain them for extended periods, the storage costs could increase. However, AWS provides tiered pricing, which could help mitigate costs for long-term storage.
  2. Retention Limits: While AWS Backup allows you to retain backups for extended periods, it's important to consider that this requires proper resource management to avoid overspending on storage.

Conclusion

Extending your backup retention period beyond the default 35 days in AWS RDS can be crucial for businesses with compliance or operational needs. By leveraging AWS Backup, you can implement a flexible, secure, and scalable backup strategy that goes beyond the default settings without the need for complex workarounds or custom solutions. Proper configuration and ongoing monitoring of your backup jobs can ensure that your data is protected and recoverable in the event of any disaster or accidental deletion.

If you need further guidance or face any specific challenges while setting up your backups, feel free to reach out or drop a comment, and we'll be happy to help!

Refer Cloud Consulting

Ready to take your cloud infrastructure to the next level? Please reach out to us Contact Us

Call to Action

Choosing the right platform depends on your organizations needs. For more insights, subscribe to our newsletter for insights on cloud computing, tips, and the latest trends in technology. or follow our video series on cloud comparisons.

Interested in setting up the right database architectgure? Please contact us and we'll be more than glad to help you embark on not only setting up the right architecture but also provide roadmap to long term success.

Step-by-Step Guide: Install and Configure GitLab on AWS EC2 | DevOps CI/CD with GitLab on AWS

· 6 min read

Introduction

This document outlines the steps taken to deploy and configure GitLab Runners, including the installation of Terraform, ensuring that the application team can focus solely on writing pipelines.

Architecture

The following diagram displays the solution architecture.

Architecture

AWS CloudFormation is used to create the infrastructure hosting the GitLab Runner. The main steps are as follows:

  1. The user runs a deploy script to deploy the CloudFormation template. The template is parameterized, and the parameters are defined in a properties file. The properties file specifies the infrastructure configuration and the environment in which to deploy the template.
  2. The deploy script calls CloudFormation CreateStack API to create a GitLab Runner stack in the specified environment.
  3. During stack creation, an EC2 autoscaling group is created with the desired number of EC2 instances. Each instance is launched via a launch template created with values from the properties file. An IAM role is created and attached to the EC2 instance, containing permissions required for the GitLab Runner to execute pipeline jobs. A lifecycle hook is attached to the autoscaling group on instance termination events, ensuring graceful instance termination.
  4. During instance launch, GitLab Runner will be configured and installed. Terraform, Git, and other software will also be installed as needed.
  5. The user may repeat the same steps to deploy GitLab Runner into another environment.

Infrastructure Setup with CloudFormation

Customizing the CloudFormation Template

The initial step in deploying GitLab Runners involved setting up the infrastructure using AWS CloudFormation. The standard CloudFormation template was customized to fit the unique requirements of the environment.

CloudFormation Template Location: GitLab Runner Template

CloudFormation Template Location: GitLab Runner Scaling Group / Cluster Template

For any automation requirement or issues, please reach out to us Contact Us

Parameters used:

Parameters

Deploying the CloudFormation Stack

To deploy the CloudFormation stack, use the following command. This command assumes you have AWS CLI configured with the appropriate credentials:

aws cloudformation create-stack --stack-name amazon-ec2-gitlab-runner-demo1 --template-body file://gitlab-runner.yaml --capabilities CAPABILITY_NAMED_IAM

To update the stack, use the following command:

aws cloudformation update-stack --stack-name amazon-ec2-gitlab-runner-demo1 --template-body file://gitlab-runner.yaml --capabilities CAPABILITY_NAMED_IAM

This command will provision a CloudFormation stack similar to table shown below:

Logical IDPhysical IDType
ASGBucketPolicyarn:aws:iam::your-account-id:policy/amazon-ec2-gitlab-runner-RnrASG-1TE6FTX28FEDB-ASGBucketPolicyAWS::IAM::ManagedPolicy
ASGInstanceProfileamazon-ec2-gitlab-runner-RnrASG-1TE6FTX28FEDB-ASGInstanceProfile-MM31yammSlL2AWS::IAM::InstanceProfile
ASGLaunchTemplatelt-0ae6b1f22e6fb59d3AWS::EC2::LaunchTemplate
ASGRebootRoleamazon-ec2-gitlab-runner-RnrASG-1TE6F-ASGRebootRole-qY5TrCFgM17ZAWS::IAM::Role
ASGSelfAccessPolicyarn:aws:iam::your-account-id:policy/amazon-ec2-gitlab-runner-RnrASG-1TE6FTX28FEDB-ASGSelfAccessPolicyAWS::IAM::ManagedPolicy
CFCustomResourceLambdaRoleamazon-ec2-gitlab-runner CFCustomResourceLambdaRol-QGhwhUWsmzOsAWS::IAM::Role
EC2SelfAccessPolicyarn:aws:iam::your-account-id:policy/amazon-ec2-gitlab-runner-RnrASG-1TE6FTX28FEDB-EC2SelfAccessPolicyAWS::IAM::ManagedPolicy
InstanceASGamazon-ec2-gitlab-runner-RnrASG-1TE6FTX28FEDB-InstanceASG-o3DHi2HsGB7YAWS::AutoScaling::AutoScalingGroup
LookupVPCInfo2024/08/09/[$LATEST]74897306b3a74abd98a9c637a27c19a7Custom::VPCInfo
LowerCasePlusRandomLambdaamazon-ec2-gitlab-runner LowerCasePlusRandomLambd-oGUYEJJRIG0OAWS::Lambda::Function
S3BucketNameLower2024/08/09/[$LATEST]e3cb7909bd224ab594c81514708e7827Custom::Lowercase
VPCInfoLambdaamazon-ec2-gitlab-runner-RnrASG-1TE6-VPCInfoLambda-kL65a1M75SYRAWS::Lambda::Function

Shell-Based Installation Approach

Rather than using Docker, in your environment, you can use Shell (kernel) for installing GitLab Runner and Terraform directly on the EC2 instances. Using shell rather than container provides the following benefits:

  • Simpler Debugging: Direct installation via shell scripts simplifies the debugging process. If something goes wrong, engineers can SSH into the instance and troubleshoot directly rather than dealing with Docker container issues.
  • Performance Considerations: Running the runner directly on the EC2 instance reduces the overhead introduced by containerization, potentially improving performance.

Installation Commands

Below are the key commands used in the shell script for installing GitLab Runner and Terraform:

#!/bin/bash
# Update and install necessary packages
yum update -y
yum install -y amazon-ssm-agent git unzip wget jq

# Install Terraform
wget https://releases.hashicorp.com/terraform/1.0.11/terraform_1.0.11_linux_amd64.zip
unzip terraform_1.0.11_linux_amd64.zip
mv terraform /usr/local/bin/

# Install GitLab Runner
sudo curl -L --output /usr/local/bin/gitlab-runner https://gitlab-runner-downloads.s3.amazonaws.com/latest/binaries/gitlab-runner-linux-amd64
sudo chmod +x /usr/local/bin/gitlab-runner
sudo useradd --comment 'GitLab Runner' --create-home gitlab-runner --shell /bin/bash
sudo gitlab-runner install --user=gitlab-runner --working-directory=/home/gitlab-runner
sudo gitlab-runner start

# Source GitBash
echo 'export PATH=$PATH:/home/gitlab-runner' >> ~/.bashrc
source ~/.bashrc

Configuration and Usage

Registering the GitLab Runner

Once the GitLab Runner is installed, it needs to be registered with your GitLab instance. This process can be automated or done manually. Below is an example of how you can register the runner using the gitlab-runner register command:

gitlab-runner register \
--non-interactive \
--url "https://gitlab.com/" \
--registration-token "YOUR_REGISTRATION_TOKEN" \
--executor "shell" \
--description "GitLab Runner" \
--tag-list "shell,sgkci/cd" \
--run-untagged="true" \
--locked="false"

A simple command:

sudo gitlab-runner register --url https://gitlab.com/ --registration-token <Your registration token>

Example:
sudo gitlab-runner register --url https://gitlab.com/ --registration-token GR1348941Du4BazUzERU5M1m_LeLU

This command registers the GitLab Runner to your GitLab project, allowing it to execute CI/CD pipelines directly on the EC2 instance using the shell executor.

Attaching Runner to GitLab Repo

Attaching Runner

Navigate to RepoSettingsCI/CD. Your runner should show up. Click "Enable for this project," after which the runner should be visible.

Note: To ensure that the runner picks up your job, ensure that the right tag is in place, and you may need to disable the Instance Runners.


🔚 Call to Action

Choosing the right platform depends on your organizations needs. For more insights, subscribe to our newsletter for insights on cloud computing, tips, and the latest trends in technology. or follow our video series on cloud comparisons.

Interested in having your organization setup on cloud? If yes, please contact us and we'll be more than glad to help you embark on cloud journey.

💬 Comment below:
Which tool is your favorite? What do you want us to review next?