20 posts tagged with "Azure"

View All Tags

Azure vs AWS vs Oracle Cloud Infrastructure (OCI): Service Mapping - Part 2

· 9 min read
Cloud & AI Engineering
Arina Technologies
Cloud & AI Engineering

In today's cloud-dominated landscape, understanding how leading providers like Azure, AWS, and OCI handle various services is essential. This blog provides service comparison, highlighting key similarities and differences across these platforms. Whether you are selecting a cloud platform or optimizing your current infrastructure, this guide will help clarify how each provider operates.


Refer Azure vs AWS vs Oracle Cloud Infrastructure (OCI): Accounts, Tagging and Organization Part 1


Introduction to Service Mapping


Cloud service mapping involves understanding how providers offer comparable services under different names, features, and configurations. Here, we compare virtual machines (VMs), Kubernetes, bare-metal hosting, and serverless functions, offering a detailed breakdown of how they function in Azure, AWS, and OCI.


ServicesAmazon Web ServicesAzureOracle Cloud InfrastructureComments
Object StorageAmazon Simple Storage Service (S3)Blob StorageObject StorageObject storage manages data as discrete units (objects) with associated metadata and unique identifiers, offering scalable and durable storage for unstructured data like documents, images, and backups.
Archival StorageAmazon S3 GlacierBlob Storage (archive access tier)Archive StorageArchival storage is a cost-effective solution for storing infrequently accessed or long-term data, optimized for durability and retrieval over extended periods.
Block StorageAmazon Elastic Block Store (EBS)Managed disksBlock VolumesBlock storage provides raw storage volumes that are divided into fixed-size blocks, allowing for high-performance and flexible storage solutions, typically used for databases and virtual machines.
Shared File SystemAmazon Elastic File SystemAzure FilesFile StorageA shared file system allows multiple users or systems to access and manage the same file storage simultaneously, enabling collaborative work and data consistency across different environments.
Bulk Data TransferAWS SnowballImport/Export Azure Data BoxData Transfer ApplianceBulk data transfer refers to the process of moving large volumes of data between storage systems or locations in a single operation, often using specialized tools or services to ensure efficiency and reliability.
Hybrid Data MigrationAWS Storage GatewayStorSimpleOCIFS (Linux)Hybrid data migration involves transferring data between on-premises systems and cloud environments, leveraging both local and cloud-based resources to ensure a seamless, integrated data transition.

Virtual Machine (VM) Setup


Multi-Tenant VMs


Multi-tenant VMs allow multiple users to share physical hardware while maintaining logical isolation.


  1. AWS: EC2 instances offer scalable VMs with diverse configurations for various workloads.
  2. Azure: Virtual Machines integrate seamlessly with Azure services, offering customizable setups.
  3. OCI: Virtual Machine instances provide cost-effective compute with flexible configurations.

Steps to Create Multi-Tenant VMs:


  1. AWS: Use the EC2 dashboard, select an AMI, configure instance size, and set up networking and security groups.
  2. Azure: Go to "Create a VM," define configurations like image type, disk size, and networking.
  3. OCI: Navigate to "Compute," select a compartment, choose a shape (VM size), and configure VCN (Virtual Cloud Network).

Single-Tenant VMs


Single-tenant VMs provide dedicated physical servers, ensuring better isolation and performance.


  1. AWS: Offers Dedicated Instances for specific accounts.
  2. Azure: Provides Dedicated Hosts for isolated workloads.
  3. OCI: Dedicated VM Hosts enable running workloads on dedicated hardware.

Steps to Create Single-Tenant VMs:


  1. AWS: Select "Dedicated Instances" during the EC2 instance setup.
  2. Azure: Search for "Dedicated Hosts," specify configurations, and assign the required VMs.
  3. OCI: Create a "Dedicated Host" and configure it similarly to a regular VM.

Bare-Metal Hosting


Bare-metal instances offer direct access to physical servers, ideal for high-performance computing or specialized workloads.


  1. AWS: EC2 Bare-Metal Instances provide complete hardware control.
  2. Azure: Bare-Metal Infrastructure supports large-scale workloads like SAP HANA.
  3. OCI: Bare-Metal Instances eliminate virtualization overhead.

Setup Process:


  1. AWS: Select bare-metal instance families during EC2 setup.
  2. Azure: Request support for bare-metal instances, configure disks, and set up networking.
  3. OCI: Choose "Bare-Metal" under shapes when creating an instance.

Kubernetes Service


Kubernetes simplifies the deployment and management of containerized applications.


  1. AWS: EKS (Elastic Kubernetes Service) integrates with ECR (Elastic Container Registry) for container orchestration.
  2. Azure: AKS (Azure Kubernetes Service) pairs with Azure Container Registry for seamless deployment.
  3. OCI: Container Engine for Kubernetes and OCI Registry enable Kubernetes management and container storage.

Setting Up Kubernetes Clusters:


  1. AWS: Use the EKS dashboard, configure clusters, and integrate with IAM roles and VPCs.
  2. Azure: Navigate to AKS, create clusters, and configure networking and policies.
  3. OCI: Go to "Kubernetes Engine," select "Quick Create" or "Custom Create," and configure resources.

Serverless Functions


Serverless computing allows event-driven architecture without the need for provisioning or managing servers.


  1. AWS: AWS Lambda executes code in response to events with no infrastructure management.
  2. Azure: Azure Functions provide scalable serverless compute with integration options like private endpoints.
  3. OCI: Functions support serverless deployments with pre-configured blueprints.

Steps to Create Functions:


  1. AWS: Use the Lambda console, select "Create Function," and choose a runtime like Python 3.13.
  2. Azure: Create a Function App, select a tier, and configure networking.
  3. OCI: Navigate to "Functions," define the application, and deploy using pre-built templates.

Key Differences and Use Cases


FeatureAWSAzureOCI
VMsEC2 with flexible instance typesHighly integrated with Azure servicesCost-effective with logical compartments
Dedicated HostingDedicated Instances/Hosts for isolationDedicated Hosts for specific workloadsDedicated VM Hosts with flexibility
Bare-MetalFull hardware control for HPC workloadsIdeal for SAP HANA and similar workloadsPowerful compute with no virtualization
KubernetesEKS + ECRAKS + Azure Container RegistryContainer Engine + OCI Registry
ServerlessLambda for event-driven architectureAzure Functions with tiered pricingFunctions with blueprint integration

Conclusion


AWS, Azure, and OCI share similar service offerings but cater to different audiences and use cases:


  1. AWS is a go-to for scalability and cutting-edge updates.
  2. Azure offers tight integration with its ecosystem, ideal for enterprises using Microsoft products.
  3. OCI provides robust solutions for Oracle-heavy environments.

Understanding these nuances will help you make informed decisions for your cloud strategy. Subscribe to our blog or newsletter for more insights and updates on cloud technology.


Call to Action Choosing the right platform depends on your organizations needs. For more insights, subscribe to our newsletter for insights on cloud computing, tips, and the latest trends in technology. or follow our video series on cloud comparisons.


Interested in having your organization setup on cloud? If yes, please contact us and we'll be more than glad to help you embark on cloud journey.

Azure vs AWS vs Oracle Cloud Infrastructure (OCI): Accounts, Tagging and Organization - Part 1

· 7 min read
Cloud & AI Engineering
Arina Technologies
Cloud & AI Engineering

As businesses increasingly rely on cloud platforms, understanding how to manage accounts, tags, and resources efficiently is critical for operational success. This blog explores how three major cloud providers— Azure, AWS, and OCI — handle account management, tagging, and resource organization.


Introduction

Choosing a cloud platform often requires a detailed understanding of its account structure, tagging capabilities, and resource organization. This guide will:


  1. Compare account management across platforms.
  2. Dive into resource grouping and tagging.
  3. Highlight key differences and use cases.

ServicesAmazon Web ServicesAzureOracle Cloud InfrastructureComments
Object StorageAmazon Simple Storage Service (S3)Blob StorageObject StorageObject storage manages data as discrete units (objects) with associated metadata and unique identifiers, offering scalable and durable storage for unstructured data like documents, images, and backups.
Archival StorageAmazon S3 GlacierBlob Storage (archive access tier)Archive StorageArchival storage is a cost-effective solution for storing infrequently accessed or long-term data, optimized for durability and retrieval over extended periods.
Block StorageAmazon Elastic Block Store (EBS)Managed disksBlock VolumesBlock storage provides raw storage volumes that are divided into fixed-size blocks, allowing for high-performance and flexible storage solutions, typically used for databases and virtual machines.
Shared File SystemAmazon Elastic File SystemAzure FilesFile StorageA shared file system allows multiple users or systems to access and manage the same file storage simultaneously, enabling collaborative work and data consistency across different environments.
Bulk Data TransferAWS SnowballImport/Export Azure Data BoxData Transfer ApplianceBulk data transfer refers to the process of moving large volumes of data between storage systems or locations in a single operation, often using specialized tools or services to ensure efficiency and reliability.
Hybrid Data MigrationAWS Storage GatewayStorSimpleOCIFS (Linux)Hybrid data migration involves transferring data between on-premises systems and cloud environments, leveraging both local and cloud-based resources to ensure a seamless, integrated data transition.

Account Management

Cloud platforms organize user access and control through accounts or subscriptions. Here's how the concept varies across the three providers:


AWS:
  1. Accounts serve as isolated environments that provide credentials and settings.
  2. Managed through AWS Organizations, allowing centralized billing and policy control.

Azure:
  1. Uses Subscriptions for resource management, analogous to AWS accounts.
  2. Supports Management Groups for hierarchical organization, enabling policy application at both parent and child levels.

OCI:
  1. Employs Tenancies, acting as the root container for resources.
  2. Supports Compartments, offering logical grouping of resources within a tenancy.

Resource Organization

Efficient resource organization ensures streamlined operations and better control over costs and security.


AWS:
  1. Resources are grouped into Resource Groups.
  2. Tags can be applied to EC2 instances, RDS databases, and more, allowing logical groupings based on attributes like environment or application type.

Azure:
  1. Resource Groups organize assets by project or application.
  2. Tags provide additional metadata for billing and tracking.

OCI:
  1. Introduced the Compartment concept, similar to resource groups in AWS/Azure.
  2. Compartments are logical containers that allow tagging for organization and access control.

Tagging Resources

Tags enable adding metadata to cloud resources for better tracking and reporting.


AWS:
  1. Tags are applied directly to resources like VMs, databases, and S3 buckets.
  2. Example: Grouping EC2 instances by environment using tags such as "Environment: Production."

Azure:
  1. Tags can be added during or after resource creation.
  2. Commonly used for cost management and reporting, e.g., tagging VMs with "Department: Finance."

OCI
  1. Tags are part of resource creation in compartments.
  2. Include attributes like region, security, and virtual private cloud (VPC) settings.

Multi-Account/Subscription Management

Handling multiple accounts is a challenge for large organizations.


AWS
  1. AWS Organizations allow managing multiple accounts under a single parent account.
  2. Supports policy application through Service Control Policies (SCPs).

Azure
  1. Management Groups facilitate organizing multiple subscriptions.
  2. Policies can be applied at root or group levels.

OCI
  1. Offers central management of tenancies and compartments.
  2. Policies and billing can be aligned across multiple subscriptions.

Best Practices

  1. Use Tags Effectively:
    1. Tags are essential for billing and operational tracking.
    2. Create a consistent tagging policy (e.g., Environment: Dev/Prod).

  1. Centralized Account Management:
    1. Use AWS Organizations, Azure Management Groups, or OCI compartments for streamlined oversight.

  1. Leverage Resource Groups:
    1. Group related resources to simplify access control and cost tracking.

  1. Apply Security Best Practices:
    1. Regularly review IAM permissions and service control policies.

Conclusion

While AWS, Azure, and OCI share similar foundational concepts for account management, resource grouping, and tagging, each platform offers unique features tailored to specific use cases.


  1. AWS is ideal for scalability and detailed control.
  2. Azure simplifies management with unified billing and hierarchical structures.
  3. OCI, with its focus on Oracle database integration, suits enterprise-grade organizations.

Call to Action Choosing the right platform depends on your organizations needs. For more insights, subscribe to our newsletter for insights on cloud computing, tips, and the latest trends in technology. or follow our video series on cloud comparisons.


Interested in having your organization setup on cloud? If yes, please contact us and we'll be more than glad to help you embark on cloud journey.

Cloud Center of Excellence: Best Practices for AWS, Azure, GCP, and Oracle Cloud

· 18 min read

In the digital age, a Center of Excellence (CoE) plays a pivotal role in guiding organizations through complex technology transformations, ensuring that they remain competitive and agile. With the expertise to foster collaboration, streamline processes, and deliver sustainable outcomes, a CoE brings together people, processes, and best practices to help businesses meet their strategic goals.


In this blog, we will explore the essentials of establishing a CoE, including definitions, focus areas, models, and practical strategies to maximize return on investment (ROI).


What is a Center of Excellence?


A Center of Excellence (CoE) is a dedicated team within an organization that promotes best practices, innovation, and knowledge-sharing around a specific area, such as cloud, enterprise architecture, or microservices. By centralizing expertise and resources, a CoE enhances efficiency, consistency, and quality across the organization, addressing challenges and promoting cross-functional collaboration.


According to Jon Strickler from Agile Elements, a CoE is "a team of people that promotes collaboration and uses best practices around a specific focus area to drive business results." This guiding principle is echoed by Mark O. George in his book The Lean Six Sigma Guide to Doing More with Less, which defines a CoE as a "team that provides leadership, evangelization, best practices, research, support, and/or training."


Why Establish a CoE?


Organizations invest in CoEs to improve efficiency, foster collaboration, and ensure that projects align with corporate strategies. By establishing a CoE, businesses can:


  1. Streamline Processes: CoEs develop standards, methodologies, and tools that reduce inefficiencies, enhancing the delivery speed and quality of technology initiatives.
  2. Enhance Learning: Through shared learning resources, training, and certifications, CoEs help team members stay current with best practices and evolving technology.
  3. Increase ROI: CoEs facilitate better resource allocation and help companies achieve economies of scale, thereby maximizing ROI.
  4. Provide Governance and Support: As an approval authority, a CoE maintains quality and compliance, ensuring that projects align with organizational values and goals.

Core Focus Areas of a CoE


CoEs can cover a variety of functions, depending on organizational needs. Typical focus areas include:


  1. Planning and Leadership: Defining the vision, strategy, and roadmap to align technology initiatives with business objectives.
  2. Guidance and Support: Creating standards, tools, and knowledge repositories to support teams throughout the project lifecycle.
  3. Learning and Development: Offering training, certifications, and mentoring to ensure continuous skill enhancement.
  4. Asset Management: Managing resources, portfolios, and service lifecycles to prevent redundancy and optimize resource utilization.
  5. Governance: Acting as the approval body for initiatives, maintaining alignment with business priorities, and coordinating across business units.

Steps to Implement a CoE


Define Clear Objectives and Roles Start by setting a clear mission and objectives that align with the organizations strategic goals. Design roles for core team members, including:


  1. Technology Governance Lead: Ensures that technology aligns with organizational goals.
  2. Architectural Standards Team: Develops and enforces standards and methodologies.
  3. Technology Champions: Subject-matter experts who provide mentorship and support.

2. Identify Success Metrics Metrics are essential for measuring a CoEs impact. Examples include:

  1. Service Metrics: Cost efficiency, development time, and defect rates.
  2. Operations Metrics: Incident response time and resolution rates.
  3. Management Metrics: Project success rates, certification levels, and adherence to standards.

3. Develop Standards and Best Practices Establish standards as a foundation for quality and efficiency. Document best practices and create reusable frameworks to ensure consistency across departments.


4. Create a Knowledge Repository A centralized knowledge hub allows easy access to documentation, tools, and other resources, promoting continuous learning and collaboration across teams.


5. Focus on Training and Certification Keeping team members updated on current best practices is crucial. Regular training and certifications validate the skills required to execute projects effectively.


Maximizing ROI with a CoE

ROI with a CoE


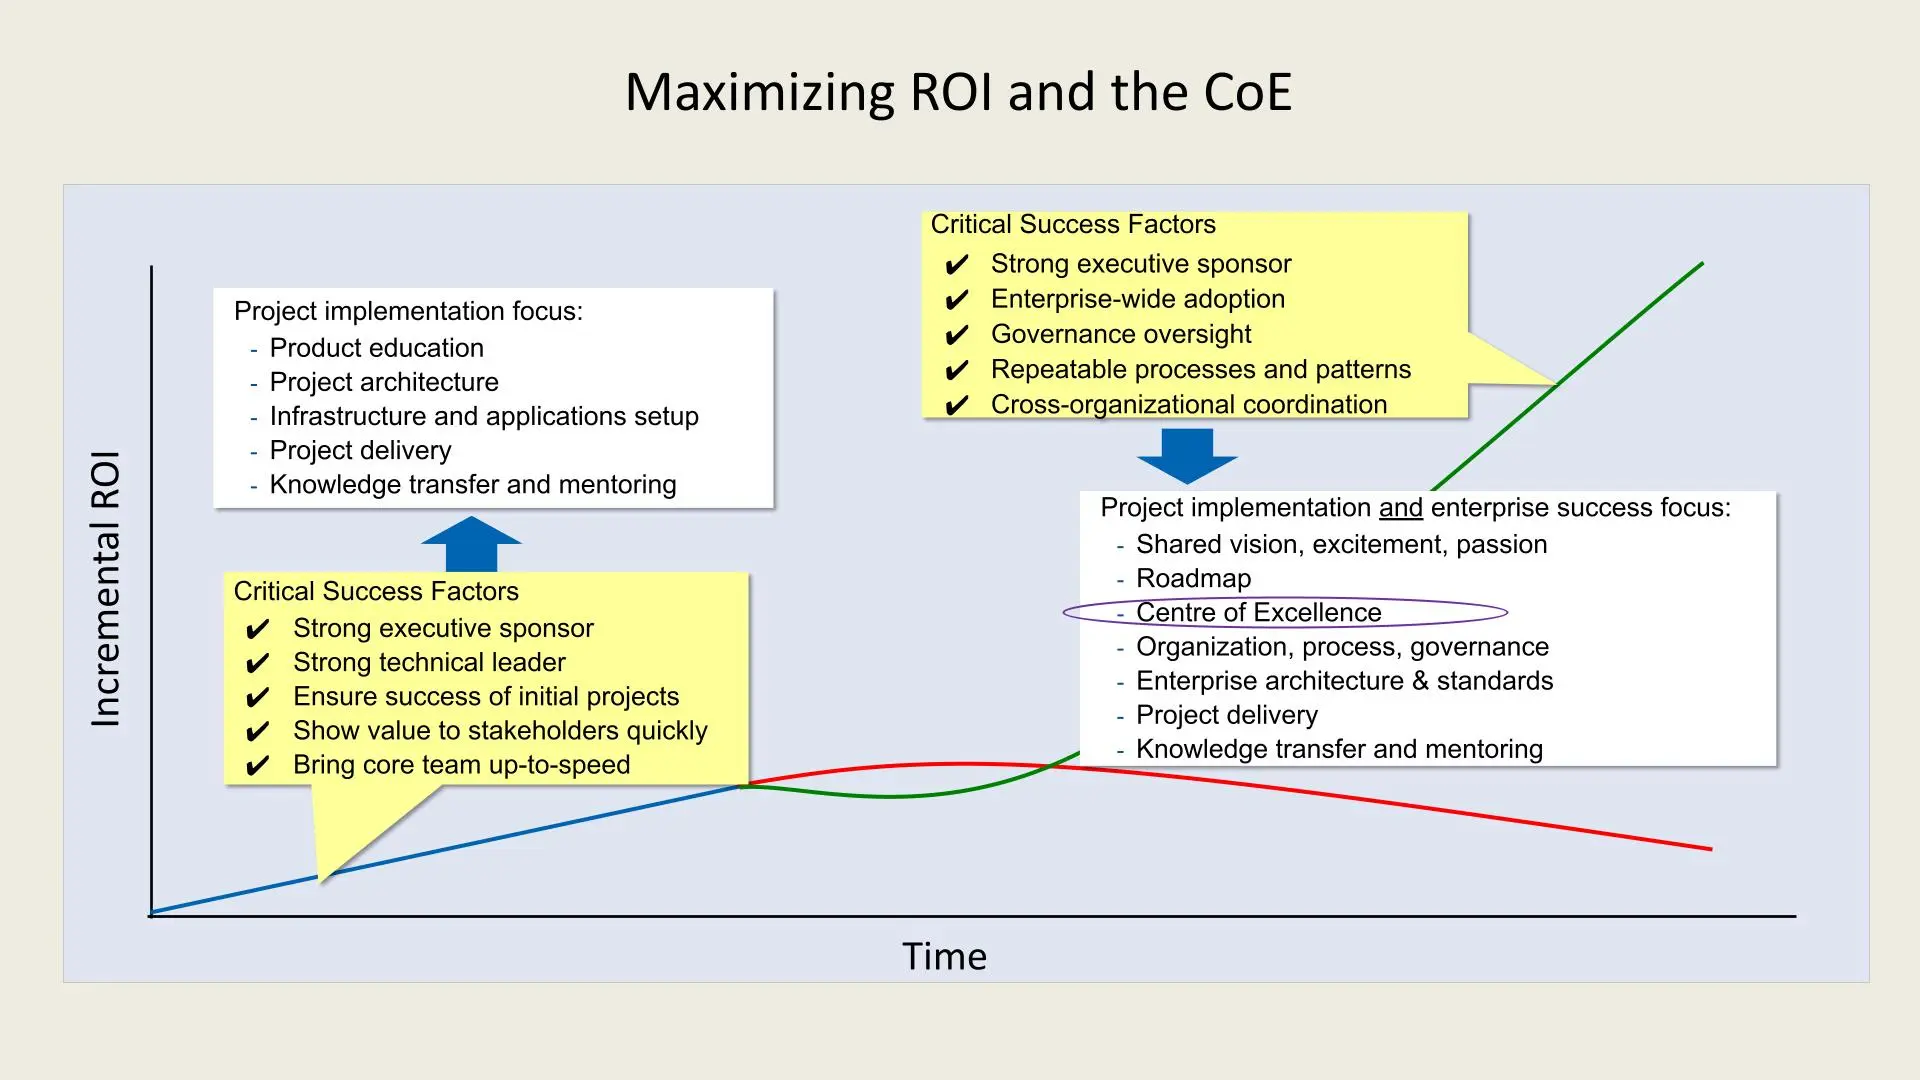
1. Project Implementation Focus:

  1. To establish a successful CoE, the initial focus must include:
  2. Product Education: Ensuring the team understands and is skilled in relevant technologies and methodologies.
  3. Project Architecture: Defining a robust architecture that can support scalability and future needs.
  4. Infrastructure and Applications Setup: Setting up reliable infrastructure and integrating applications to support organizational goals.
  5. Project Delivery: Ensuring projects are delivered on time and within budget.
  6. Knowledge Transfer and Mentoring: Facilitating the sharing of knowledge and skills across teams to build long-term capabilities.
ROI with a CoE


2. Critical Success Factors:

  1. Strong Executive Sponsor: Having a high-level executive who champions the CoE initiative is crucial for securing resources and alignment with organizational goals.
  2. Strong Technical Leader: A technically skilled leader is essential to drive the vision and make informed technical decisions.
  3. Initial Project Success: Early wins are essential to build confidence in the CoE framework and showcase its value.
  4. Value to Stakeholders: Demonstrating quick wins to stakeholders builds trust and secures continued support.
  5. Core Team Development: Bringing the core team up to speed ensures that they are equipped to handle responsibilities efficiently.

3. Scaling and Sustaining Success: Once the foundation is established, the CoE must focus on broader organizational success, including:

  1. Shared Vision and Passion: A CoE thrives when it aligns with the organization's vision and ignites excitement among team members.
  2. Roadmap Development: A clear, strategic roadmap helps the CoE stay aligned with organizational goals and adapt to changes.
  3. Cross-organizational Coordination: Ensuring collaboration and coordination across different departments fosters a cohesive approach.
  4. Governance Oversight: Governance mechanisms help standardize processes, enforce policies, and maintain quality across projects.

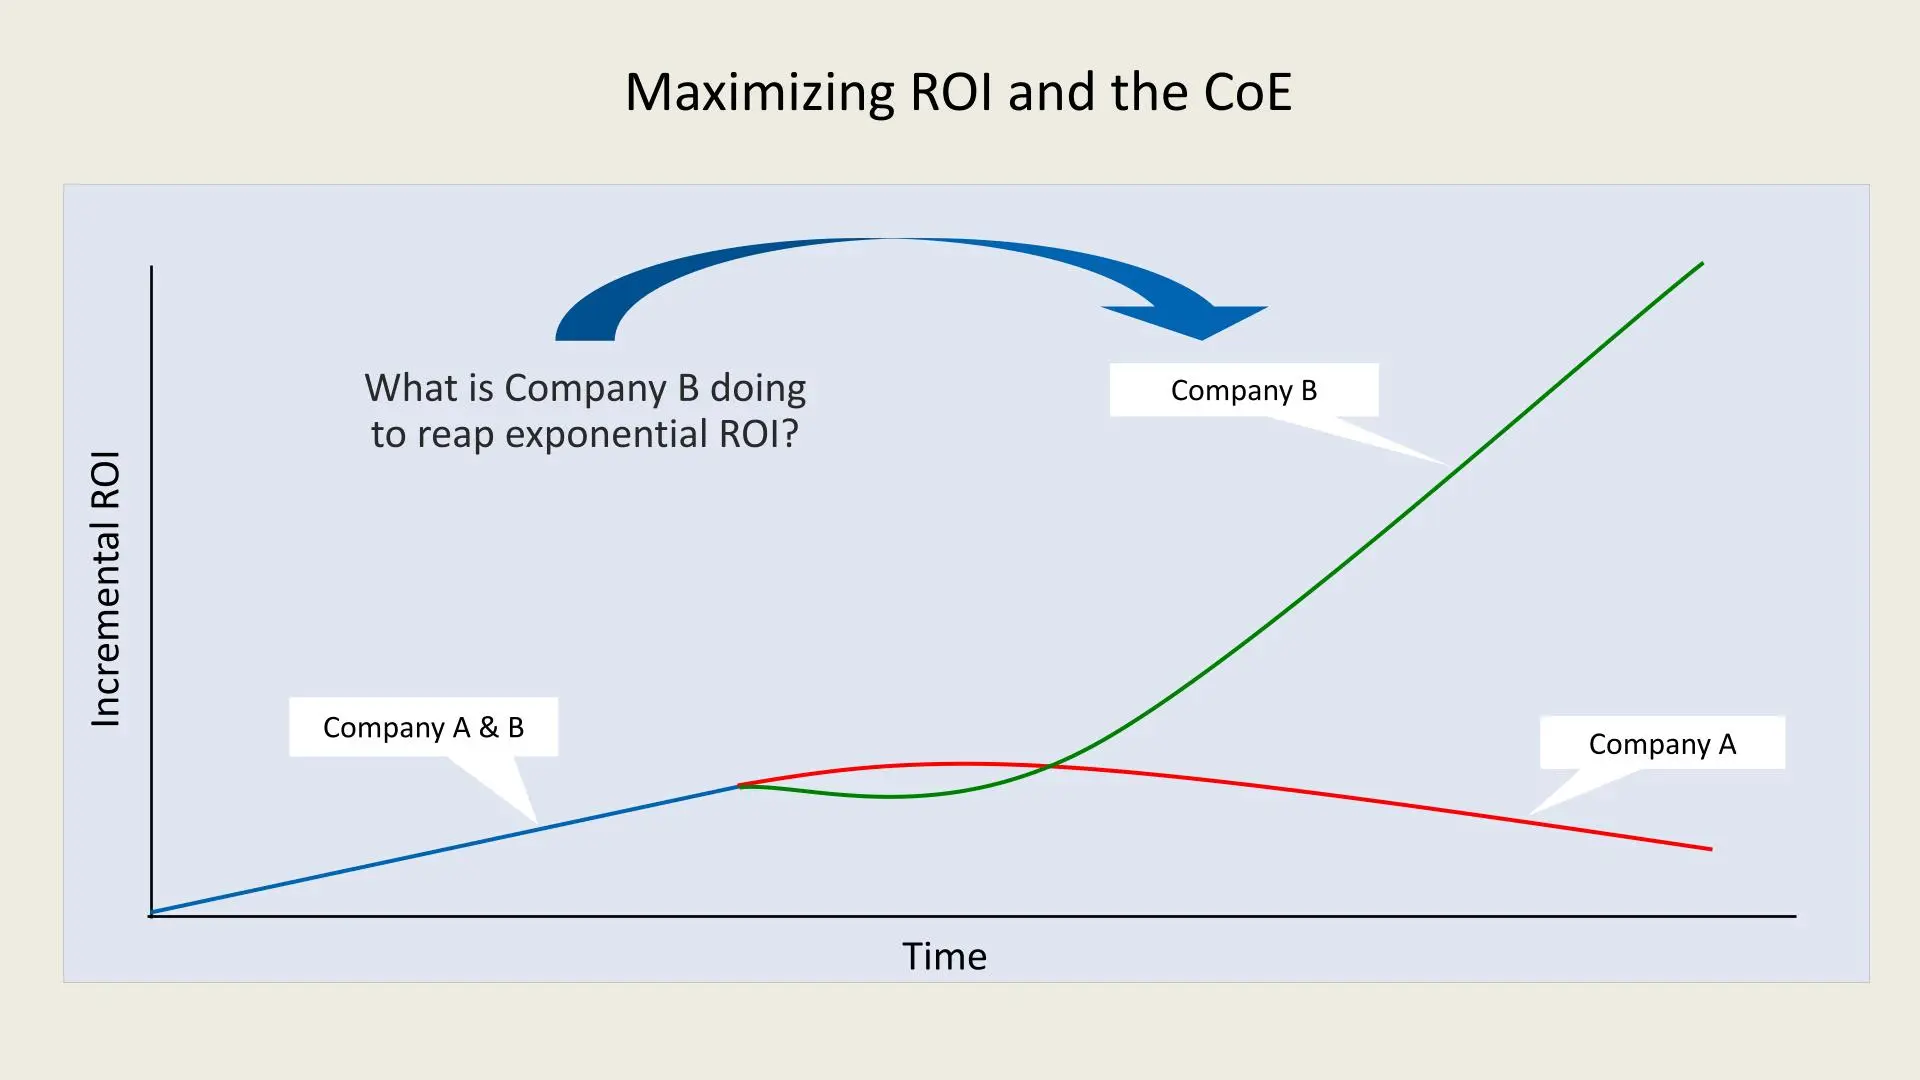
4. Long-term ROI Goals: A mature CoE leads to optimized processes, minimized costs, and significant ROI growth. By integrating repeatable processes, organizational knowledge, and governance, the CoE helps sustain performance improvement, which is reflected by the green curve in the chart.


Key Takeaways:

  1. Structured Approach: Company B benefits from a CoE that provides structure, standardized governance, and shared knowledge across projects, enabling it to scale efficiently.
  2. Exponential Growth: With a CoE in place, Company B experiences exponential growth in ROI as the organization matures, capturing more value from its initiatives.
  3. Sustainable Performance: A CoE helps maintain high performance by adapting to evolving business needs, ensuring continuous improvement, and maximizing the value derived from investments.

Maximizing ROI with a CoE

ROI with a CoE


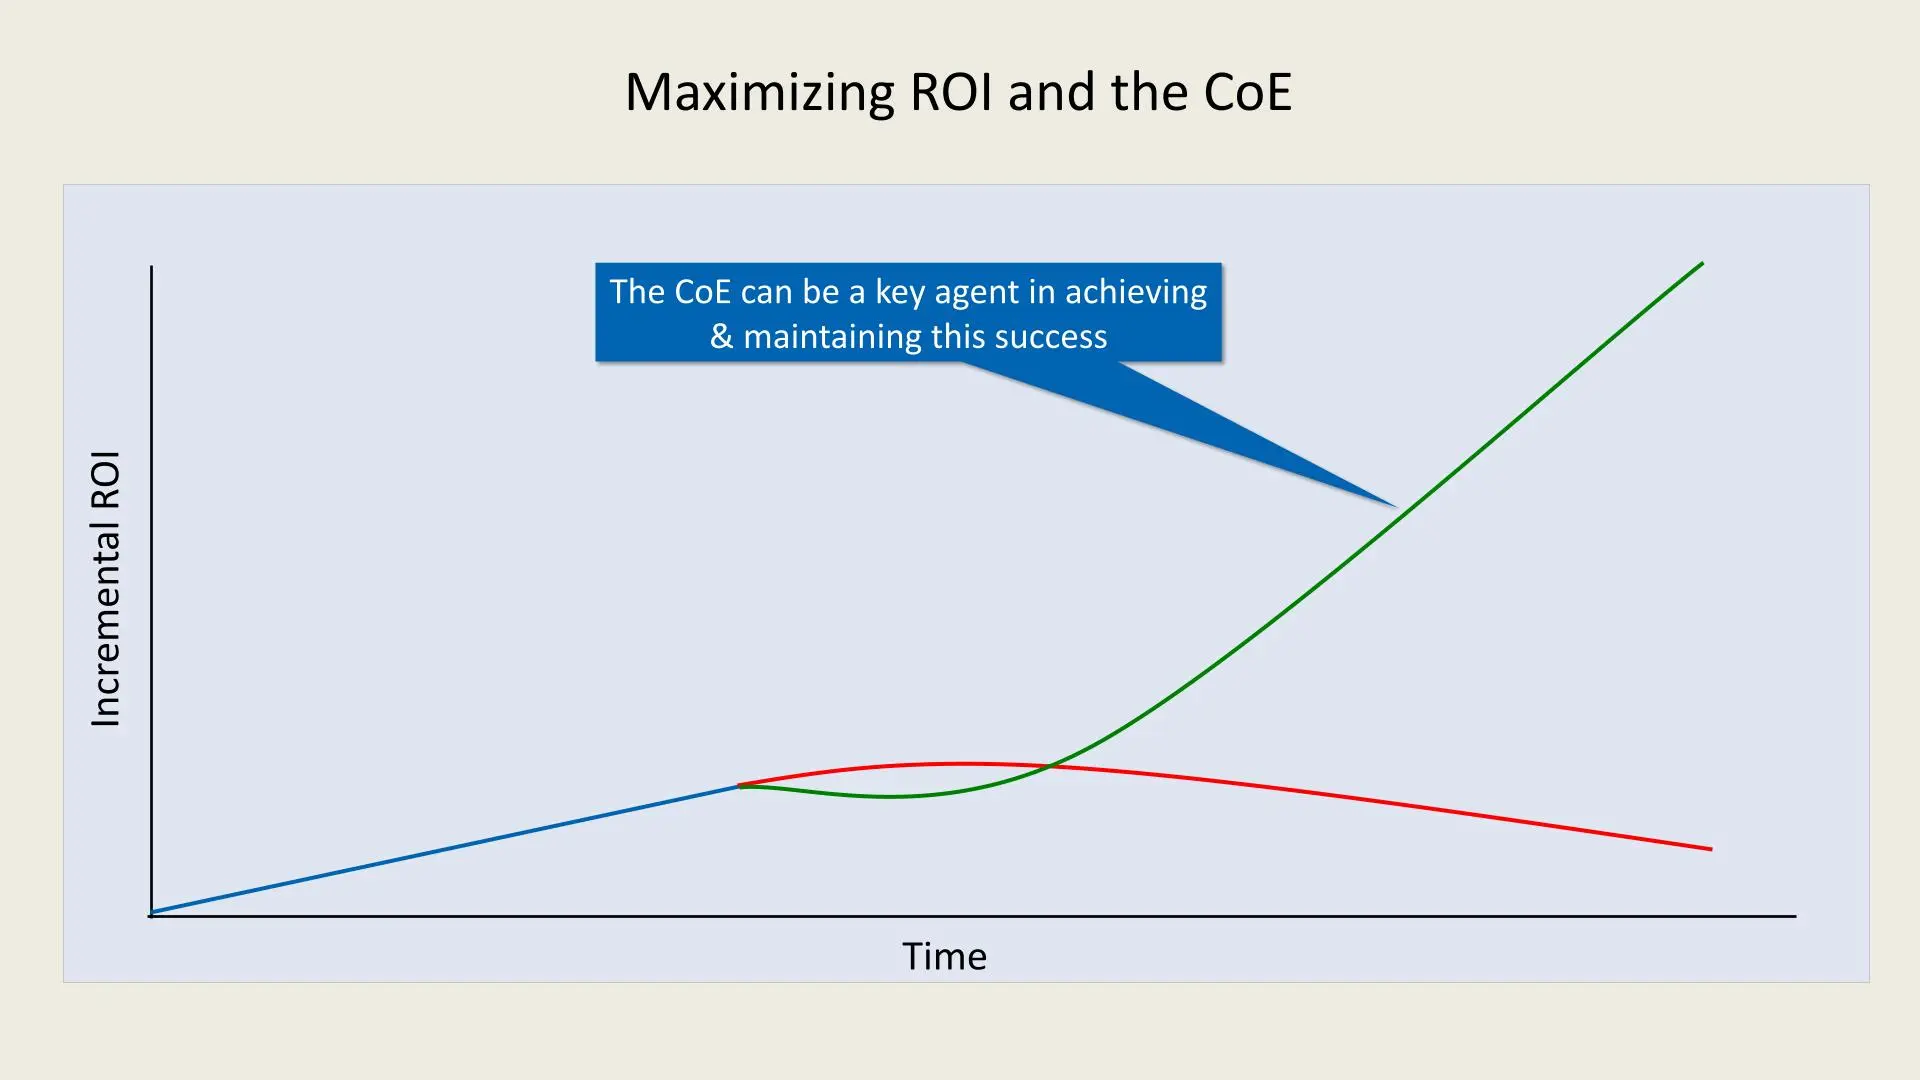
In the chart, Company A and Company B start with similar levels of incremental ROI. However, as time progresses, the ROI for Company A plateaus and even begins to decline, as represented by the red line. This suggests that without a structured CoE, organizations may struggle to sustain growth and consistently achieve high returns due to a lack of standardized practices, governance, and strategic alignment.


On the other hand, Company B, which has implemented a CoE, follows the green line that shows exponential ROI growth. The structured and mature CoE within Company B ensures that best practices, continuous improvement, and cross-functional collaboration are maintained. This leads to sustained, repeatable performance and eventually optimal ROI.


CoE Maturity Levels and Their ROI Impact

ROI with a CoE


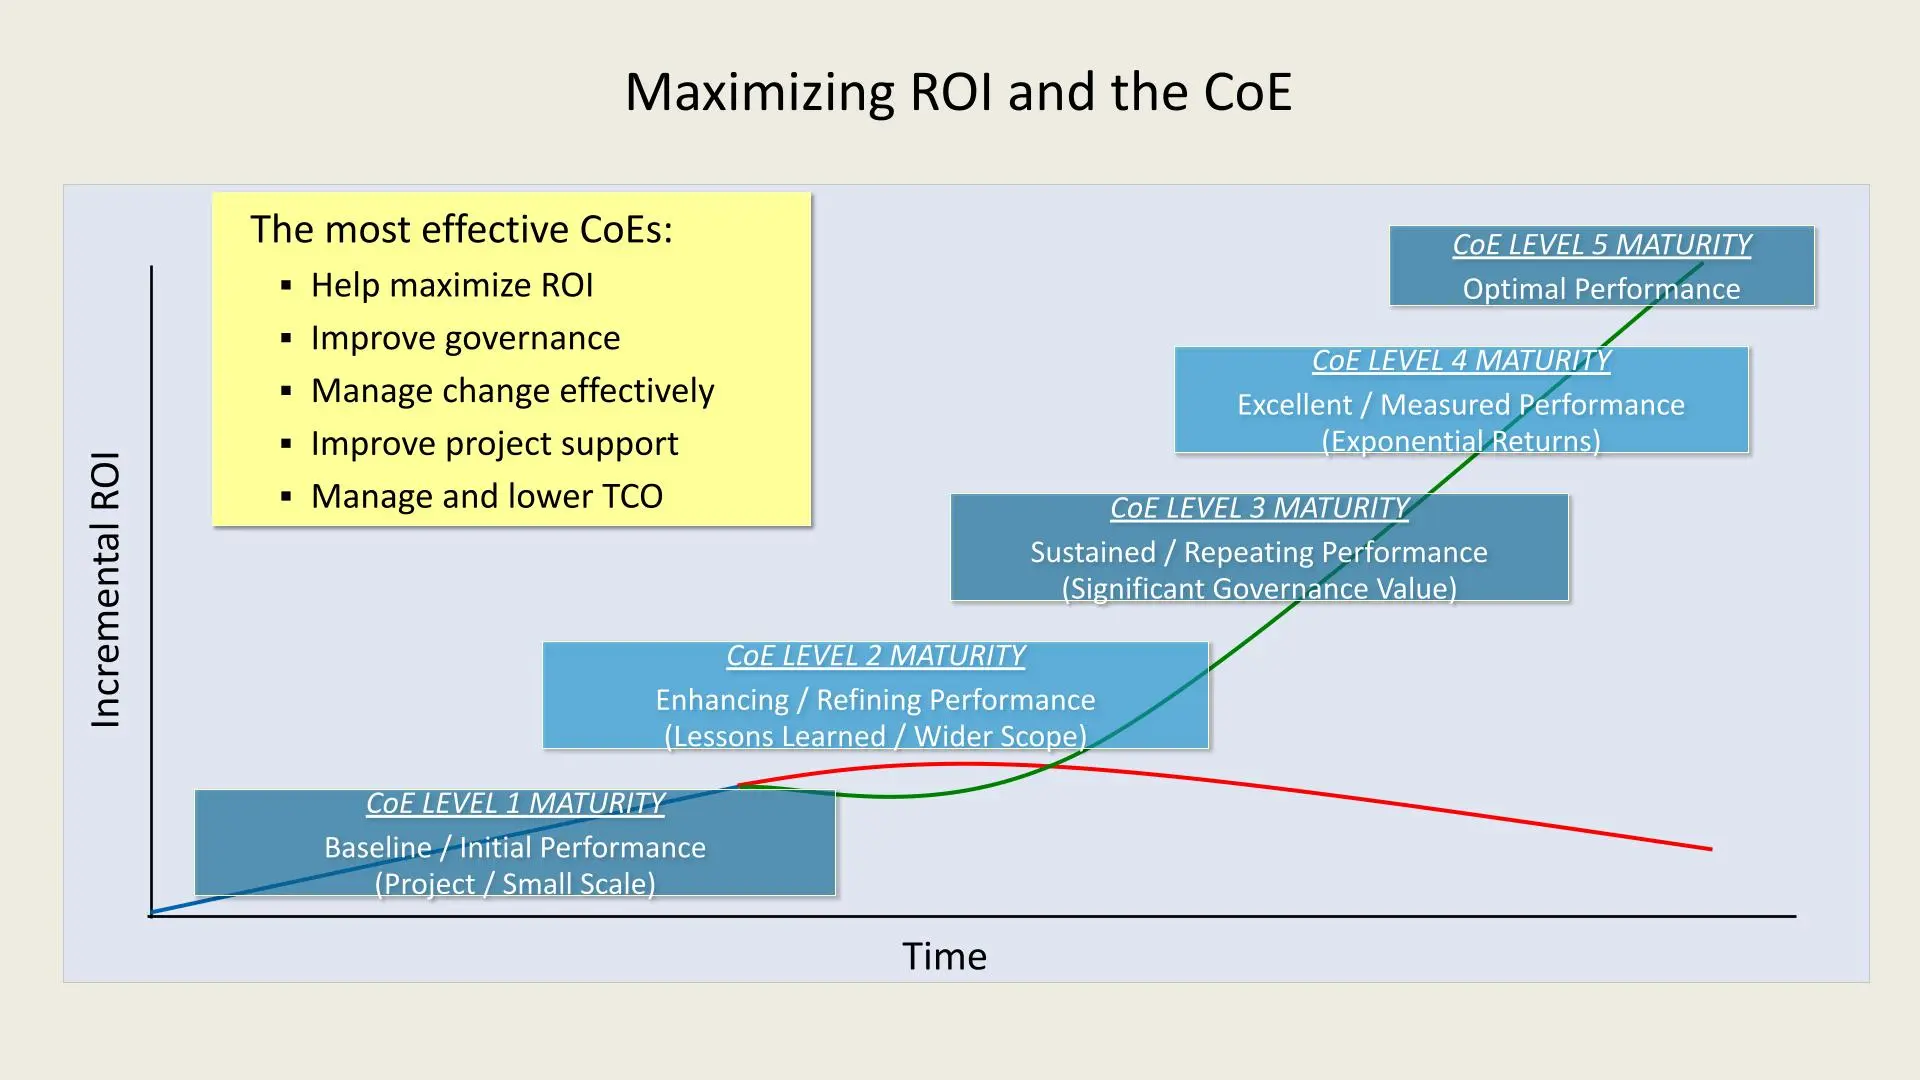
Level 1 Maturity 1. Baseline/Initial Performance:

  1. Initial small-scale projects define this stage.
  2. ROI is relatively low as processes and standards are still under development.

Level 2 Maturity 1. Enhancing/Refining Performance:

  1. The CoE begins to refine its approach, learning from initial projects.
  2. Wider scope and incremental improvements lead to better ROI.

Level 3 Maturity 1. Sustained/Repeating Performance:

  1. At this stage, CoEs establish repeatable processes with substantial governance.
  2. This results in steady and significant improvements in ROI.

Level 4 Maturity 1. Excellent/Measured Performance:

  1. Performance becomes measurable, and returns become exponential.
  2. The CoEs processes are well-governed, supporting growth and optimizing costs.

Level 5 Maturity 1. Optimal Performance:

  1. The CoE reaches optimal performance, where ROI is maximized and sustained.
  2. Continuous improvements and strategic insights drive ongoing success.

Key Benefits of Effective CoEs


The most impactful CoEs:

  1. Maximize ROI: By implementing best practices and fostering collaboration, CoEs significantly increase ROI.
  2. Improve Governance: They establish structured processes and compliance, ensuring smoother operations.
  3. Manage Change Effectively: CoEs play a pivotal role in managing transitions and adapting to new technologies.
  4. Improve Project Support: They enhance support for various initiatives across the organization.
  5. Lower Total Cost of Ownership (TCO): By optimizing resources and eliminating redundancies, CoEs reduce operational costs.

Core Focus Areas of a CoE


  1. Planning and Leadership: Outlining a strategic roadmap, managing risks, and setting a vision.
  2. Guidance and Support: Establishing standards, tools, and methodologies.
  3. Shared Learning: Providing education, certifications, and skill development.
  4. Measurements and Asset Management: Using metrics to demonstrate CoE value and managing assets effectively.
  5. Governance: Ensuring investment in high-value projects and creating economies of scale.

The Most Valuable Functions of a Center of Excellence (CoE)

In today's rapidly evolving technology landscape, organizations are increasingly leveraging Centers of Excellence (CoEs) to drive digital transformation, manage complex projects, and foster innovation. But what functions make a CoE truly valuable? According to a Forrester survey, the highest-impact CoE functions go beyond technical training, emphasizing governance, leadership, and vision. In this post, we will break down the essential functions of a CoE and explore why they are crucial to an organizations success.


The Role of Governance in CoE Success The first step in understanding a CoE's value is to recognize its role as a governance body rather than just a training entity. According to Forrester's survey results, having a CoE correlates with higher satisfaction levels with cloud technologies and other technological initiatives. CoEs primarily provide value through leadership and governance, which guides organizations in making informed decisions and maintaining a strategic focus. Key points include:


  1. Higher Satisfaction: Organizations with CoEs report better satisfaction with their technological initiatives.
  2. Focus on Leadership: Rather than detailed technical skills, CoEs drive value by establishing a leadership framework.
  3. Governance First, Training Second: The CoE should primarily be seen as a governance body, shaping organizational policy and direction.

Key Functions of a CoE


A successful CoE is defined by several core functions that help align organizational goals, foster innovation, and ensure effective project management. Here are some of the most valuable functions, as highlighted in Forresters survey:


  1. Creating & Maintaining Vision and Plans
    CoEs provide a broad vision and ensure that all stakeholders are aligned. This includes setting a strategic direction for technology initiatives to keep everyone on track.

  2. Acting as a Governance Body
    A CoE provides approval on key decisions, giving it a strong leadership position. This approval process acts as a mentorship tool and ensures that guidance is followed effectively.

  3. Managing Patterns for Implementations
    By creating and managing implementation patterns, CoEs make it easier for teams to follow established best practices, reducing the need for reinventing solutions.

  4. Portfolio Management of Services
    CoEs organize services and tools to facilitate their use across the organization. This management helps streamline workflows, often using resources like spreadsheets, registries, and repositories.

  5. Planning for Future Technology Needs
    A CoE avoids the risk of each team working in silos by setting a long-term plan for technology evolution, ensuring cohesive growth that aligns with the organization's goals.


Centers of Excellence (CoEs) are powerful assets that can significantly enhance an organization's capability to manage and implement new technologies effectively. By focusing on governance and leadership rather than technical skills alone, CoEs bring the organization closer to achieving its strategic vision. Whether it's managing service portfolios or creating a cohesive plan for future technologies, CoEs provide indispensable guidance in today's fast-paced, tech-driven world.


Types of CoE Models


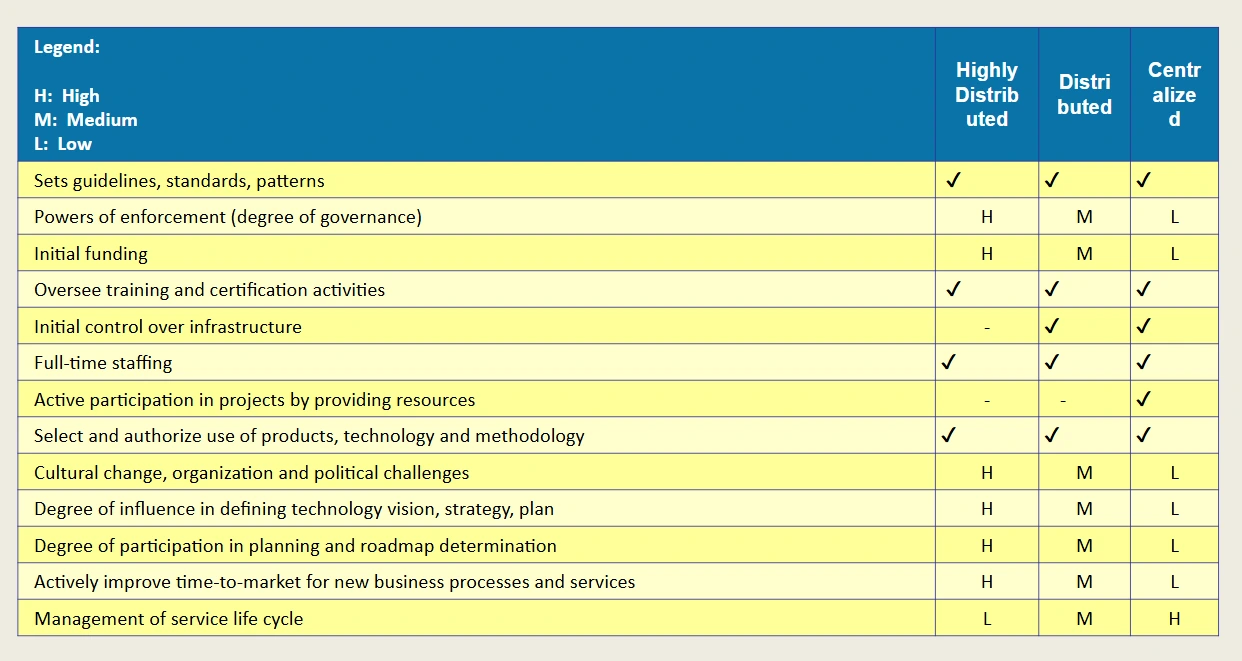
  1. Centralized Model (Service Center): Best suited for strong governance and standards.
  2. Distributed Model (Support Center): Allows for flexibility and faster adoption.
  3. Highly Distributed Model (Steering Group): Minimal staffing, ideal for independent business unit support.

The structure of a CoE varies based on organizational size and complexity. Here are three primary models:


1. Centralized Model


In this model, the CoE operates as a single, unified entity. It manages all technology-related practices and provides support to the entire organization.


Pros:

  1. Easier Governance: Centralized models streamline oversight and standardization.
  2. Simple Feedback Loops: By centralizing processes, this model enables more efficient communication and rapid issue resolution.

Cons:

  1. Limited Flexibility: The centralized model may struggle to meet the diverse needs of larger organizations.

CoE & E-Strategy


For a CoE to evolve and meet organizational goals, it must continuously:

  1. Evangelize: Promote new strategies and state-of-the-art practices.
  2. Evolve: Adapt frameworks and processes as technology and business needs change.
  3. Enforce: Ensure adherence to standards and guidelines.
  4. Escalate: Address and resolve governance challenges effectively.

2. Distributed Model


Here, each department has its own CoE, allowing teams to tailor best practices to their unique requirements.


Pros:

  1. Adaptable to Specific Needs: Each department can quickly adopt and adapt standards to suit its goals.
  2. Scalable: The distributed model grows more effectively with the organization.

Cons:

  1. Higher Complexity: Governance and coordination become challenging, especially across multiple CoEs.

3. Highly Distributed Model


In a highly distributed setup, the CoE functions as a flexible steering group, with minimal centralized authority. This model is particularly effective in global enterprises with varied business needs.


Pros:

  1. High Flexibility: This model meets the unique requirements of diverse business units.
  2. Adaptable to Large Organizations: It supports scalability and regional differences effectively.

Cons:

  1. Complex Governance: Managing coherence across different units requires robust oversight mechanisms.

Typical CoE model characteristics

ROI with a CoE


The diagram depicts the primary interactions between the Center of Excellence (CoE) and various teams:
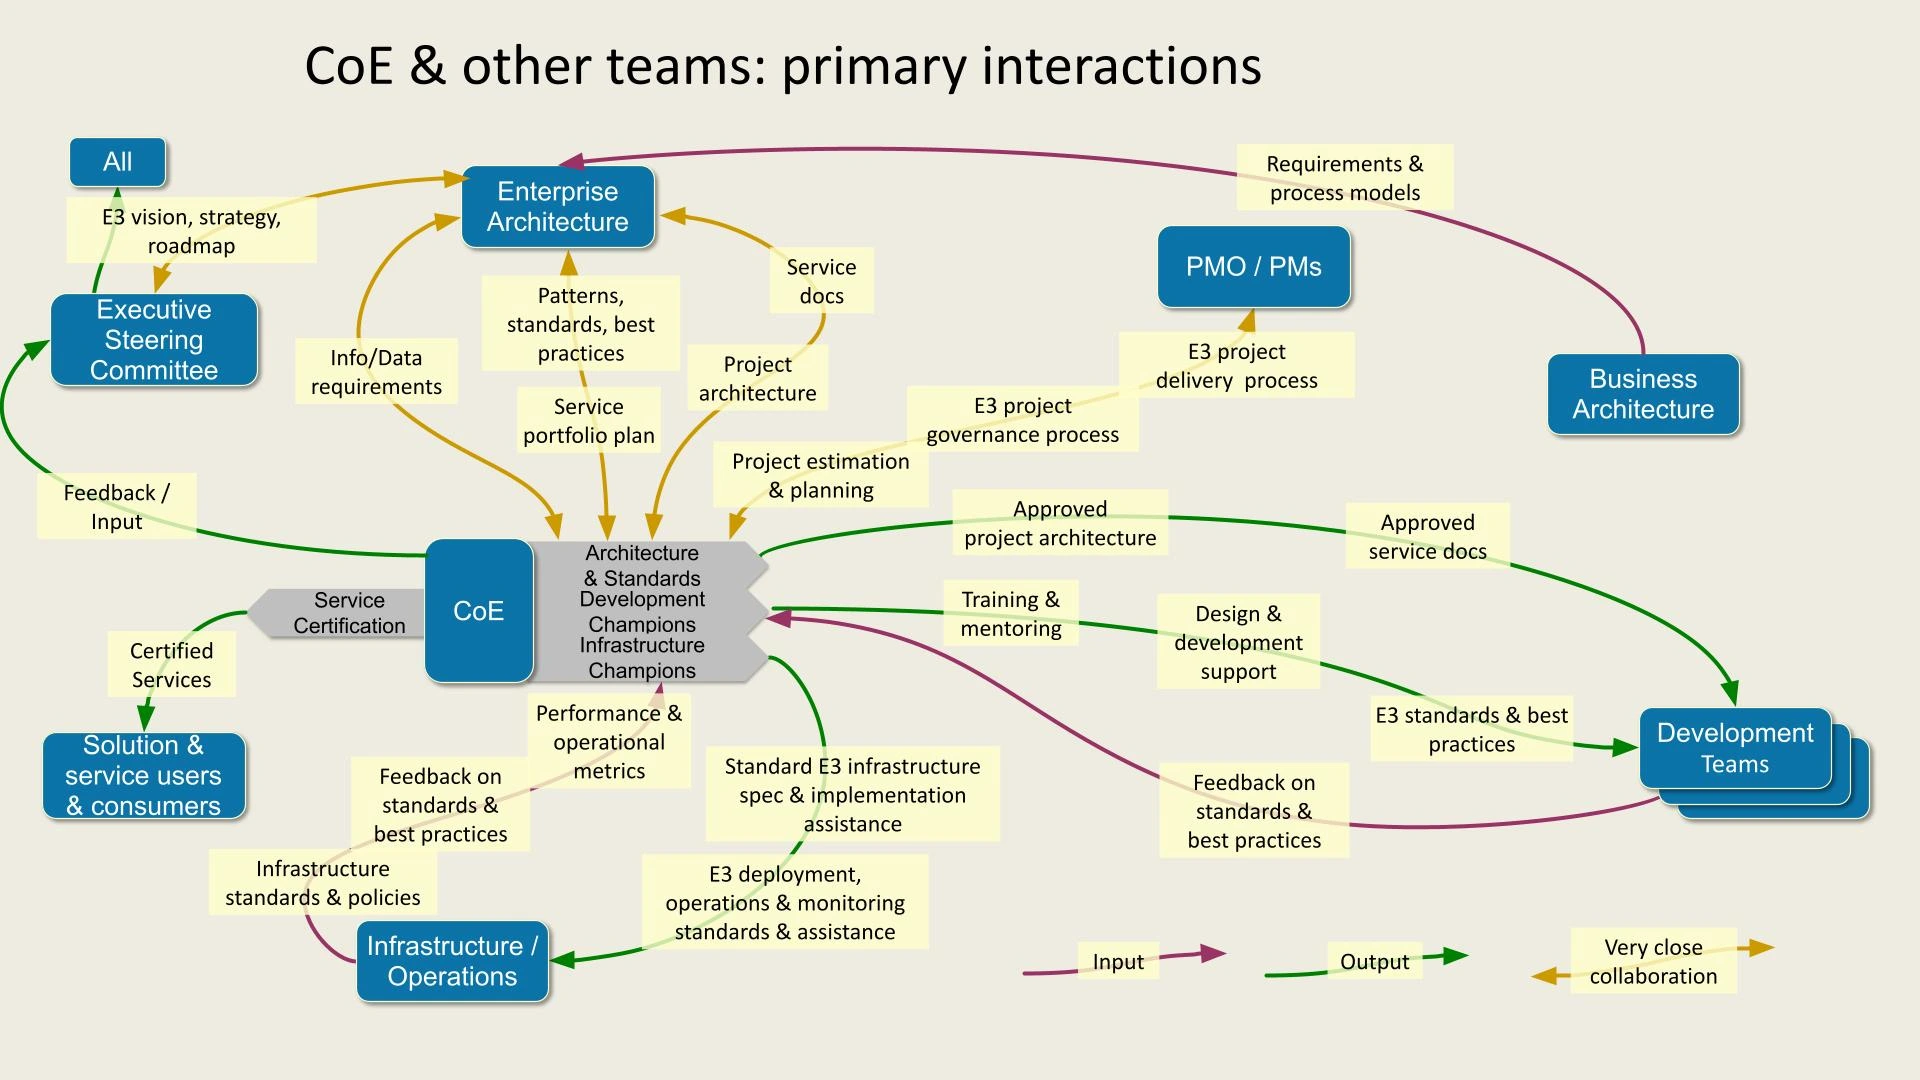

CoE


  1. Executive Steering Committee: Provides E3 vision, strategy, and roadmap, and receives feedback/input.
  2. Enterprise Architecture: Collaborates with CoE on patterns, standards, and best practices, providing project architecture and service portfolio plans.
  3. PMO/Project Managers: Oversee project governance, requirements, and process models.
  4. Business Architecture: Supplies approved service documents and E3 project delivery process support.
  5. Development Teams: Receive E3 standards, training, and approved service docs for design and development.
  6. Infrastructure/Operations: Ensures infrastructure standards, operations support, and feedback on best practices.
  7. Solution & Service Users: Receive certified services and provide input.

An example CoE (Center of Excellence) organization within an Enterprise Architecture (EA) framework:
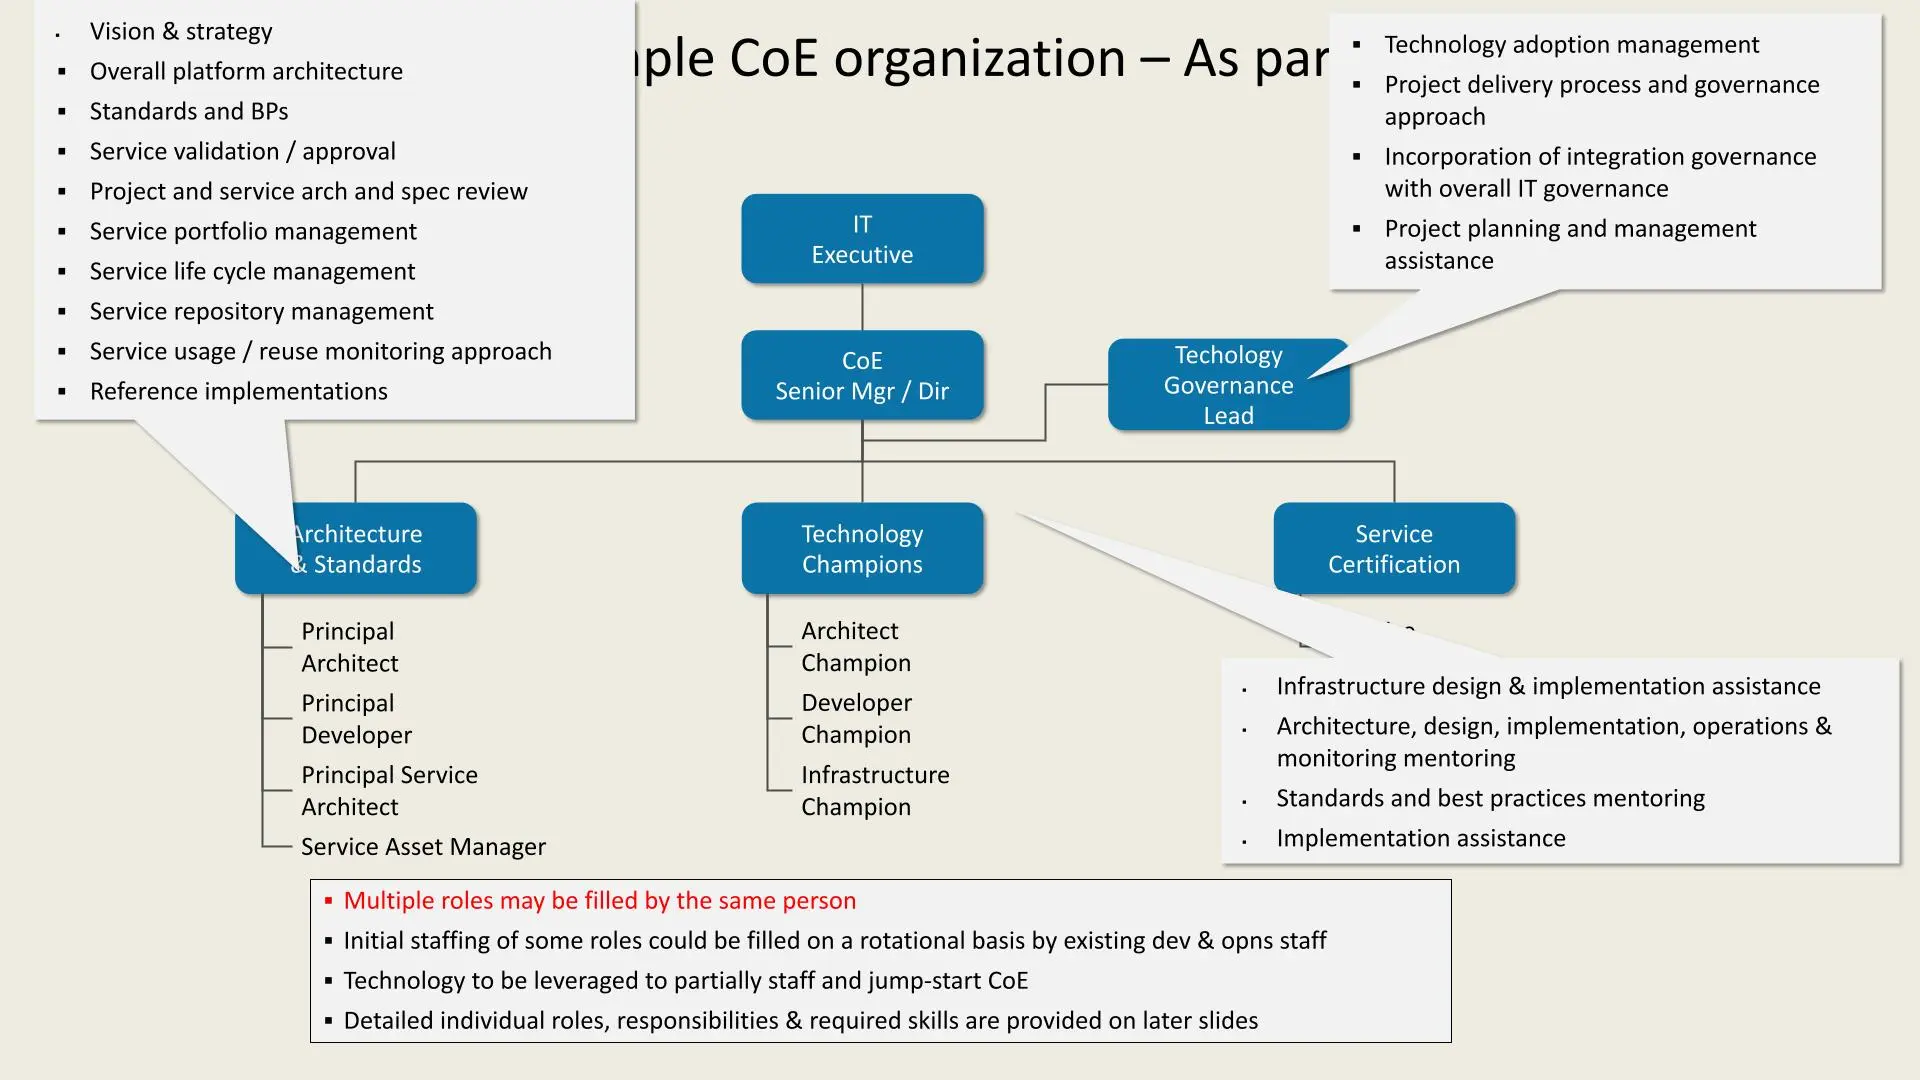

example CoE


  1. IT Executive oversees the CoE Senior Manager/Director.
  2. Technology Governance Lead handles technology adoption, project governance, and planning assistance.
  3. Architecture & Standards defines vision, platform architecture, standards, and service management. Key roles include Principal Architect, Developer, Service Architect, and Asset Manager.
  4. Technology Champions focus on specific areas: Architect Champion, Developer Champion, and Infrastructure Champion.
  5. Service Certification provides infrastructure, architecture, and implementation support, ensuring standards and best practices.

This example outlines key roles in a CoE team structure:
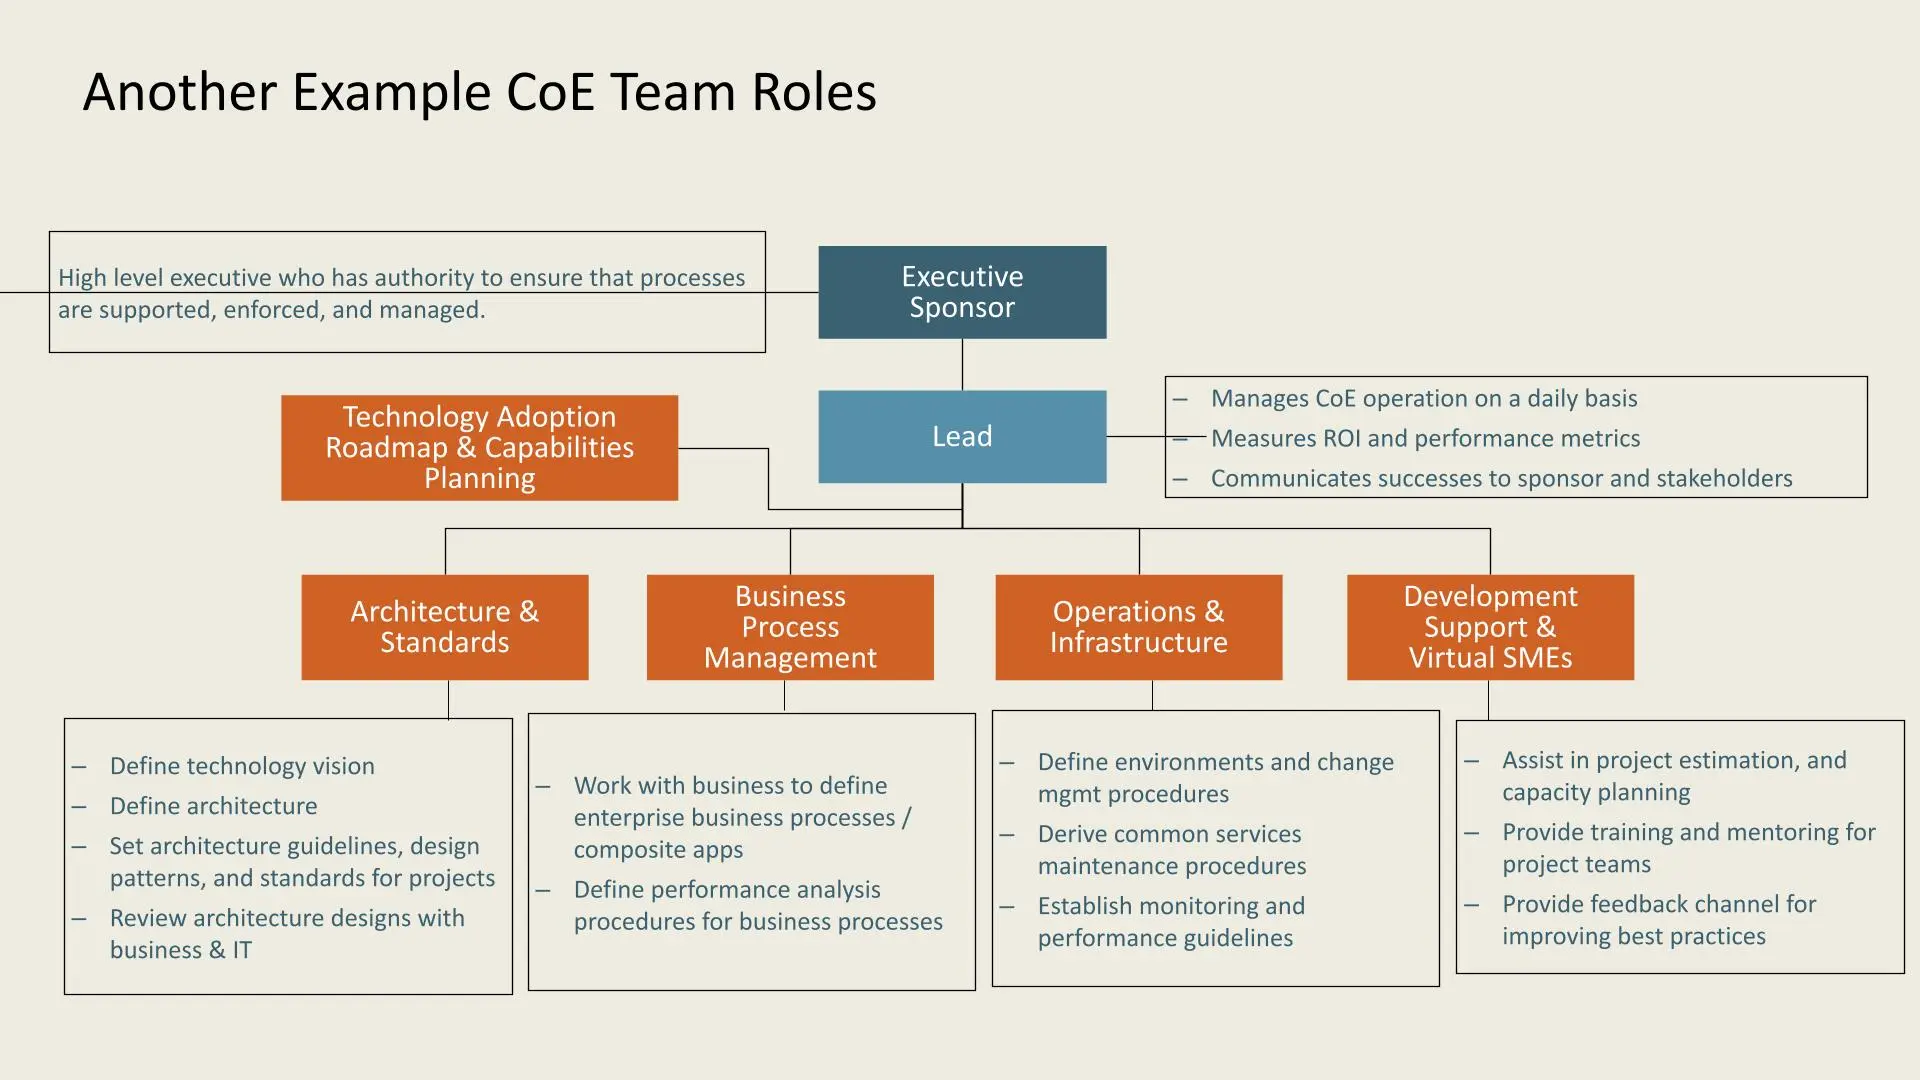

example CoE


  1. Executive Sponsor: Ensures process support, enforcement, and management.
  2. Lead: Oversees daily CoE operations, measures ROI, and communicates achievements.

**Functional areas include:


  1. Technology Adoption Roadmap & Capabilities Planning
  2. Architecture & Standards: Defines technology vision, architecture, and standards.
  3. Business Process Management: Aligns with business to define processes and performance analysis.
  4. Operations & Infrastructure: Manages environments, maintenance, and performance guidelines.
  5. Development Support & Virtual SMEs: Provides project support, training, and feedback for best practices.

Another example outlines key roles in a CoE team structure:
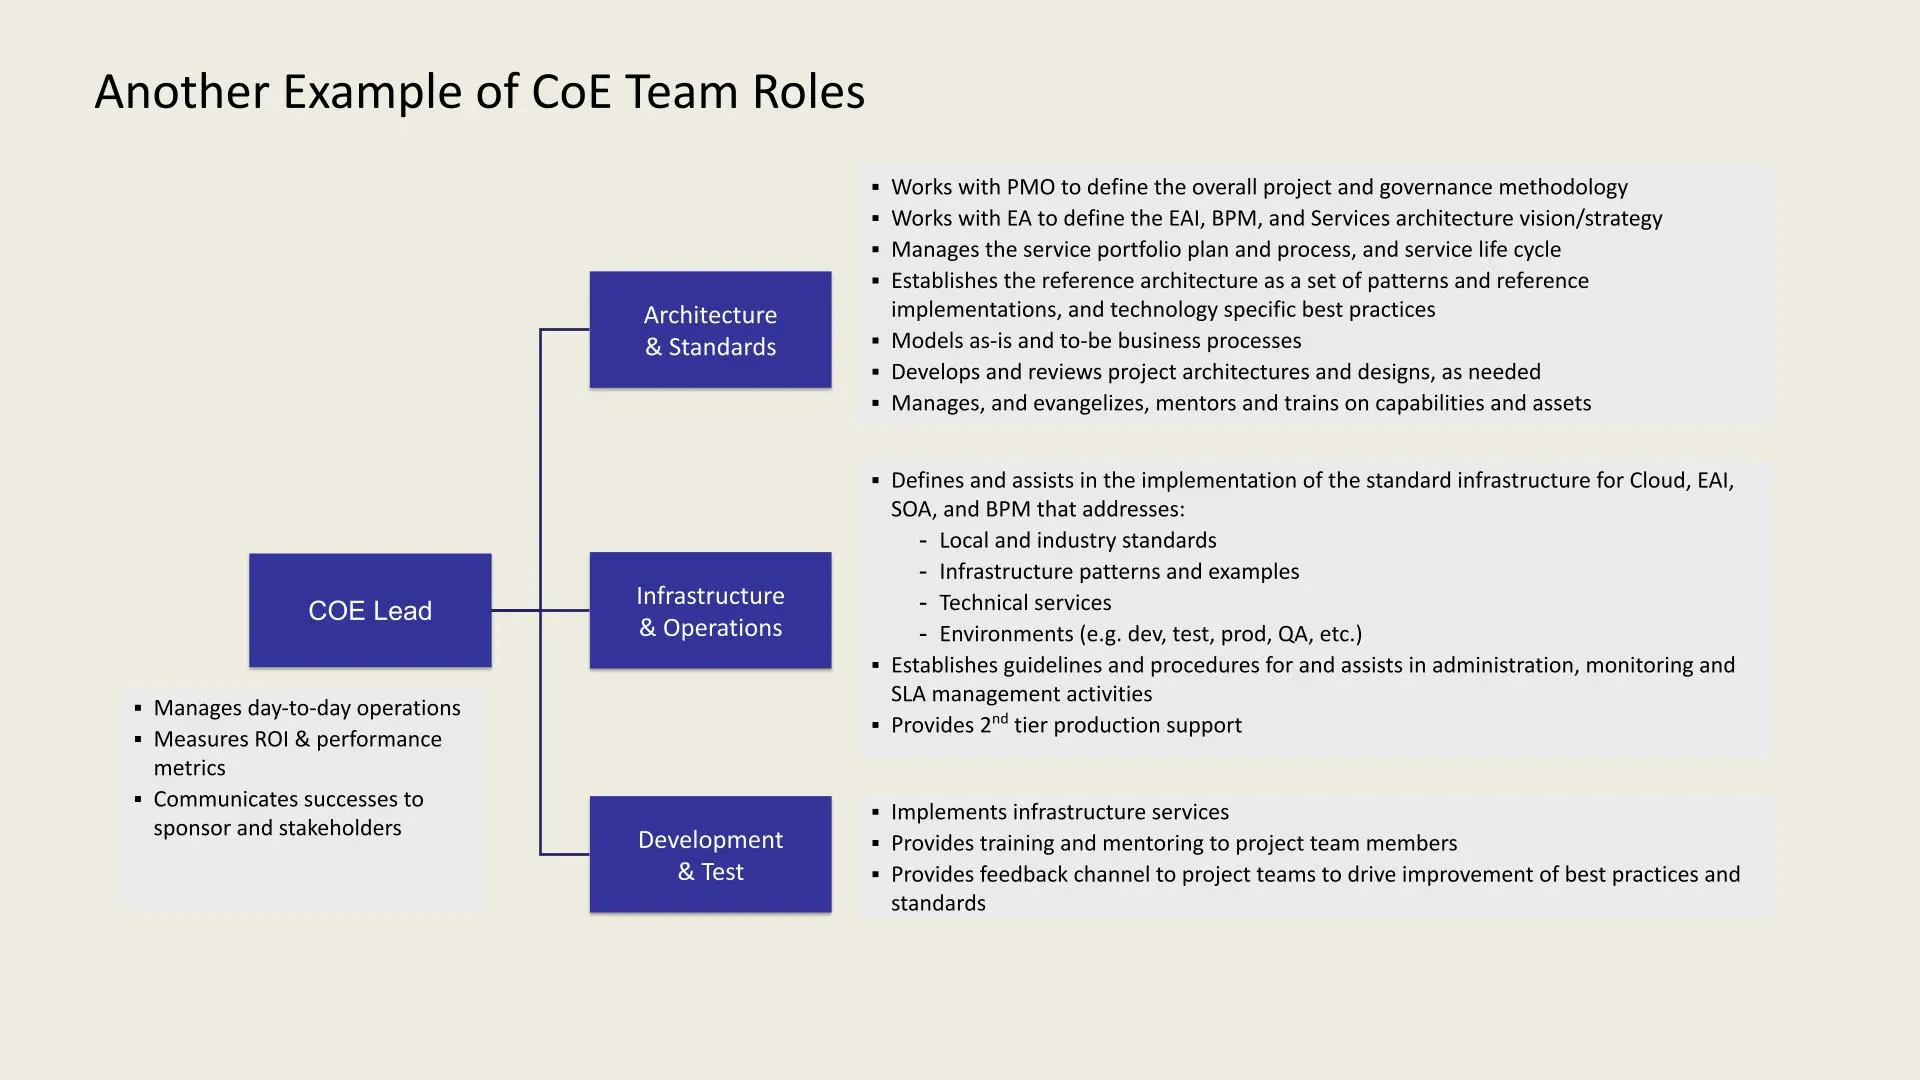

example CoE


  1. CoE Lead: Oversees daily operations, tracks ROI and performance, and communicates results to stakeholders.
  2. Architecture & Standards: Collaborates with PMO and EA, manages service portfolio, sets architecture standards, models business processes, and provides training.
  3. Infrastructure & Operations: Defines infrastructure standards, manages environments (e.g., dev, test, prod), handles administration, monitoring, SLA management, and provides second-tier support.
  4. Development & Test: Implements infrastructure services, provides team training, and facilitates feedback for standards improvement.

Another example outlines key roles in a CoE team structure:
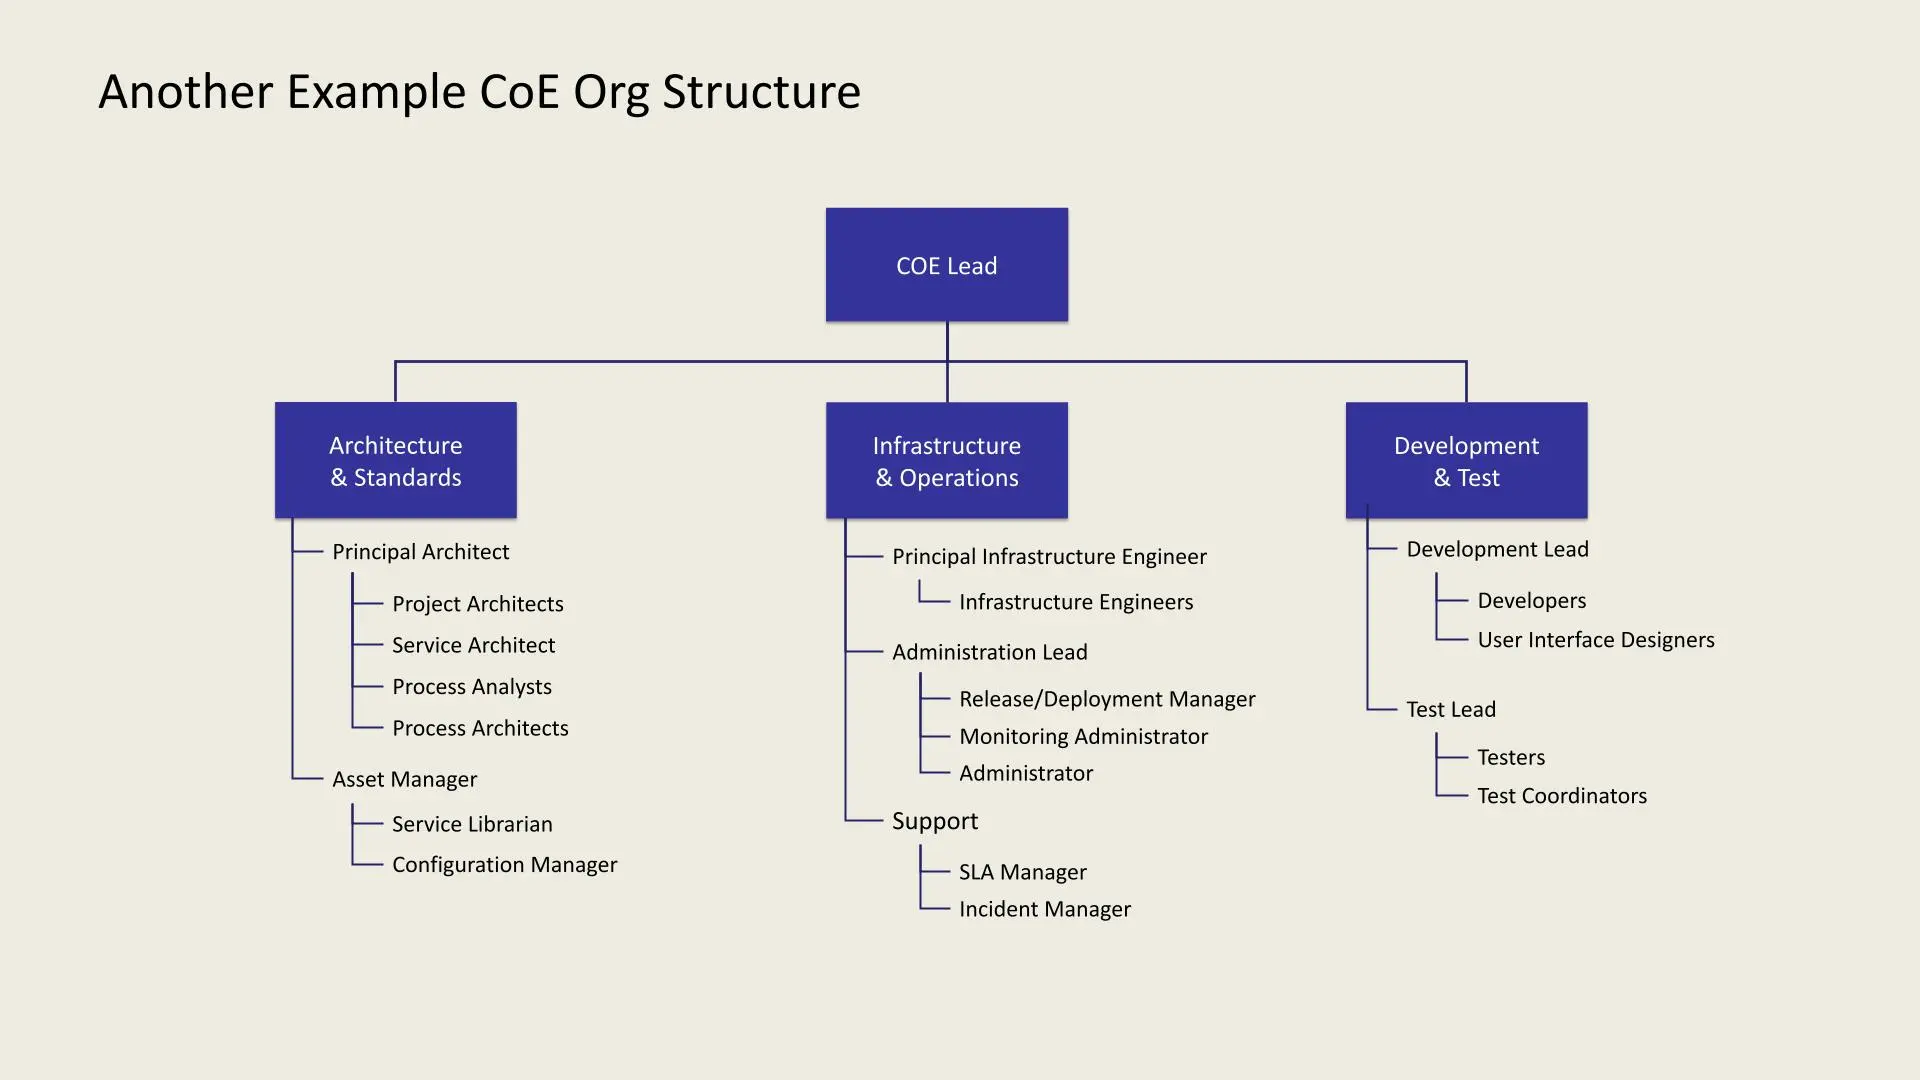

example CoE


  1. CoE Lead: Oversees all divisions.
  2. Architecture & Standards: Led by a Principal Architect, includes Project Architects, Service Architect, Process Analysts, Process Architects, Asset Manager, Service Librarian, and Configuration Manager.
  3. Infrastructure & Operations: Led by a Principal Infrastructure Engineer, includes Infrastructure Engineers, Administration Lead, Release/Deployment Manager, Monitoring Administrator, Administrator, SLA Manager, and Incident Manager.
  4. Development & Test: Led by a Development Lead and Test Lead, includes Developers, UI Designers, Testers, and Test Coordinators.

Sample IT Metrics for Evaluating Success


Service/Interface Development Metrics:

  1. Cost and time to build
  2. Cost to change
  3. Defect rate during warranty
  4. Reuse rate
  5. Demand forecast
  6. Retirement rate

Operations & Support Metrics:

  1. Incident response and resolution time
  2. Problem resolution rate
  3. Metadata quality
  4. Performance and response times
  5. Service availability
  6. First-time release accuracy

Management Metrics:

  1. Application portfolio size
  2. Number of interfaces and services
  3. Project statistics
  4. Standards exceptions
  5. Staff certification rates

The Delivery Approach involves the following steps:


example CoE.webp)


  1. Start: Kick-off with Executive Sponsor.
  2. Understand Landscape: Assess current and future state.
  3. Architecture Assessment: Create an assessment report.
  4. Identify Priorities: Define technical foundation priorities and deliverables.
  5. Develop and Execute Plan: Formulate and execute the technical foundation development plan, covering architecture, development, infrastructure, and common services.
  6. CoE Quick Start: Establish organization, process, governance, CoE definition, and evolution strategy.
  7. Follow-On Work: Conduct additional work as per the high-leThe Path: Today vs Long Term Focusvel program plan.

The Path: Today vs Long Term Focus


The Path: Today vs Long Term
FocusToday: Project FocusLong Term: Enterprise Focus
ArchitectureEnterprise and project architecture definitionEnterprise architecture definition; project architect guidance, training, review
DesignDo the designDefine/teach how to design
ImplementationDo the implementationDefine/teach how to implement
OperationAssist in new technology operationCo-develop operational best practices
Technology Best PracticesClimb the learning curveShare the knowledge (document, train)
GovernanceDetermine appropriate governanceSee that governance practices are followed
RepositoryContribute services and design patternsSee that services and design patterns are entered

Key Elements of an Effective E-Strategy


An E-Strategy is essential for leveraging technology and improving operations in todays fast-paced business environment. Here is a concise roadmap:


Evangelize

  1. Business Discovery: Work closely with stakeholders to align E-Strategy with business needs.
  2. Innovate: Define an ideal future state with next-gen tech and real-time data advantages.
  3. Proof of Concept (POC): Test ideas in a sandbox, demo successful ones, and shelve unsuccessful ones to save resources.

Common Services

  1. Standardization: Establish reusable services with thorough documentation for easier onboarding and efficient project estimates.

Evolve

  1. Adaptability: Streamline architecture, operations, and infrastructure for flexibility and quick delivery.
  2. Automation: Use dynamic profiling, scalability, and automated installation to expedite deployments.

Enforce

  1. Standards and Governance: Implement best practices, enforce guidelines, and establish a strong governance structure with sign-offs on key areas.
  2. Version Control and Bug Tracking: Maintain organized development processes to prevent errors and ensure consistency.

Escalate

  1. Project Collaboration: Negotiate with project teams, aligning their needs with CoE standards.
  2. Ownership: CoE can guide or own infrastructure activities, balancing governance with flexibility.

Additional Considerations

Evolve standards as each project progresses, making the strategy adaptable and cost-efficient while yielding ROI.


Conclusion

A Center of Excellence is an invaluable asset for organizations navigating technological transformation. By centralizing knowledge, enforcing standards, and promoting continuous learning, a CoE enables businesses to stay competitive and agile.


Choosing the right CoE model and implementing it thoughtfully allows organizations to leverage the expertise of cross-functional teams, fostering a culture of collaboration, innovation, and excellence. Whether its through a centralized, distributed, or highly distributed model, the ultimate goal is the same: to empower teams, streamline processes, and drive sustainable growth.


Please reach out to us for any of your cloud requirements


Ready to take your cloud infrastructure to the next level? Please Contact Us

One Bucket, One Key: Simplify Your Cloud Storage!

· 4 min read

In today's cloud-centric environment, data security is more crucial than ever. One of the common challenges faced by organizations is ensuring that sensitive data stored in AWS S3 buckets is accessible only under strict conditions. This blog post delves into a hands-on session where we set up an AWS Key Management Service (KMS) policy to restrict access to a single S3 bucket using a customer's own encryption key.

Introduction to AWS S3 and KMS

Amazon Web Services (AWS) offers robust solutions for storage and security. S3 (Simple Storage Service) provides scalable object storage, and KMS offers managed creation and control of encryption keys.

Scenario Overview

The need: A customer wants to use their own encryption key and restrict its usage to a single S3 bucket. This ensures that no other buckets can access the key.

Setting Up the KMS Key

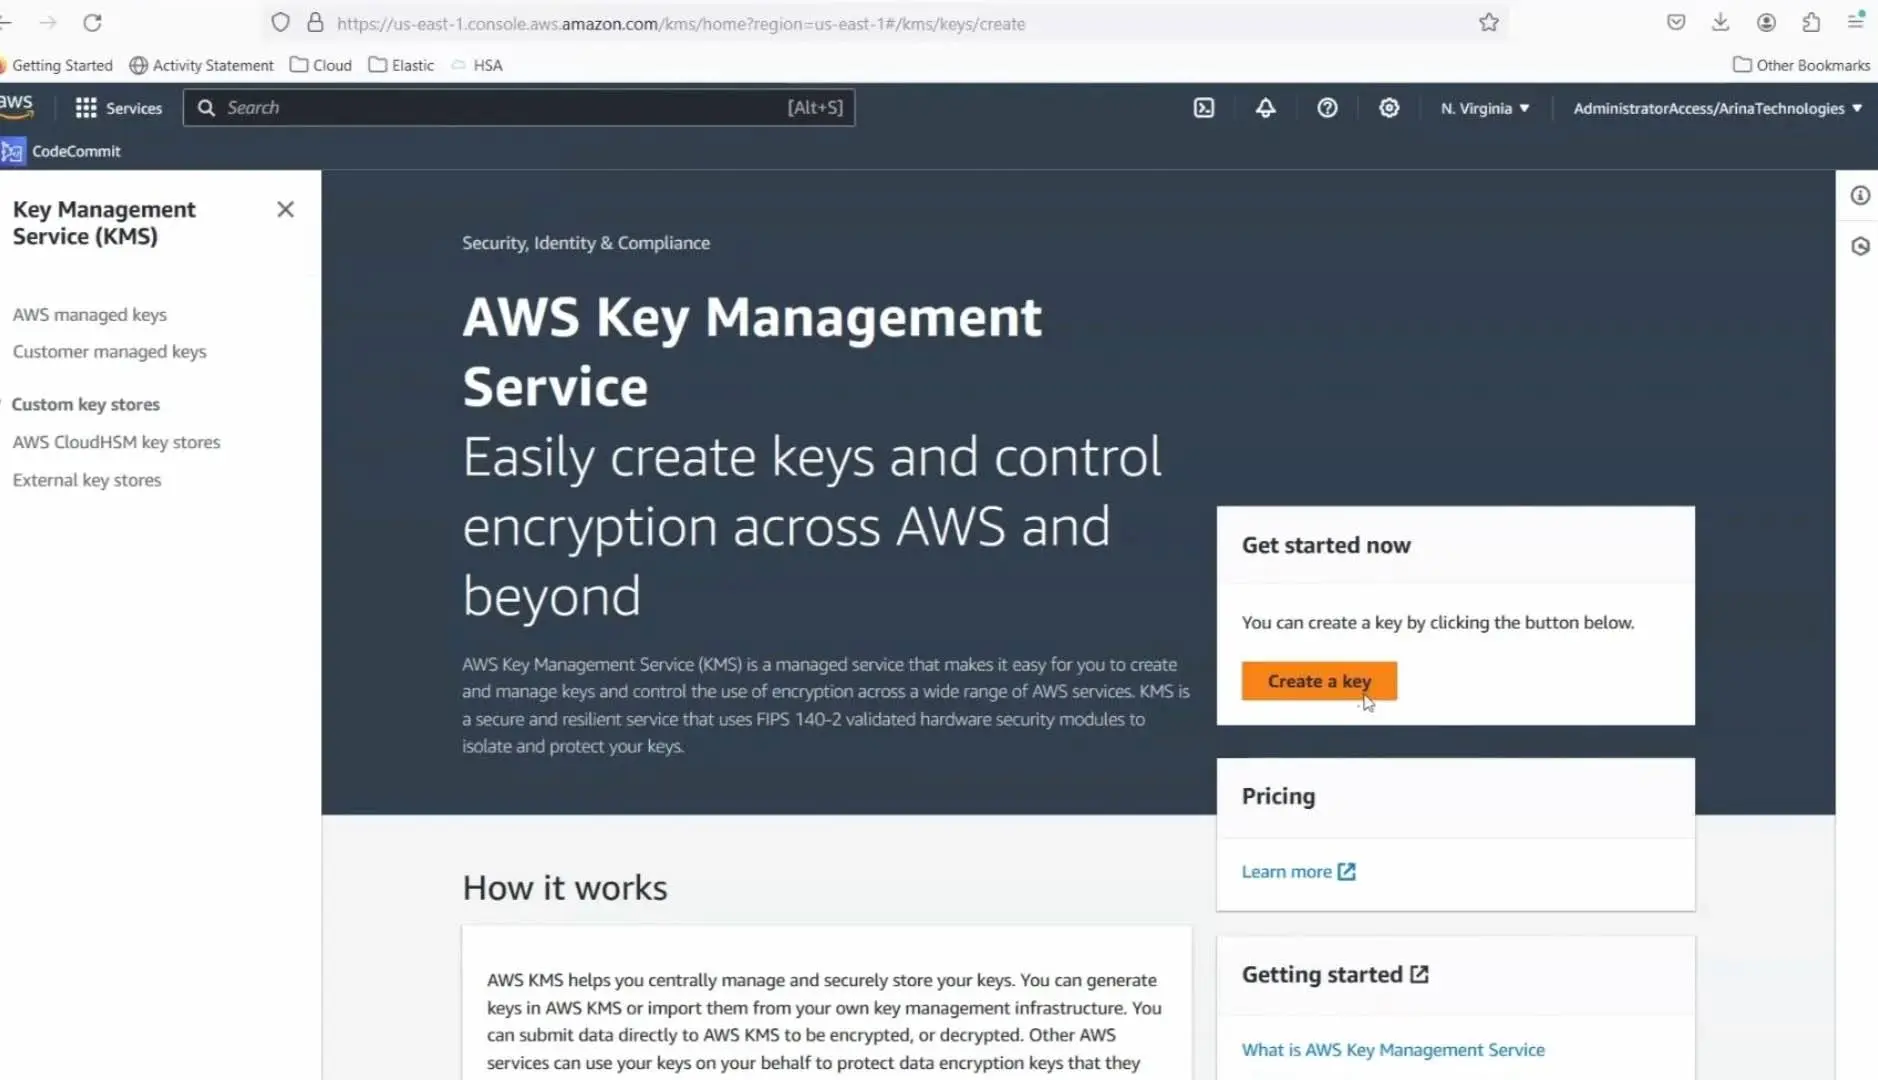
Step 1: Creating the Key

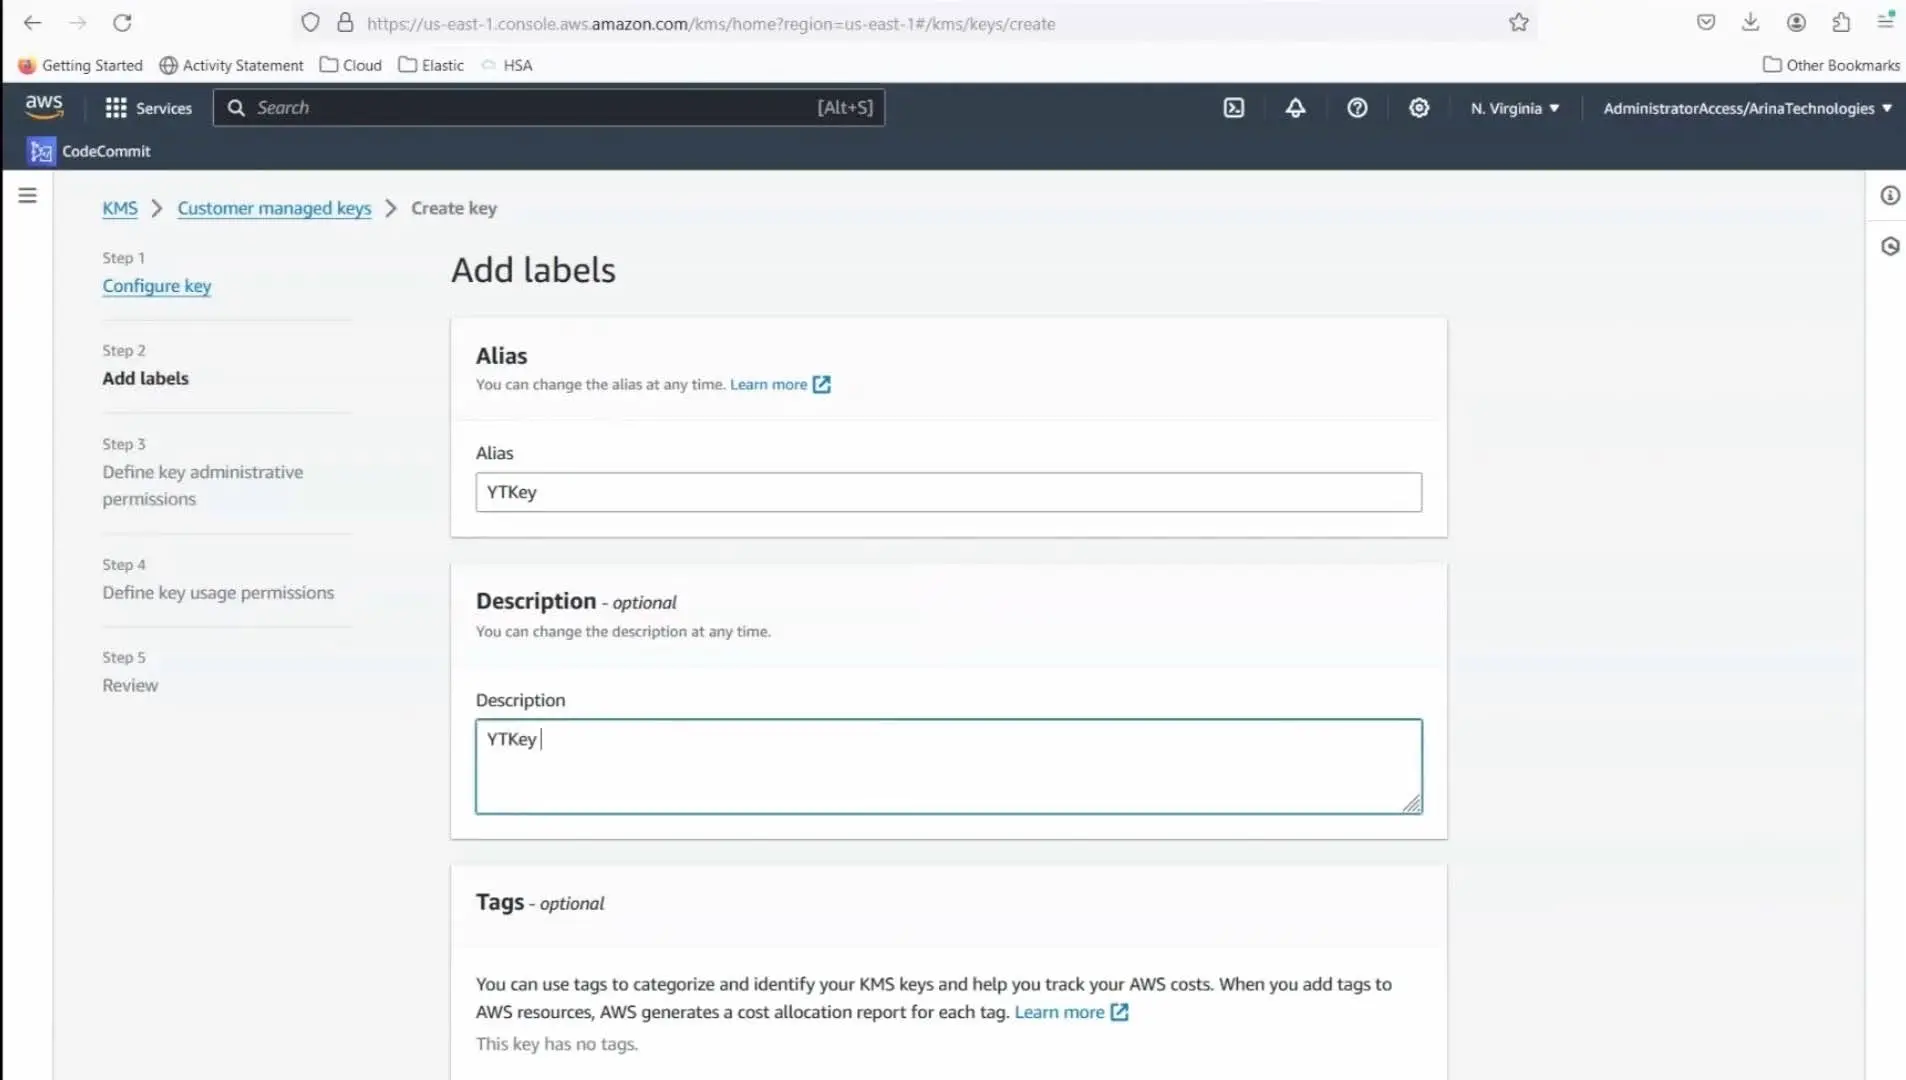
Creating the Key

  • Navigate to the Key Management Service: Start by opening the AWS Management Console and selecting KMS.
  • Create a new key: Choose the appropriate options for your key. For simplicity, skip tagging and advanced options during this tutorial.

Step 2: Configuring Key Policies

Configuring Key Policies

  • Permission settings: Initially, you might be tempted to apply broad permissions. However, to enhance security, restrict the key’s usage to a specific IAM user and apply a policy that denies all other requests.

Crafting a Bucket Policy

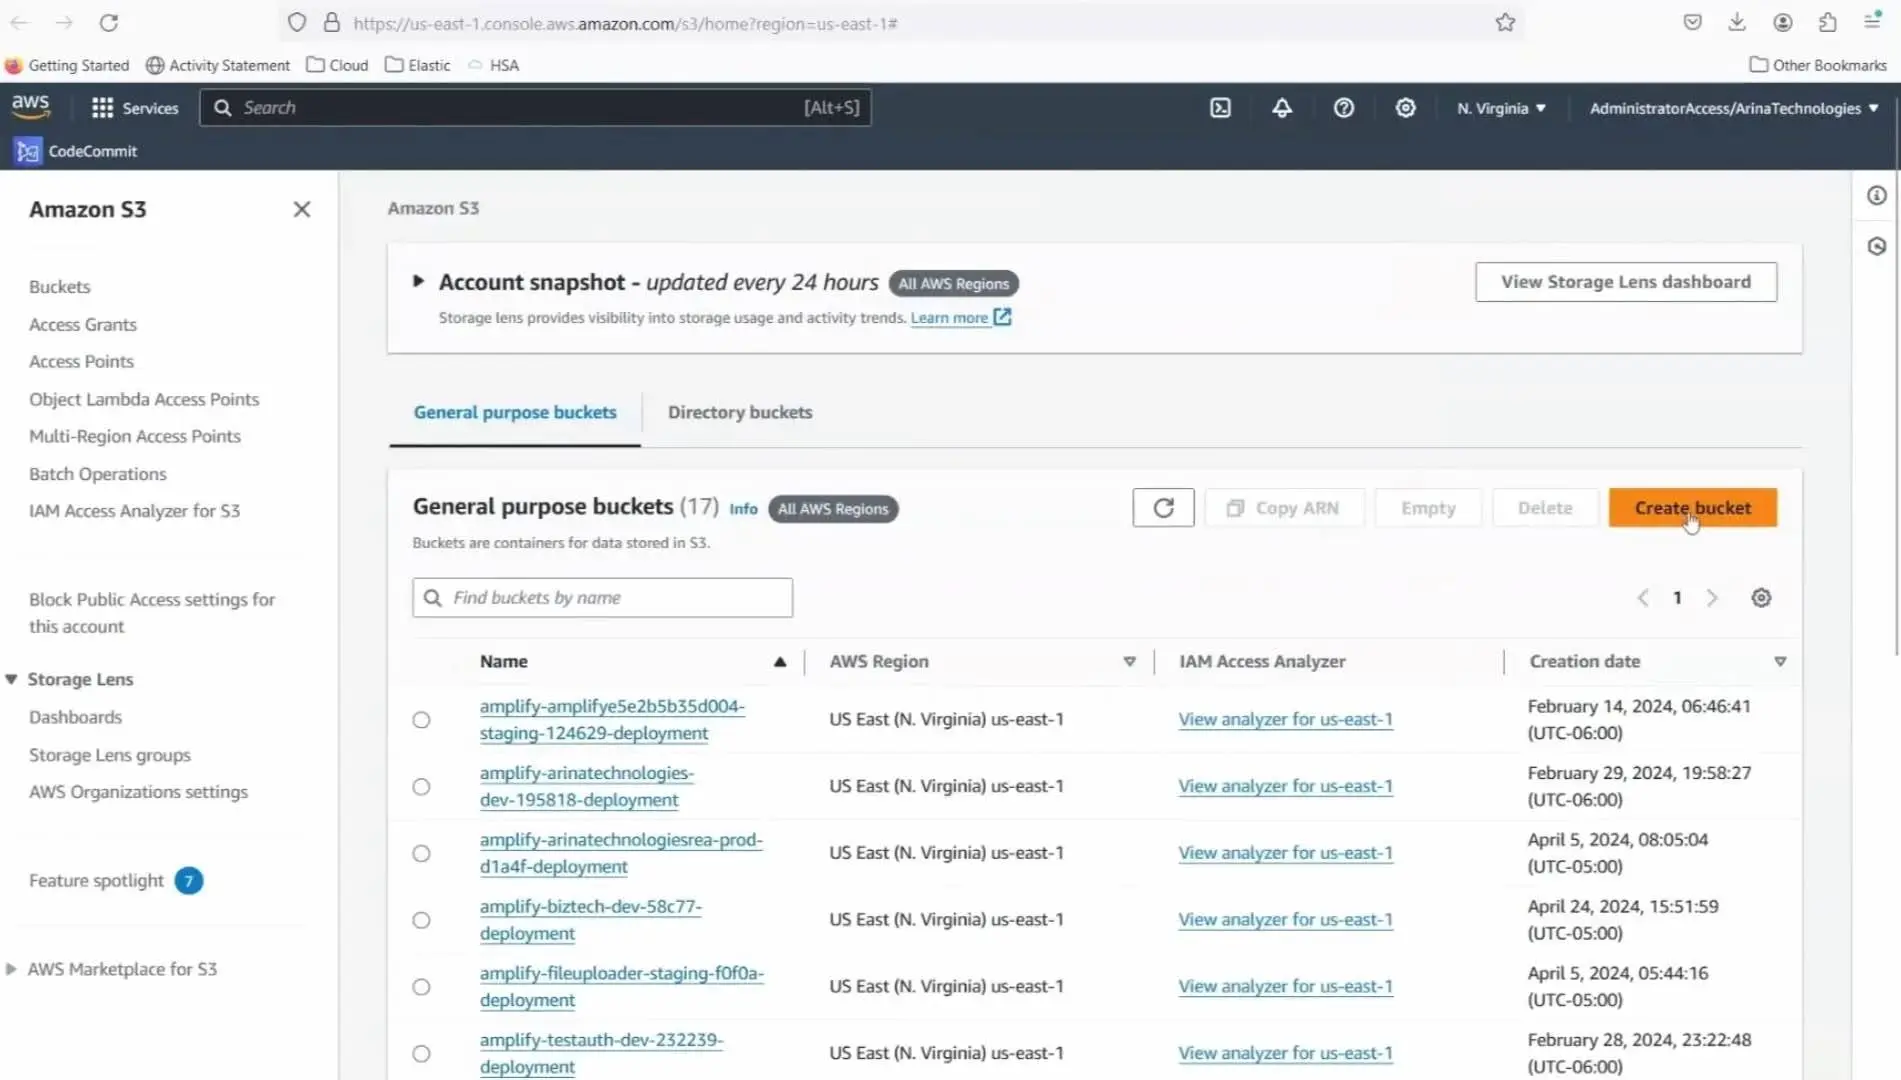
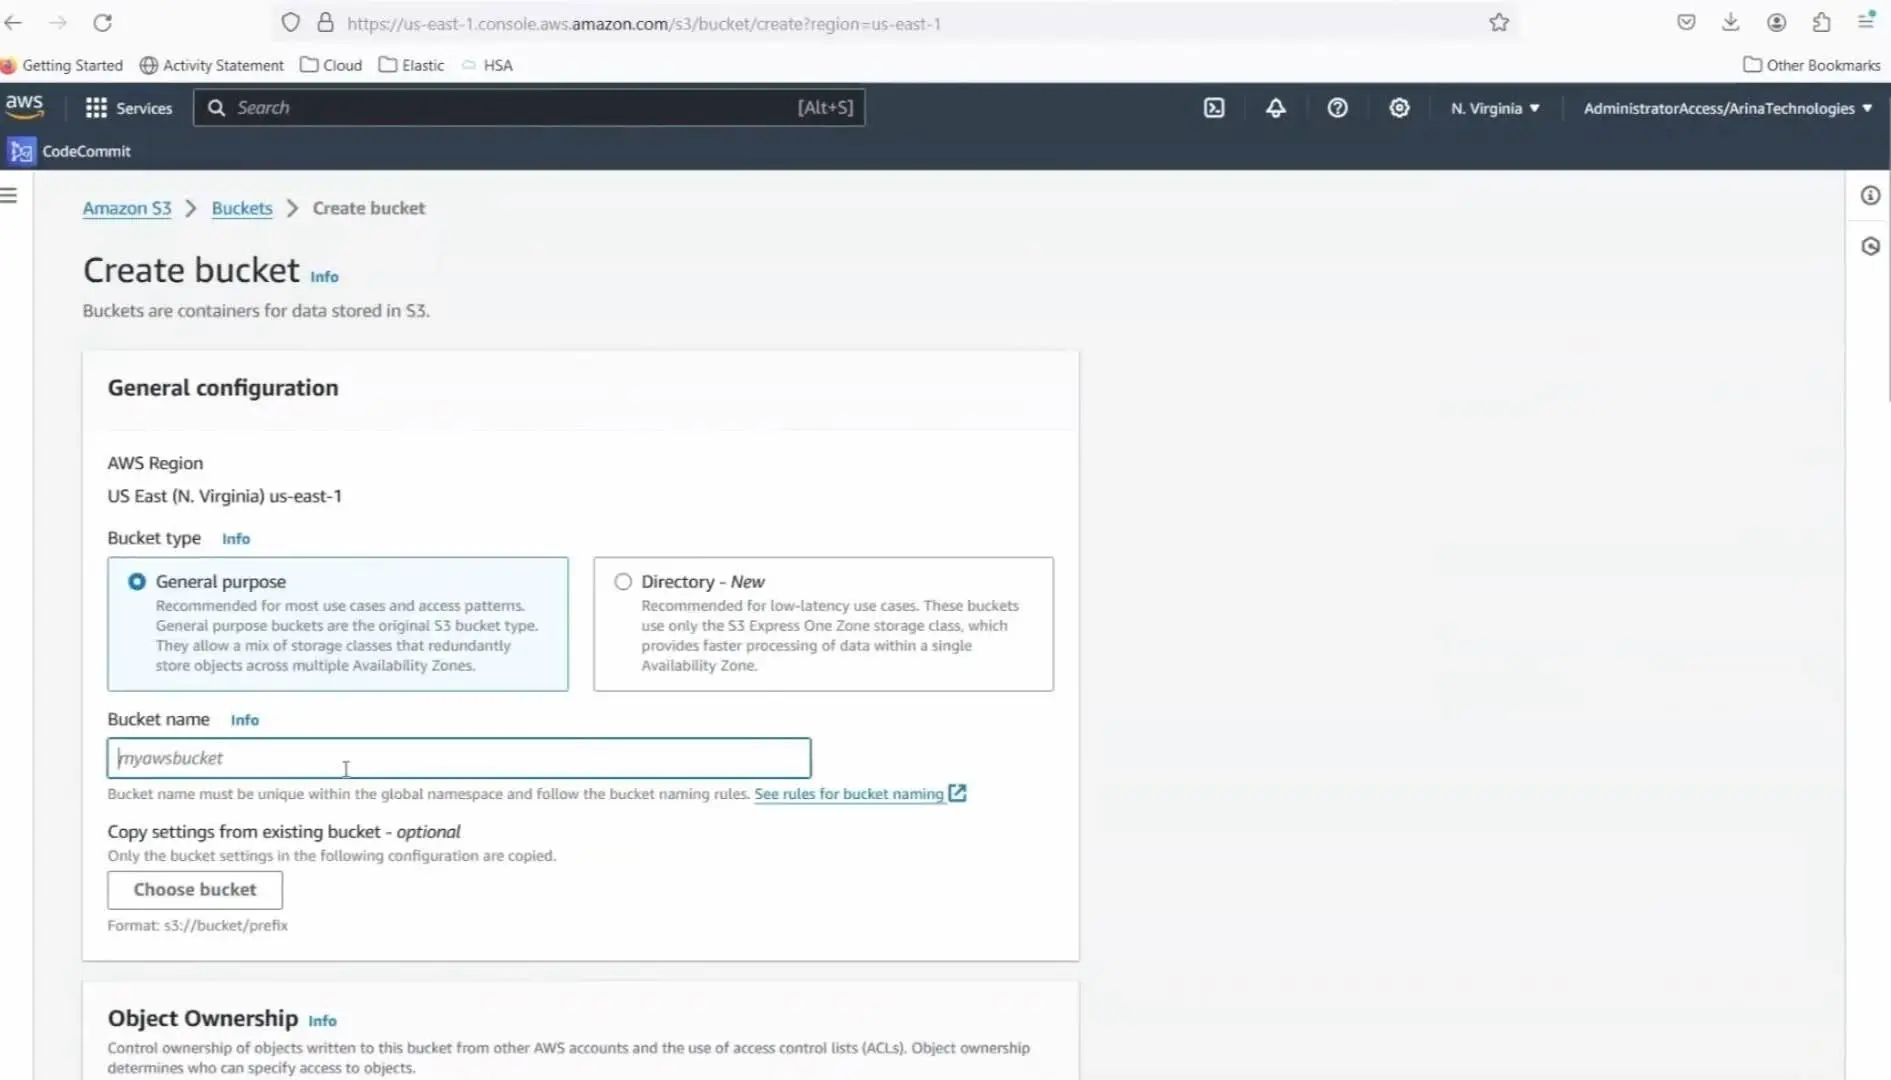
Step 1: Creating the Bucket

Creating the Bucket

  • Unique bucket name: Remember, S3 bucket names need to be globally unique. Create the bucket intended for the exclusive use of the KMS key.
  • Disable bucket versioning: If not required, keep this setting disabled to manage storage costs.

Step 2: Policy Configuration

Policy Configuration

  • Deny other buckets: The crucial part of this setup involves crafting a bucket policy that uses a "Deny" statement. This statement should specify that if the bucket name doesn’t match your specific bucket, access should be denied.
  • Set conditions: Use conditions to enforce that the KMS key can only encrypt/decrypt objects when the correct S3 bucket is specified.
{
"Version": "2012-10-17",
"Id": "key-consolepolicy-3",
"Statement": [
{
"Sid": "Enable IAM User Permissions",
"Effect": "Allow",
"Principal": {
"AWS": "arn:aws:iam::<account-number>:root"
},
"Action": "kms:*",
"Resource": "*"
},
{
"Sid": "Deny access to key if the request is not for a yt-test-bucket",
"Effect": "Deny",
"Principal": {
"AWS": "*"
},
"Action": [
"kms:GenerateDataKey",
"kms:Decrypt"
],
"Resource": "*",
"Condition": {
"StringNotEquals": {
"kms:EncryptionContext:aws:s3:arn": "arn:aws:s3:::yt-s3-bucket"
}
}
}
]
}

Testing the Configuration

  • Validate with another bucket: Create an additional S3 bucket and try to use the KMS key. The attempt should fail, confirming that your policy works.
  • Verify with the correct bucket: Finally, test the key with the correct bucket to ensure that operations like uploading and downloading are seamless.

Conclusion

This setup not only strengthens your security posture but also adheres to best practices of least privilege by limiting how and where the encryption key can be used. Implementing such precise controls is critical for managing sensitive data in the cloud.


🔚 Call to Action

Choosing the right platform depends on your organizations needs. For more insights, subscribe to our newsletter for insights on cloud computing, tips, and the latest trends in technology. or follow our video series on cloud comparisons.

Interested in having your organization setup on cloud? If yes, please contact us and we'll be more than glad to help you embark on cloud journey.

💬 Comment below:
How is your experience with Mac on EC2? What do you want us to review next?

A Detailed Overview Of AWS SES and Monitoring - Part 2

· 6 min read

In our interconnected digital world, managing email efficiently and securely is a critical aspect of business operations. This post delves into a sophisticated setup using Amazon Web Services (AWS) that ensures your organization's email communication remains robust and responsive. Specifically, we will explore using AWS Simple Email Service (SES) in conjunction with Simple Notification Service (SNS) and AWS Lambda to handle email bounces and complaints effectively.

Understanding the Components

Before diving into the setup, let's understand the components involved:

  • AWS SES: An email service that enables you to send and receive emails securely.
  • AWS SNS: A flexible, fully managed pub/sub messaging and mobile notifications service for coordinating the delivery of messages to subscribing endpoints and clients.
  • AWS Lambda: A serverless compute service that runs your code in response to events and automatically manages the underlying compute resources.

Read about SES Part - 1

The Need for Handling Bounces and Complaints

Managing bounces and complaints efficiently is crucial for maintaining your organization’s email sender reputation. High rates of bounces or complaints can affect your ability to deliver emails and could lead to being blacklisted by email providers.

Step-by-Step Setup

Step 1: Configuring SES

SES

First, configure your AWS SES to handle outgoing emails. This involves:

  • Setting up verified email identities (email addresses or domains from which you'll send emails).
  • Creating configuration sets in SES to specify how emails should be handled and tracked.

Step 2: Integrating SNS for Notifications

The next step is to set up AWS SNS to receive notifications from SES. This is crucial for real-time alerts on email bounces or complaints:

  • Create an SNS topic that SES will publish to when specified events (like bounces or complaints) occur.
  • Configure your SES configuration set to send notifications to the created SNS topic.
{
"Version": "2008-10-17",
"Statement": [
{
"Effect": "Allow",
"Principal": {
"Service": "ses.amazonaws.com"
},
"Action": "SNS:Publish",
"Resource": "arn:aws:sns:us-east-1:<account number>:SES-tracking",
"Condition": {
"StringEquals": {
"AWS:SourceAccount": "<account number>"
},
"StringLike": {
"AWS:SourceArn": "arn:aws:ses:*"
}
}
}
]
}

Step 3: Using AWS Lambda for Automated Responses

With SNS in place, integrate AWS Lambda to automate responses based on the notifications:

  • Create a Lambda function that will be triggered by notifications from the SNS topic.
  • Program the Lambda function to execute actions like logging the incident, updating databases, or even triggering remedial workflows.
import boto3, os, json
from botocore.exceptions import ClientError

# Set the global variables
fromEmail= str(os.getenv('from_email','from email address'))
ccEmail = str(os.getenv('cc_email','cc email address'))
toEmail = str(os.getenv('cc_email','to email address'))

awsRegion = str(os.getenv('aws_region','us-east-1'))
# The character encoding for the email.
CHARSET = "UTF-8"

# Create a new SES resource and specify a region.
sesClient = boto3.client('ses',region_name=awsRegion)

def sendSESAlertEmail(eventData):
message = eventData['Records'][0]['Sns']['Message']
print("message = "+message)

bouceComplaintMsg = json.loads(message)
print("bouceComplaintMsg == "+str(bouceComplaintMsg))

json_formatted_str_text = pp_json(message )
if "bounce" in bouceComplaintMsg:
print("Email is bounce")

# The email body for recipients with non-HTML email clients.
BODY_TEXT = "SES: Bounce email notification" +"\r\n"+json_formatted_str_text

bounceEmailAddress = bouceComplaintMsg['bounce']['bouncedRecipients'][0]['emailAddress']
bounceReason = bouceComplaintMsg['bounce']['bouncedRecipients'][0]['diagnosticCode']
print("bounceEmailAddress == "+bounceEmailAddress)
print("bounceReason == "+bounceReason)

subject = "SES Alert: Email to "+bounceEmailAddress+" has bounced"

# The HTML body of the email.
BODY_HTML = """<html>
<head></head>
<body>
<p>Email to %(bounceEmailAddressStr)s has bounced</p>
<p>Reason: %(bounceReasonStr)s</p>
<p>Complete details:%(jsonFormattedStr)s</p>
</body>
</html>""" % { "bounceEmailAddressStr": bounceEmailAddress, "bounceReasonStr": bounceReason, "jsonFormattedStr": json_formatted_str_text}
sendSESEmail (subject, BODY_TEXT, BODY_HTML)
else:
print("Email is Complaint")

# The email body for recipients with non-HTML email clients.
BODY_TEXT = "SES: Complaint email notification" +"\r\n"+json_formatted_str_text

complaintEmailAddress = bouceComplaintMsg['complaint']['complainedRecipients'][0]['emailAddress']
complaintReason = bouceComplaintMsg['complaint']['complaintFeedbackType']
print("complaintEmailAddress == "+complaintEmailAddress)
print("complaintReason == "+complaintReason)

subject = "SES Alert: Email "+complaintEmailAddress+" has raised a Complaint"

# The HTML body of the email.
BODY_HTML = """<html>
<head></head>
<body>
<p>Email %(complaintEmailAddressStr)s has raised a Complaint</p>
<p>Reason: %(complaintReasonStr)s</p>
<p>Complete details:%(jsonFormattedStr)s</p>
</body>
</html>""" % { "complaintEmailAddressStr": complaintEmailAddress, "complaintReasonStr": complaintReason, "jsonFormattedStr": json_formatted_str_text}
sendSESEmail (subject, BODY_TEXT, BODY_HTML)


def sendSESEmail(SUBJECT, BODY_TEXT, BODY_HTML):
# Send the email.
try:
#Provide the contents of the email.
response = sesClient.send_email(
Destination={
'ToAddresses': [
toEmail,
],
'CcAddresses': [
ccEmail,
]
},
Message={
'Body': {
'Html': {
'Charset': CHARSET,
'Data': BODY_HTML,
},
'Text': {
'Charset': CHARSET,
'Data': BODY_TEXT,
},
},
'Subject': {
'Charset': CHARSET,
'Data': SUBJECT,
},
},
Source=fromEmail,
)
print("SES Email Sent.....")
# Display an error if something goes wrong. 
except ClientError as e:
print("SES Email sent! Message ID:"+ e.response['Error']['Message'])
else:
print("SES Email sent! Message ID:" + response['MessageId'])

def pp_json(json_thing, sort=True, indents=4):
if type(json_thing) is str:
print("json is a str")
return (json.dumps(json.loads(json_thing), sort_keys=sort, indent=indents).replace(' ', '&nbsp;').replace('\n', '<br>'))
else:
return (json.dumps(json_thing, sort_keys=sort, indent=indents).replace(' ', '&nbsp;').replace('\n', '<br>'))

def lambda_handler(event, context):
print(event)
sendSESAlertEmail(event)

Step 4: Testing and Validation

Send test emails

Once configured, it's important to test the setup:

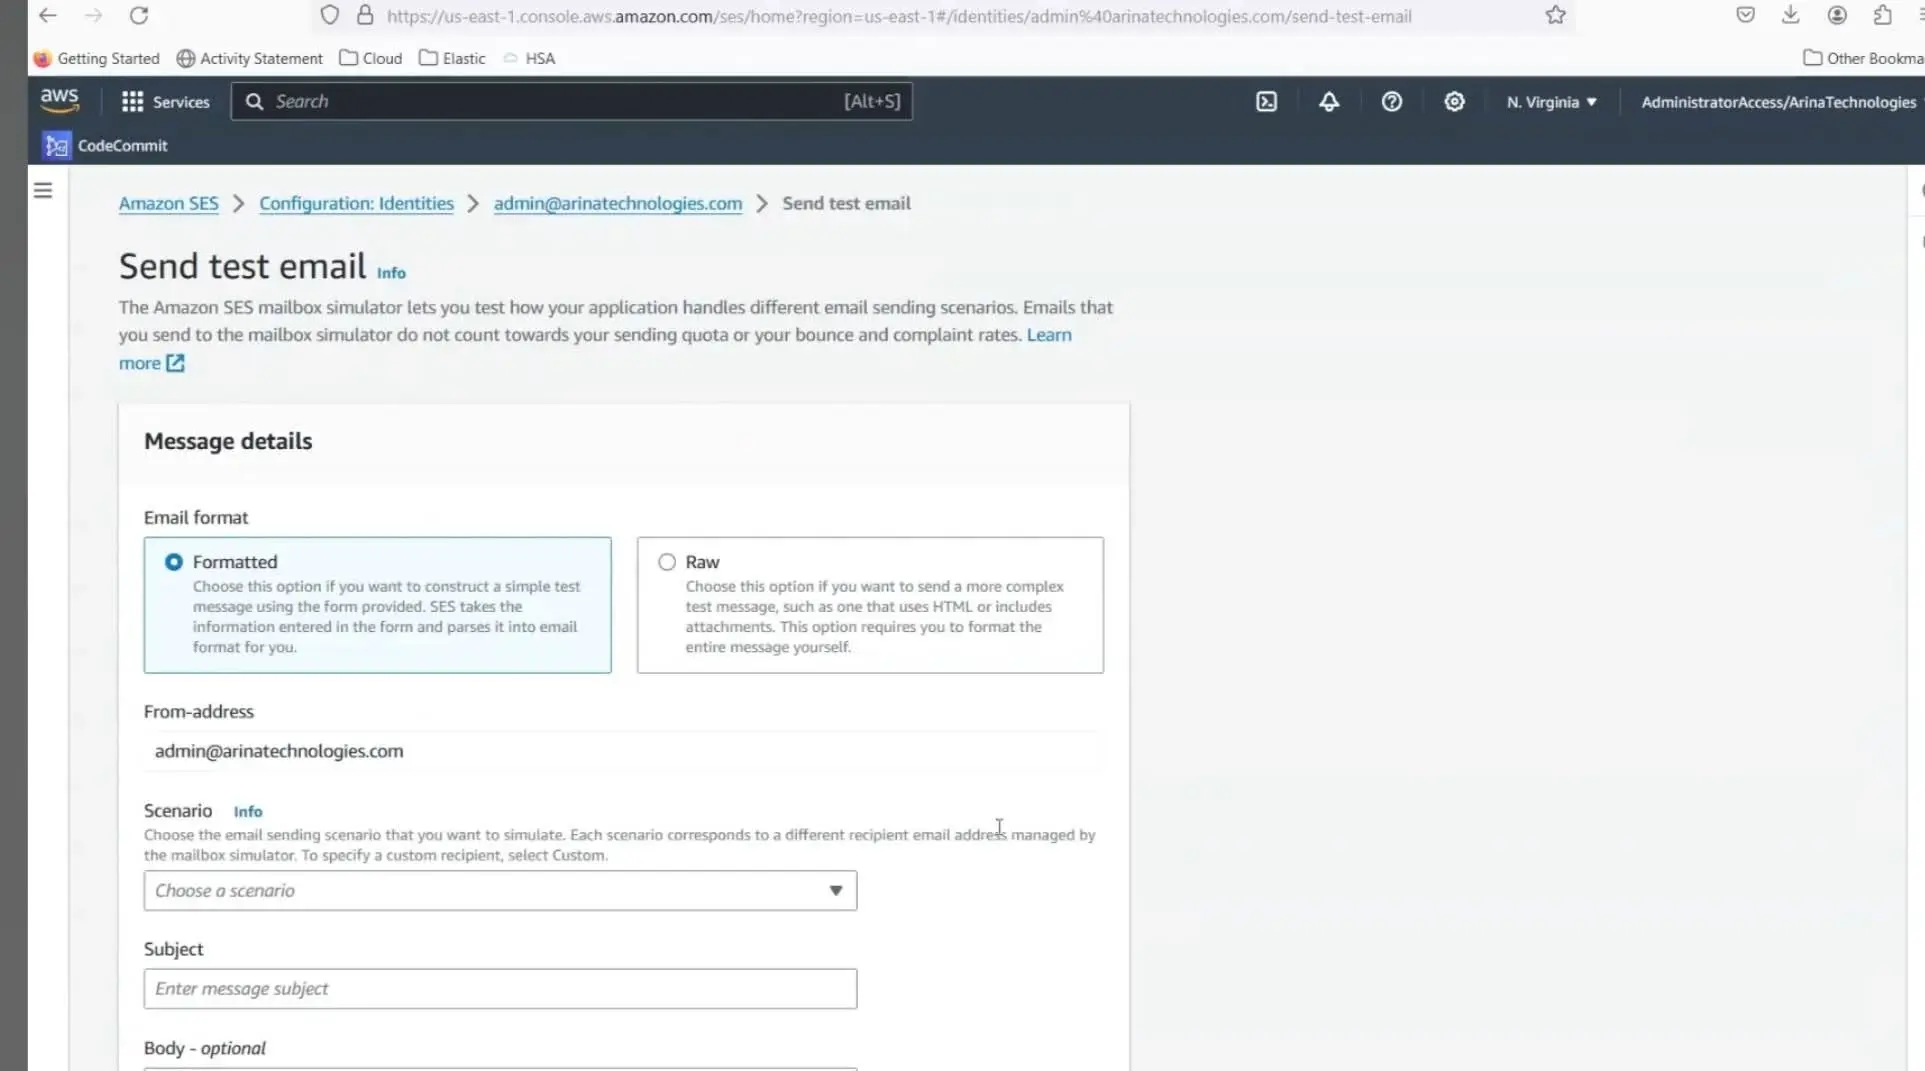
  • Send test emails that will trigger bounce or complaint notifications.
  • Verify that these notifications are received by SNS and correctly trigger the Lambda function.

Step 5: Monitoring and Adjustments

AWS CloudWatch

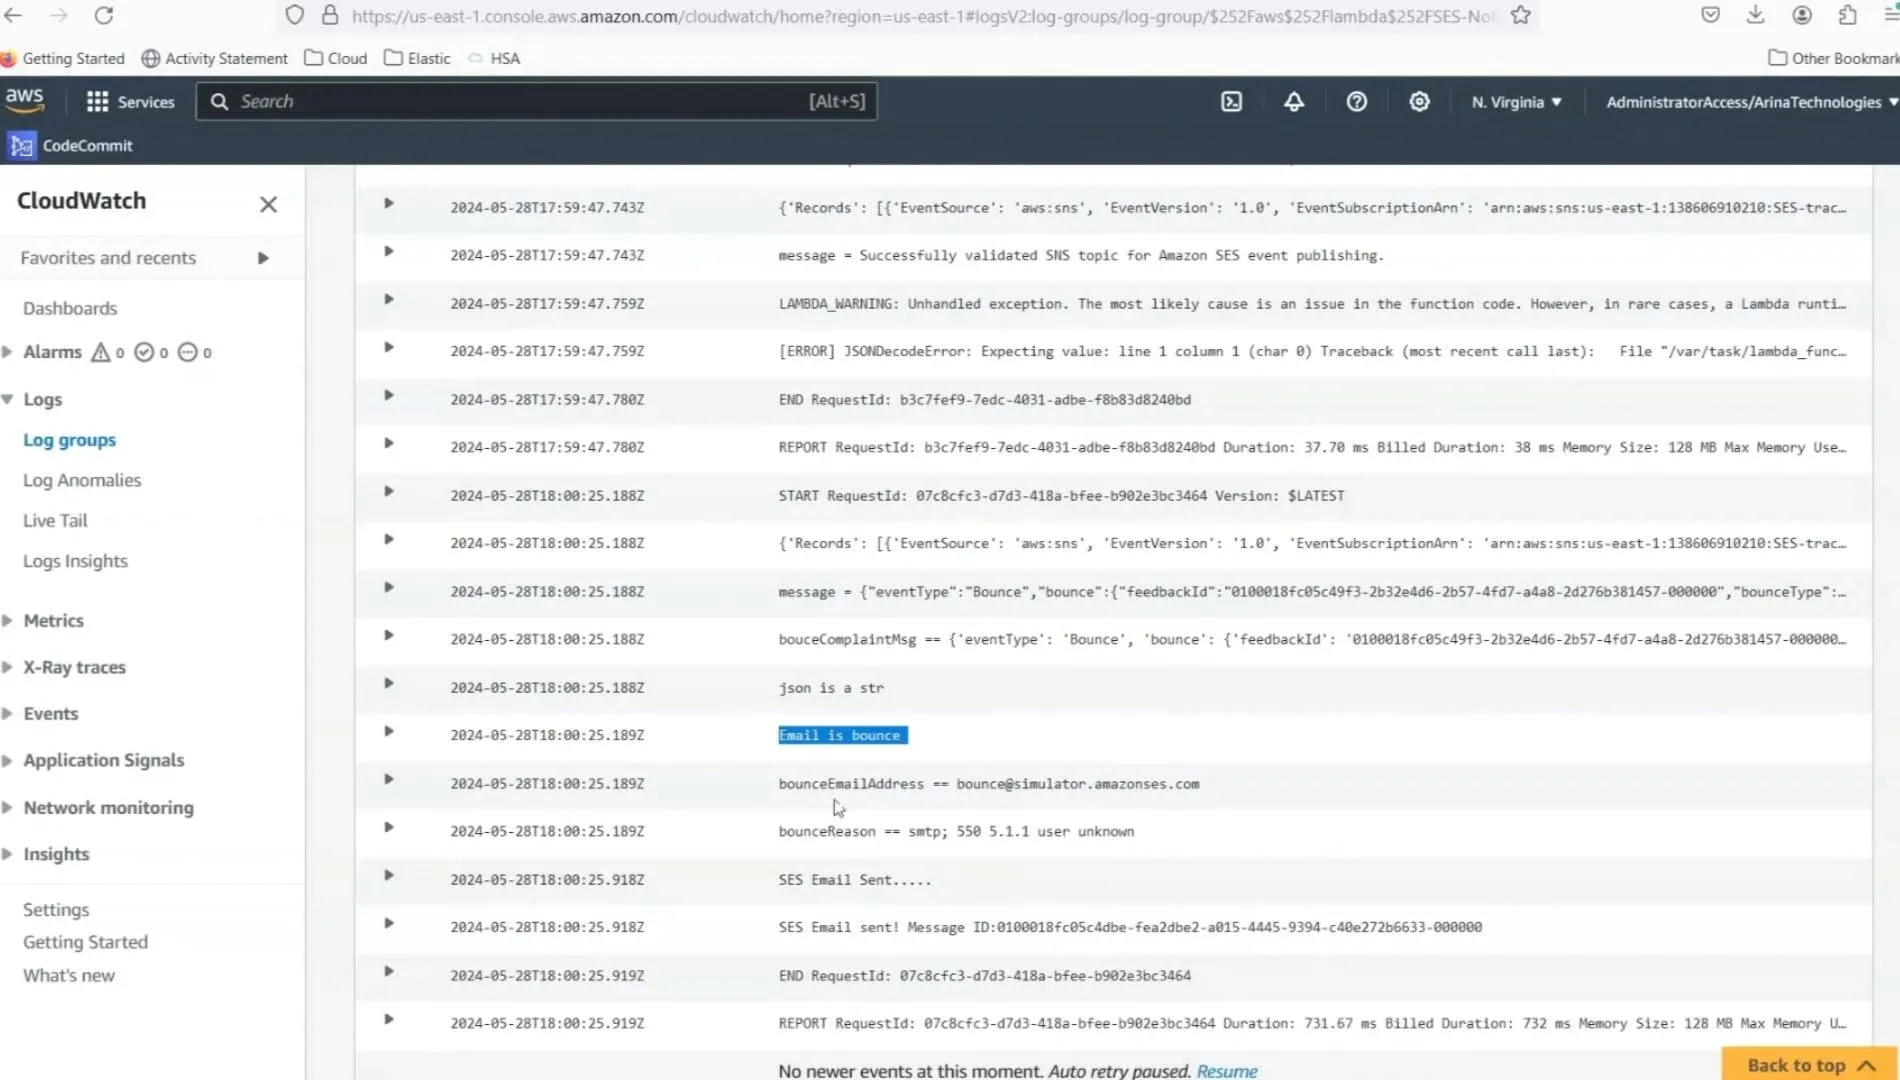
Regularly monitor the setup through AWS CloudWatch and adjust configurations as necessary to handle any new types of email issues or to refine the process.

Advanced Considerations

Consider exploring more advanced configurations such as:

  • Setting up dedicated Lambda functions for different types of notifications.
  • Using AWS KMS (Key Management Service) for encrypting the messages that flow between your services for added security.

Please refer our Newsletter where we provide solutions to creating customer marketing newsletter.

Conclusion

This setup not only ensures that your organization responds swiftly to critical email events but also helps in maintaining a healthy email environment conducive to effective communication. Automating the handling of email bounces and complaints with AWS SES, SNS, and Lambda represents a proactive approach to infrastructure management, crucial for businesses scaling their operations.

Azure Messaging: Service Bus, Event Hub & Event Grid

· 7 min read

In the realm of Azure, messaging services play a critical role in facilitating communication and data flow between different applications and services. With Azure's Service Bus, Event Hub, and Event Grid, developers have powerful tools at their disposal to implement robust, scalable, and efficient messaging solutions. But understanding the differences, use cases, and how to leverage each service optimally can be a challenge. This blog aims to demystify these services, providing clarity and guidance on when and how to use them.

Adapting to change is not about holding onto a single solution but exploring a spectrum of possibilities. Azure Messaging services—Service Bus, Event Hub, and Event Grid—embody this principle by offering diverse paths for seamless communication and data flow within cloud architectures.

Before diving into the specific Azure messaging services, it's essential to differentiate between two key concepts: events and messages.

Events

Events signify a state change or a condition met, alerting the system that something has happened. They are lightweight and only provide information that an action has occurred, leaving it to the recipient to determine the response. Events can be singular or part of a sequence, providing insights without carrying the original data payload.

Messages

Messages, on the other hand, contain data intended for processing or storage elsewhere. They imply an agreement on how the data will be handled by the recipient, ensuring that the message is processed as expected and acknowledged upon completion.

Azure Messaging Services Overview

Azure Service Bus

Azure Service Bus is a fully managed enterprise messaging service offering advanced features like transaction support, message sequencing, and duplicate detection. It's ideal for complex applications requiring secure, reliable communication between components or with external systems.

Key Features

1.Trustworthy asynchronous messaging services that rely on active polling.

2.Sophisticated messaging functionalities including: • First-in, first-out (FIFO) organization • Session batching • Transaction support • Handling of undeliverable messages through dead-lettering • Scheduled delivery • Message routing and filtering • Avoidance of message duplication 3.Guaranteed delivery of each message at least once.

4.Provides choice to enforce message ordering.

Azure Event Hub

Designed for big data scenarios, Azure Event Hub excels in ingesting and processing large volumes of events in real time. It's a high-throughput service capable of handling millions of events per second, making it suitable for telemetry and event streaming applications.

Key Features

  • Ultra-low-low latency for rapid data handling.
  • The capacity to absorb and process an immense number of events each second.
  • Guarantee of delivering each event at least once.

Azure Event Grid

Azure Event Grid is a fully managed event routing service that enables event-driven, reactive programming. It uses a publish-subscribe model to filter, route, and deliver events efficiently, from Azure services as well as external sources.

Choosing the Right Service


FeatureService BusEvent HubEvent Grid
Messaging PatternsQueues,Topics,SubscriptionsEvent StreamsReactive Programming
Protocols SupportedAMQP 1.0, HTTP/HTTPS, SBMPAMQP 1.0, HTTP/HTTPSHTTP/HTTPS
Specifications SupportedJMS, WS/SOAP, REST APIKafka, Capture, REST APICloudEvents
CostCan get expensive with Premium and Dedicated tiersCan get expensive with Premium and Dedicated tiersCheapest
Service TiersBasic, Standard, PremiumBasic, Standard, Premium, DedicatedBasic, Standard
Ideal Use CaseEnterprise Messaging, Ordered DeliveryBig Data, Telemetry IngestionReact to resource status changes
ThroughputLower than Event HubDesigned for High ThroughputDynamically Scales Based on Events
OrderingSupports FIFOLimited to PartitionEvent Ordering Not Guaranteed
Delivery GuaranteeAt Least OnceAt Least OnceAt Least Once, with Retry Policies
LatencyMillisecondsLow, MillisecondsVery Low, Sub-Second
Maximum Message SizeService Bus messaging services (queues and topics/subscriptions) allow application to send messages of size up to 256 KB (standard tier) or 100 MB (premium tier).256 KB - Basic 1 MB - StandardMQTT limits in Event Grid namespace - 512 KB
Retention Premium tier - 90 days, Basic tier - 14 days Standard tier - 7 days, Premium and dedicated tier - 90 days Minimum value is 1 minute, Maximum value is topic's retention Default value is 7 days or topic retention

Architecture Pattern Showing Service Bus, Event Hub and Event Grid

Following architecture diagram shows a sample architecture pattern where all 3 Azure services are used:

Architecture Pattern Showing Service Bus, Event Hub and Event Grid

This architecture diagram illustrates the seamless integration of on-premises datacenter applications with Azure services to enhance data processing and analytics capabilities. The workflow initiates from an on-premises datacenter, where application data is generated and needs to be processed in the cloud for advanced analytics.

On-Prem Datacenter:

The starting point of the data flow, representing the on-premises infrastructure where application data is generated. This might include servers, databases, or other data sources within a company's internal network.

VPN Connection:

A secure and encrypted Virtual Private Network (VPN) connection is established between the on-premises datacenter and Azure. This VPN ensures that data transferred to the cloud is done so securely, maintaining the integrity and confidentiality of sensitive information.

VNET (Virtual Network):

Upon reaching Azure, data enters the VNET, a fundamental building block providing isolation and segmentation within the Azure cloud. The VNET serves as the backbone of the cloud infrastructure, ensuring that different components within the architecture can communicate securely.

Publish to Service Bus:

Data is then published to Azure Service Bus, a messaging service that enables disconnected communication among applications and services. Service Bus supports complex messaging patterns and ensures that data is reliably transferred between different components of the architecture.

Function App for Processing:

Azure Functions, a serverless compute service, is utilized to process the incoming data. These functions can transform, aggregate, or perform other operations on the data before persisting it to storage or forwarding it for further analysis.

Blob Storage:

The processed data is then stored in Azure Blob Storage, providing a scalable and secure place to maintain large volumes of unstructured data. Blob Storage supports a wide range of data types, from text and images to application logs and data backups.

Event Grid Consumption:

Azure Event Grid, an event-driven service, detects when new objects are put into Blob Storage. It triggers subsequent processes or workflows, ensuring that data changes result in immediate and responsive actions across the architecture.

EventHub for Real-time Analytics:

For real-time analytics, the architecture incorporates Azure Event Hub, capable of handling massive streams of data in real-time. Event Hub is ideal for scenarios requiring rapid data ingestion and processing, such as telemetry, live dashboards, or time-sensitive analytics.

Log Analytics Workspace:

Finally, Azure Log Analytics Workspace is used for monitoring, analyzing, and visualizing the data and operations within the architecture. It provides insights into the performance and health of the services, helping to detect anomalies, understand trends, and make informed decisions based on the processed data.

Conclusion

Azure Service Bus, Event Hub, and Event Grid offer a range of capabilities for implementing messaging and event-driven architectures in Azure. By understanding the features, use cases, and configuration options of each service, developers can choose the right tool for their application needs, ensuring efficient and scalable communication between services and components.

Mastering Data Transfer Times for Cloud Migration

· 7 min read

First, let's understand what cloud data transfer is and its significance. In today's digital age, many applications are transitioning to the cloud, often resulting in hybrid models wherecomponents may reside on-premises or in cloud environments. This shift necessitates robustdata transfer capabilities to ensure seamless communication between on-premises and cloud components.

Businesses are moving towards cloud services not because they enjoy managing data centers, but because they aim to run their operations more efficiently. Cloud providers specialize in managing data center operations, allowing businesses to focus on their core activities. This fundamental shift underlines the need for ongoing data transfer from onpremises infrastructure to cloud environments.

To give you a clearer picture, we present an indicative reference architecture focusing on Azure (though similar principles apply to AWS and Google Cloud). This architecture includes various components such as virtual networks, subnets, load balancers, applications, databases, and peripheral services like Azure Monitor and API Management. This setup exemplifies a typical scenario for a hybrid application requiring data transfer between cloud and on-premises environments.

Indicative Reference Architecture

Calculating Data Transfer Times

A key aspect of cloud migration is understanding how to efficiently transfer application data. We highlight useful tools and calculators that have aided numerous cloud migrations. For example, the decision between using AWS Snowball, Azure Data Box, or internet transfer is a common dilemma. These tools help estimate the time required to transfer data volumes across different bandwidths, offering insights into the most cost-effective and efficient strategies. Following calculators should be used to calculate data transfer costs.

Ref: https://cloud.google.com/architecture/migration-to-google-cloud-transferring-your-large-datasets#time

Ref: https://learn.microsoft.com/en-us/azure/storage/common/storage-choose-data-transfer-solution

Following image from Google documentation provides a good chart on data size with respect to network bandwidth:

Calculating Data Transfer Times

Cost-Effective Data Transfer Strategies

Simplification is the name of the game when it comes to data transfer. Utilizing simple commands and tools like Azure's azcopy, AWS S3 sync, and Google's equivalent services can significantly streamline the process. Moreover, working closely with the networking team to schedule transfers during off-peak hours and chunking data to manage bandwidth utilization are strategies that can minimize disruption and maximize efficiency.

[x] Leverage SDK and APIs where applicable [x] Work with the organizations network team [x] Try to split data transfers and leverage resumable transfers [x] Compress & Optimize the data [x] Use Content Delivery Networks (CDNs), caching and regions closer to data [x] Leverage cloud provider products to its strength and do your own analysis

Deep Dive Comparison

We compare data transfer services across AWS, Azure, and Google Cloud, covering direct connectivity options, transfer acceleration mechanisms, physical data transfer appliances, and services tailored for large data movements. Each cloud provider offers unique solutions, from AWS's Direct Connect and Snowball to Azure's ExpressRoute and Data Box, and Google Cloud's Interconnect and Transfer Appliance.

AWSAzureGCP
AWS Direct ConnectAzure ExpressRouteCloud Interconnect
Provides a dedicated network connection from on-premises to AWS.Offers private connections between Azure data centers and infrastructure.Provides direct physical connections to Google Cloud.
Amazon S3 Transfer AccelerationAzure Blob Storage TransferGoogle Transfer Appliance
Speeds up the transfer of files to S3 using optimized network protocols.Accelerates data transfer to Blob storage using Azure's global network.A rackable high-capacity storage server for large data transfers.
AWS Snowball/SnowmobileAzure Data BoxGoogle Transfer appliance
Physical devices for transporting large volumes of data into and out of AWS.Devices to transfer large amounts of data into Azure Storage.Is a high-capacity storage device that can transfer and securely ship data to a Google upload facility. The service is available in two configurations: 100TB or 480TB of raw storage capacity, or up to 200TB or 1PB compressed.
AWS Storage GatewayAzure Import/ExportGoogle Cloud Storage Transfer Service
Connects on-premises software applications with cloud-based storage.Service for importing/exporting large amounts of data using hard drives and SSDs.Provides similar but not ditto same services such as DataPrep.
AWS DataSyncAzure File SyncGoogle Cloud Storage Transfer Service
Automates data transfer between on-premises storage and AWS services.Synchronizes files across Azure File shares and on-premises servers.Automates data synchronization from and to GCP Storage from external sources.
CloudEndureAzure Site RecoveryMigrate 4 Compute Engine
AWS CloudEndure works with both Linux and Windows VMs hosted on hypervisors, including VMware, Hyper-V and KVM. CloudEndure also supports workloads running on physical servers as well as cloud-based workloads running in AWS, Azure, Google Cloud Platform and other environmentsHelp your business to keep doing business—even during major IT outages. Azure Site Recovery offers ease of deployment, cost effectiveness, and dependability.To lift & shift on-prem apps to GCP.

Conclusion

As we wrap up our exploration of the data transfer speed and corresponding services provided by AWS, Azure, and GCP, it should be clear what options to consider for what data size and that each platform offers a wealth of options designed to meet the diverse needs of businesses moving and managing big data. Whether you require direct network connectivity, physical data transport devices, or services that synchronize your files across cloud environments, there is a solution tailored to your specific requirements.

Choosing the right service hinges on various factors such as data volume, transfer frequency, security needs, and the level of integration required with your existing infrastructure. AWS shines with its comprehensive services like Direct Connect and Snowball for massive data migration tasks. Azure's strength lies in its enterprise-focused offerings like ExpressRoute and Data Box, which ensure seamless integration with existing systems. Meanwhile, GCP stands out with its Interconnect and Transfer Appliance services, catering to those deeply invested in analytics and cloud-native applications.

Each cloud provider has clearly put significant thought into how to alleviate the complexities of big data transfers. By understanding the subtleties of each service, organizations can make informed decisions that align with their strategic goals, ensuring a smooth and efficient transition to the cloud.

As the cloud ecosystem continues to evolve, the tools and services for data transfer are bound to expand and innovate further. Businesses should stay informed of these developments to continue leveraging the best that cloud technology has to offer. In conclusion, the journey of selecting the right data transfer service is as critical as the data itself, paving the way for a future where cloud-driven solutions are the cornerstones of business operations.

Call to Action

Choosing the right platform depends on your organizations needs. For more insights, subscribe to our newsletter for insights on cloud computing, tips, and the latest trends in technology. or follow our video series on cloud comparisons.

Interested in having your organization setup on cloud? If yes, please contact us and we'll be more than glad to help you embark on cloud journey.

How do I deploy ECS Task in a different account using CodePipeline that uses CodeDeploy

· 10 min read

(Account 1) Create a customer-managed AWS KMS key that grants usage permissions to account 1's CodePipeline service role and account 2


  1. In account 1, open the AWS KMS console.
  2. In the navigation pane, choose Customer managed keys.
  3. Choose Create key. Then, choose Symmetric.
    Note: In the Advanced options section, leave the origin as KMS.
  4. For Alias, enter a name for your key.
  5. (Optional) Add tags based on your use case. Then, choose Next.
  6. On the Define key administrative permissions page, for Key administrators, choose your AWS Identity and Access Management (IAM) user. Also, add any other users or groups that you want to serve as administrators for the key. Then, choose Next.
  7. On the Define key usage permissions page, for This account, add the IAM identities that you want to have access to the key. For example: The CodePipeline service role.
  8. In the Other AWS accounts section, choose Add another AWS account. Then, enter the Amazon Resource Name (ARN) of the IAM role in account 2.
  9. Choose Next. Then, choose Finish.
  10. In the Customer managed keys section, choose the key that you just created. Then, copy the key's ARN.

Important: You must have the AWS KMS key's ARN when you update your pipeline and configure your IAM policies.


(Account 1) Create an Amazon S3 bucket with a bucket policy that grants account 2 access to the bucket


  1. In account 1, open the Amazon S3 console.
  2. Choose an existing Amazon S3 bucket or create a new S3 bucket to use as the ArtifactStore for CodePipeline.
  3. On the Amazon S3 details page for your bucket, choose Permissions.
  4. Choose Bucket Policy.
  5. In the bucket policy editor, enter the following policy:

Important: Replace codepipeline-source-artifact with the SourceArtifact bucket name for CodePipeline. Replace ACCOUNT_B_NO with the account 2 account number.


{
'Version': '2012-10-17',
'Statement': [
{
'Effect': 'Allow',
'Principal': {
'Service': 'logs.us-east-1.amazonaws.com'
},
'Action': 's3:GetBucketAcl',
'Resource': 'arn:aws:s3:::current-account-pipeline-bucket',
'Condition': {
'StringEquals': {
'aws:SourceAccount': ' <<Account 1>>'
},
'ArnLike': {
'aws:SourceArn': 'arn:aws:logs:us-east-1: <<Account 1>>:*'
}
}
},
{
'Effect': 'Allow',
'Principal': {
'Service': 'logs.us-east-1.amazonaws.com'
},
'Action': 's3:PutObject',
'Resource': 'arn:aws:s3:::current-account-pipeline-bucket/*',
'Condition': {
'StringEquals': {
'aws:SourceAccount': ' <<Account 1>>',
's3:x-amz-acl': 'bucket-owner-full-control'
}
}
},
{
'Effect': 'Allow',
'Principal': {
'AWS': 'arn:aws:iam::<<Account2>>:root'
},
'Action': [
's3:Get*',
's3:Put*'
],
'Resource': 'arn:aws:s3:::current-account-pipeline-bucket/*'
},
{
'Effect': 'Allow',
'Principal': {
'AWS': 'arn:aws:iam::<<Account2>>:root'
},
'Action': 's3:ListBucket',
'Resource': 'arn:aws:s3:::current-account-pipeline-bucket'
}
]
}

  1. Choose Save.

(Account 2) Create a cross-account IAM role


Create an IAM policy that allows the following
a. The pipeline in account 1 to assume the cross-account IAM role in account 2.
b. CodePipeline and CodeDeploy API actions.
c. Amazon S3 API actions related to the SourceArtifact
1. In account 2, open the IAM console.
2. In the navigation pane, choose Policies. Then, choose Create policy.
3. Choose the JSON tab. Then, enter the following policy into the JSON editor:


Important: Replace codepipeline-source-artifact with your pipeline's Artifact store's bucket name.


{
'Version': '2012-10-17',
'Statement': [
{
'Effect': 'Allow',
'Action': [
's3:List*',
's3:DeleteObjectVersion',
's3:*Object',
's3:CreateJob',
's3:Put*',
's3:Get*'
],
'Resource': [
'arn:aws:s3:::current-account-pipeline-bucket/*'
]
},
{
'Action': [
'kms:DescribeKey',
'kms:GenerateDataKey',
'kms:Decrypt',
'kms:CreateGrant',
'kms:ReEncrypt*',
'kms:Encrypt'
],
'Resource': [
'arn:aws:kms:us-east-1: <<Account 1>>:key/f031942c-5c7b-4e9f-9215-56be4cddab51'
],
'Effect': 'Allow',
'Sid': 'KMSAccess'
},
{
'Effect': 'Allow',
'Action': [
's3:Get*',
's3:ListBucket'
],
'Resource': [
'arn:aws:s3:::current-account-pipeline-bucket'
]
},
{
'Effect': 'Allow',
'Action': [
'cloudformation:*',
'iam:PassRole'
],
'Resource': '*'
}
]
}

4. Choose Review policy.
5. For Name, enter a name for the policy.
6. Choose Create policy.


Create a second IAM policy that allows AWS KMS API actions


1. In account 2, open the IAM console.
2. In the navigation pane, choose Policies. Then, choose Create policy.
3. Choose the JSON tab. Then, enter the following policy into the JSON editor:
Important: Replace arn:aws:kms:REGION:ACCOUNT_A_NO:key/key-id with your AWS KMS key's ARN that you copied earlier.


{
'Action' : [
'kms:DescribeKey',
'kms:GenerateDataKey',
'kms:Decrypt',
'kms:CreateGrant',
'kms:ReEncrypt*',
'kms:Encrypt'
],
'Resource': [
'arn:aws:kms:us-east-1: <<Account 1>>:key/f031942c-5c7b-4e9f-9215-56be4cddab51'
],
'Effect': 'Allow',
'Sid': 'KMSAccess'
}

4. Choose Review policy.
5. For Name, enter a name for the policy.
6. Choose Create policy.


Create the cross-account IAM role using the policies that you created


1. In account 2, open the IAM console.
2. In the navigation pane, choose Roles.
3. Choose Create role.
4. Choose Another AWS account.
5. For Account ID, enter the account 1 account ID.
6. Choose Next: Permissions. Then, complete the steps to create the IAM role.
7. Attach the cross-account role policy and KMS key policy to the role that you created. For instructions, see Adding and removing IAM identity permissions.


(Account 1) Add the AssumeRole permission to the account 1 CodePipeline service role to allow it to assume the cross-account role in account 2


1. In account 1, open the IAM console.
2. In the navigation pane, choose Roles.
3. Choose the IAM service role that you're using for CodePipeline.
4. Choose Add inline policy.
5. Choose the JSON tab. Then, enter the following policy into the JSON editor:


Important: Replace ACCOUNT_B_NO with the account 2 account number.

{
'Version': '2012-10-17',
'Statement': {
'Effect': 'Allow',
'Action': 'sts:AssumeRole',
'Resource': [
'arn:aws:iam::ACCOUNT_B_NO:role/*'
]
}
}

6. Choose Review policy, and then create the policy.


(Account 2) Create a service role for CodeDeploy and if using EC2 you need to also setup AutoScaling for EC2 service role that includes the required permissions for the services deployed by the stack


Note:

1. In account 2, open the IAM console.

2. In the navigation pane, choose Roles.

3. Create a role for AWS CloudFormation to use when launching services on your behalf.

4. Apply permissions to your role based on your use case.


Important: Make sure that your trust policy allows resources in Account 1: < Account 1 > 0 to access services that are deployed by the stack.


(Account 1) Update the CodePipeline configuration to include the resources associated with account 2


Note: If you receive errors when running AWS Command Line Interface (AWS CLI) commands, confirm that you're running a recent version of the AWS CLI.


You can't use the CodePipeline console to create or edit a pipeline that uses resources associated with another account. However, you can use the console to create the general structure of the pipeline. Then, you can use the AWS CLI to edit the pipeline and add the resources associated with the other account. Or, you can update a current pipeline with the resources for the new pipeline. For more information, see Create a pipeline in CodePipeline.


1. Get the pipeline JSON structure by running the following AWS CLI command: aws codepipeline get-pipeline --name MyFirstPipeline >pipeline.jsonCopy CodeCopy CodeCopy CodeCopy CodeCopy CodeCopy CodeCopy CodeCopy CodeCopy Code

2. In your local pipeline.json file, confirm that the encryptionKey ID under artifactStore contains the ID with the AWS KMS key's ARN. Note: For more information on pipeline structure, see create-pipeline in the AWS CLI Command Reference.

3. The RoleArn inside the 'name': 'Deploy' configuration JSON structure for your pipeline is the role for the CodePipeline role in Account 2. This is IMPORTANT as using this role the pipeline in Account 1 will be able to know the ECS Service/task is in which account.

4. Verify that the role is updated for both of the following:

a. The RoleArn inside the action configuration JSON structure for your pipeline.

b. The roleArn outside the action configuration JSON structure for your pipeline.

Note: In the following code example, RoleArn is the role passed to AWS CloudFormation to launch the stack. CodePipeline uses roleArn to operate an AWS CloudFormation stack.


{
'pipeline': {
'name': 'svc-pipeline',
'roleArn': 'arn:aws:iam:: <<Account 1>>:role/codepipeline-role',
'artifactStores': {
'eu-west-2': {
'type': 'S3',
'location': 'codepipeline-eu-west-2-419402304744',
'encryptionKey': {
'id': 'arn:aws:kms:us-east-1: <<Account 1>>:key/f031942c-5c7b-4e9f-9215-56be4cddab51',
'type': 'KMS'
}
},
'us-east-1': {
'type': 'S3',
'location': 'codepipeline-us-east-1- <<Account 1>>'
}
},
'stages': [
{
'name': 'Source',
'actions': [
{
'name': 'Source',
'actionTypeId': {
'category': 'Source',
'owner': 'AWS',
'provider': 'CodeCommit',
'version': '1'
},
'runOrder': 1,
'configuration': {
'BranchName': 'develop',
'OutputArtifactFormat': 'CODE_ZIP',
'PollForSourceChanges': 'false',
'RepositoryName': 'my-ecs-service'
},
'outputArtifacts': [
{
'name': 'SourceArtifact'
}
],
'inputArtifacts': [],
'region': 'us-east-1'
}
]
},
{
'name': 'TST_Develop',
'actions': [
{
'name': 'Build-TST',
'actionTypeId': {
'category': 'Build',
'owner': 'AWS',
'provider': 'CodeBuild',
'version': '1'
},
'runOrder': 1,
'configuration': {
'ProjectName': 'codebuild-project'
},
'outputArtifacts': [
{
'name': 'BuildArtifact'
}
],
'inputArtifacts': [
{
'name': 'SourceArtifact'
}
],
'region': 'us-east-1'
},
{
'name': 'Build-Docker',
'actionTypeId': {
'category': 'Build',
'owner': 'AWS',
'provider': 'CodeBuild',
'version': '1'
},
'runOrder': 2,
'configuration': {
'PrimarySource': 'SourceArtifact',
'ProjectName': 'codebuild_docker_prj'
},
'outputArtifacts': [
{
'name': 'ImagedefnArtifactTST'
}
],
'inputArtifacts': [
{
'name': 'SourceArtifact'
},
{
'name': 'BuildArtifactTST'
}
],
'region': 'us-east-1'
},
{
'name': 'Deploy',
'actionTypeId': {
'category': 'Deploy',
'owner': 'AWS',
'provider': 'ECS',
'version': '1'
},
'runOrder': 3,
'configuration': {
'ClusterName': '<<Account2>>-ecs',
'ServiceName': '<<Account2>>-service'
},
'outputArtifacts': [],
'inputArtifacts': [
{
'name': 'ImagedefnArtifactTST'
}
],
'roleArn': 'arn:aws:iam::<<Account2>>:role/codepipeline-role',
'region': 'eu-west-2'
}
]
}
],
'version': 3,
'pipelineType': 'V1'
},
'metadata': {
'pipelineArn': 'arn:aws:codepipeline:us-east-1: <<Account 1>>:pipeline',
'created': '2024-01-25T16:53:19.957000-06:00',
'updated': '2024-01-25T18:57:07.565000-06:00'
}
}

5. Remove the metadata configuration from the pipeline.json file. For example


'metadata': {
'pipelineArn': 'arn:aws:codepipeline:us-east-1: <<Account 1>>:Account1-pipeline',
'created': '2024-01-25T16:53:19.957000-06:00',
'updated': '2024-01-25T18:57:07.565000-06:00'
}

Important: To align with proper JSON formatting, remove the comma before the metadata section.


6. (Optional) To create a pipeline and update the JSON structure, run the following command to update the pipeline with the new configuration file: aws codepipeline update-pipeline --cli-input-json file://pipeline.jsonCopy CodeCopy CodeCopy CodeCopy CodeCopy CodeCopy CodeCopy CodeCopy CodeCopy Code
7. (Optional) To use a current pipeline and update the JSON structure, run the following command to create a new pipeline: aws codepipeline create-pipeline --cli-input-json file://pipeline.jsonCopy CodeCopy CodeCopy CodeCopy CodeCopy CodeCopy CodeCopy CodeCopy CodeCopy Code


Important: In your pipeline.json file, make sure that you change the name of your new pipeline.


Deploy ECS tasks across accounts seamlessly with CodePipeline and CodeDeploy for efficient multi-account management.


Call to Action


Choosing the right platform depends on your organizations needs. For more insights, subscribe to our newsletter for insights on cloud computing, tips, and the latest trends in technology. or follow our video series on cloud comparisons.


Interested in having your organization setup on cloud? If yes, please contact us and we'll be more than glad to help you embark on cloud journey.

AWS vs Google vs Azure: Decoding the Ultimate Cloud Battle

· 14 min read

In the ever-evolving world of technology, one question frequently arises among professionals and businesses alike: which cloud provider is the best fit for my needs? With a plethora of options available, including giants like AWS (Amazon Web Services), Microsoft Azure, and Google Cloud, the decision can seem daunting. This blog aims to shed light on the key differences and strengths of these leading cloud services, helping you navigate the complex landscape of cloud computing.

"Choose wisely: AWS's global reach and vast services, Azure's seamless integration with Microsoft's ecosystem, and Google Cloud's leading data analytics and machine learning capabilities are shaping the future of the cloud, driving innovation, and redefining what's possible in technology."


Understanding Cloud Computing

Cloud computing has revolutionized the way we store, manage, and process data. At its core, cloud computing allows users to access and utilize computing resources over the internet, offering flexibility, scalability, and cost-efficiency. As the demand for these services grows, so does the landscape of providers, with AWS, Azure, and Google Cloud leading the charge. But what makes cloud computing so significant, and how has it evolved over the years? This section delves into the basics of cloud computing, its importance, and the transformative impact it has had on businesses and technology strategies worldwide.


Comparing Cloud Providers

When it comes to selecting a cloud service provider, the choice often boils down to AWS, Azure, and Google Cloud. Each provider offers unique strengths and services tailored to different business needs.


AWS

Amazon Web Services (AWS) is a pioneer in the cloud computing domain, offering an extensive range of services. From powerful compute options like EC2 to innovative technologies such as AWS Lambda for serverless computing, AWS caters to a wide array of computing needs. Its global network of data centers ensures high availability and reliability for businesses worldwide.


Azure

Microsoft Azure provides a seamless integration with Microsoft's software ecosystem, making it an attractive option for enterprises heavily invested in Microsoft products. Azure excels in hybrid cloud solutions, allowing businesses to bridge their on-premises infrastructure with the cloud. Azure's AI and machine learning services are also noteworthy, offering cutting-edge tools for businesses to leverage.

Read more about Azure


Google Cloud

Google Cloud stands out for its data analytics and machine learning services, building on Google's extensive experience in data management and AI. With solutions like BigQuery and TensorFlow, Google Cloud is ideal for projects that require advanced data analysis and machine learning capabilities.


Other Providers

Beyond these giants, the cloud landscape includes other notable providers such as IBM Cloud, Oracle Cloud, and Alibaba Cloud, each offering unique services and regional strengths.


Choosing the Right Cloud Provider

Selecting the right cloud provider depends on several factors:

  • Cost Efficiency: Comparing pricing models is crucial as costs can vary significantly based on resource consumption, storage needs, and network usage.
  • Service Offerings: Consider the range of services offered and how they align with your project requirements.
  • Scalability and Flexibility: Assess the provider's ability to scale resources up or down based on demand.
  • Security and Compliance: Ensure the provider meets your industry's security standards and compliance requirements.
  • Support and Community: Consider the level of support offered and the active community around the cloud services.

The Future of Cloud Computing

The future of cloud computing is poised for exponential growth, with emerging trends such as edge computing, serverless architectures, and AI-driven cloud services shaping the next wave of innovation. Businesses must stay abreast of these developments to leverage cloud computing effectively and maintain a competitive edge.


Service Comparison: AWS vs Azure vs Google Cloud Compute

ServiceAmazon Web ServicesGoogle Cloud PlatformMicrosoft Azure
Deploy, manage, and maintain virtual serversElastic Compute Cloud EC2Compute EngineVirtual Machines Virtual Machine Scale Sets
Shared Web hostingAWS AmplifyWeb AppsFirebase
Management support for Docker/Kubernetes containersEC2 Container Service (ECS)Kubernetes EngineContainer Service
Docker container registryEC2 Container Registry (ECR)Container RegistryContainer Registry
Orchestrate and manage microservice-based applicationsAWS Elastic BeanstalkApp EngineService Fabric
Integrate systems and run backend logic processesLambdaCloud FunctionsFunctions
Run large-scale parallel and high-performance batch computingBatchPreemptible VMsBatch
Automatically scale instancesAuto ScalingInstance GroupsVirtual Machine Scale Sets App Service Scale Capability PAAS AutoScaling

Service Comparison: AWS vs Azure vs Google Cloud Storage

ServiceAmazon Web ServicesGoogle Cloud PlatformMicrosoft Azure
Object storage service for use casesSimple Storage Services (S3)Google Cloud StorageStorage (Block Blob)
Virtual server disk infrastructureElastic Block Store (EBS)Compute Engine Persistent DisksStorage (Page Blobs)
Archive storageS3 Infrequent Access (IA) GlacierNearline ColdlineStorage (Cool) Storage (Archive) Data Archive
Create and configure shared file systemsElastic File System (EFS)
File Store
ZFS / AvereAzure Files Azure NetApp Files
Hybrid storageStorage GatewayEgnyte SyncStorSimple
Bulk data transfer solutions

Elastic File System (EFS) File Store Snowmobile

Storage transfer ServiceImport/Export Azure Data Box
Snowmobile
BackupObject StorageBackup
Cold Archive Storage
Storage Gateway
Automatic protection and disaster recoveryDisaster RecoveryDisaster Recovery CookbookSite Recovery

Service Comparison: AWS vs Azure vs Google Cloud Networking and Content Delivery

ServiceAmazon Web ServicesGoogle Cloud PlatformMicrosoft Azure
Isolated, private cloud private networkingVirtual Private CloudVirtual Private CloudVirtual Network
Cross-premises connectivityAPI GatewayCloud VPNVPN Gateway
Manage DNS names and recordsRoute 53Google Cloud DNSAzure DNS Traffic Manager
Global content delivery networksCloudFrontCloud InterconnectContent Delivery Network
Dedicated, private network connectionDirect ConnectCloud InterconnectExpressRoute
Load balancing configurationElastic Load BalancingCloud Load BalancingLoad Balancer Application Gateway

Service Comparison: AWS vs Azure vs Google Cloud Database

ServiceAmazon Web ServicesGoogle Cloud PlatformMicrosoft Azure
Managed relational database-as-a-serviceRDSCloud SQL Cloud Spanner Database for PostgreSQLSQL Database Database for MySQL
NoSQL (Indexed)DynamoDB Cloud BigtableCloud DatastoreCosmos DB
NoSQL (Key-value)DynamoDB SimpleDBCloud Datastoretable Storage
Managed data warehouseRedshiftBig QuerySQL Data Warehouse

Service Comparison: AWS vs Azure vs Google Cloud Big Data & Advanced Analytics

ServiceAmazon Web ServicesGoogle Cloud PlatformMicrosoft Azure
Big Data Managed Cluster as a ServiceEMRCloud DataProcAzure HDInsight
Cloud SearchCloudSearch OpenSearch ServiceSearchAzure Search
Streaming ServiceKinesis Kinesis Video StreamsCloud DataflowAzure Stream Analytics
Data WarehouseRedshiftBigQueryAzure SQL Data Warehouse
Business Intelligence, Data VisualizationQuickSight LookerGoogle Data StudioPowerBI
Cloud EtLAWS Data Pipeline AWS GlueCloud DataPrep Cloud Data FusionAzure Data Factory Azure Data Catalog
Simple Workflow Service (SWF)Cloud ComposerLogic Apps
third party data exchangeAWS Data ExchangeAnalytics HubAzure Data Share
Data Analytics platformRedshiftBig QueryAzure Databricks

Service Comparison: AWS vs Azure vs Google Cloud Artificial Intelligence

ServiceAmazon Web ServicesGoogle Cloud PlatformMicrosoft Azure
Language Processing AIAmazon LexNatural Language APILUIS (Language Understanding Intelligent Service)
Amazon ComprehendCloud text-to-SpeechAzure Bot Service
DialogFlow Enterprise EditionAzure text Analytic
Speech Recognition AIAmazon Pollytranslation APISpeaker Recognition
Amazon transcribeSpeech APISpeech to text
Amazon translateSpeech translation
Image Recognition AIAmazon RecognitionVision APIEmotion API
Cloud Video IntelligenceComputer Vision
Face API
Machine LearningAmazon Machine LearningCloud DataLabAzure Machine Learning
Amazon Sage​MakerCloud AutoMLAzure Machine Learning Workbench
AWS NeuronVertex AIAzure Machine Learning Model Management
Machine Learning FrameworkstensorFlow on AWSVertex AI (tensorFlow, Pytorch, XGBoost, Scikit-Learn)Azure Machine Learning
Pytorch on AWS
Apache MXNet on AWS
Business analysisAmazon ForecastVertex AI (tensorFlow, Pytorch, XGBoost, Scikit-Learn)Azure Analysis Service
Amazon Fraud DetectorAzure Metrics Advisor
Amazon Lookout for MetricsPersonalize
Amazon Augmented AI (Amazon A2I)
Amazon Personalize
Machine Learning InferenceAmazon Elastic InferenceVertex AI Predictionstime Series Insights reference data sets

Service Comparison: AWS vs Azure vs Google Cloud Management and Monitoring

ServiceAmazon Web ServicesGoogle Cloud PlatformMicrosoft Azure
Cloud advisor capabilitiestrusted AdvisorCloud Platform SecurityAdvisor
DevOps deployment orchestrationOpsWorks (Chef-based)Cloud Deployment ManagerAutomation
CloudFormationResource Manager
Cloud resources management monitoringCloudWatchStackdriver MonitoringPortal
X-RayCloud ShellMonitor
Management ConsoleDebuggerApplication Insights
trace
Error Reporting
AdministrationApplication Discovery ServiceCloud ConsoleLog Analytics
Systems ManagerOperations Management Suite
Personal Health DashboardResource Health
Storage Explorer
BillingBilling APICloud Billing APIBilling API

Service Comparison: AWS vs Azure vs Google Cloud Security

ServiceAmazon Web ServicesGoogle Cloud PlatformMicrosoft Azure
Authentication and authorizationIdentity and Access Management (IAM)Cloud IAMActive DirectoryActive Directory Premium
OrganizationsCloud Identity-Aware Proxy
Information ProtectionInformation Protection
Protect and safeguard with data encryptionKey Management ServiceStorage Service Encryption
Hardware-based security modulesCloudHSMCloud KeyKey Vault
Management Service
FirewallWeb Application FirewallCloud ArmorApplication Gateway
Cloud security assessment and certification servicesInspectorSecurity Command CenterSecurity Center
Certificate Manager
Directory servicesAWS Directory ServiceIdentity PlatformActive Directory Domain Services
Identity managementCognitoFirebase AuthenticationActive Directory B2C
Support cloud directoriesDirectory ServiceWindows Server Active Directory
ComplianceArtifactService trust Portal
Cloud services with protectionShieldCloud ArmorDDoS Protection Service

Service Comparison: AWS vs Azure vs Google Cloud Developer

ServiceAmazon Web ServicesGoogle Cloud PlatformMicrosoft Azure
Media transcodingElastic transcodertranscoder APIAzure Media Services
Cloud source code repositoryCodeCommitSource RepositoriesDevOps Server
Build Continuous IntegrationCodeBuildCloud BuildAzure DevOps Server
DeploymentCodeDeployCloud BuildAzure Pipeline
DevOps - Continuous Integration DeliveryCodePipelineCloud BuildAzure Devtest Labs
SDK for various languagesAWS Mobile SDKFirebaseAzure SDK

Lets discuss how we can optimize your business operations. Contact us for a consultation Contact Us


Conclusion

Choosing between AWS, Azure, and Google Cloud depends on your specific needs, budget, and long-term technology strategy. By understanding the strengths and offerings of each provider, businesses can make informed decisions that align with their objectives. As the cloud computing landscape continues to evolve, staying informed and adaptable will be key to leveraging the power of the cloud to drive business success.

How to improve data transfer efficiency in Azure

· 4 min read

Introduction

In the rapidly evolving digital landscape, efficiently managing and transferring data is crucial for organizations. Azure provides a plethora of services designed for secure, efficient data transfer, addressing a range of requirements and scenarios. This blog offers a deep dive into Azure Data Box, Azure Import/Export Service, Azure File Sync, Azure Data Factory, and their roles in data migration, replication, and integration.


  • Azure Data Transfer Options Overview
  • Azure Data Box
  • Blob Storage Transfer
  • Azure File Sync
  • Azure Data Factory
  • Comparing Azure Data Transfer Options
  • Conclusion

Azure Data Box-The Heavyweight Champion

Designed for large-scale data transfers, especially when network constraints exist, Azure Data Box is the go-to solution for moving over 100 terabytes of data to Azure. This ruggedized, secure appliance ensures data is moved safely and efficiently. Azure Import/Export Service - The Traditionalist: Now integrated with Azure Data Box, this service facilitates the shipping of large data volumes via physical disks, ideal for scenarios lacking high-speed internet connectivity.


Azure File Sync:- The Collaborator

Azure File Sync extends the capability to synchronize files across Azure File shares and on-premises servers, offering a seamless way to centralize file storage in Azure while ensuring local access for performance needs.


Azure Data Factory - The Pipeline Maestro

As a service for creating data-driven workflows, Azure Data Factory enables data movement and transformation across diverse sources, making it a powerful tool for data integration and processing tasks.


Comparative Analysis

The blog will conduct a comparative analysis of these services, examining their suitability based on data volume, transfer speed, security, cost-effectiveness, and integration capabilities. It aims to provide clear guidance on choosing the right service for different data transfer scenarios.

Feature / OptionAzure Data BoxAzure Data BoxAzure File SyncAzure Blob Storage Transfer (AZCopy)
Data VolumeUsually >100 TerrabytesData Pipeline from low to high volumeLow to high volumeLarge volumes (TBs)
Transfer SpeedOfflineOnline (network-based)Online (network-based)Online (network-based)
Use CaseMassive, one-time migrationRecurring data integration workflowsSyncing files across global officesOptimizing transfer to/from Azure Blob Storage
SecurityHigh (physical shipment)High (data encryption in transit and at rest)High (encryption in transit and at rest)High (encryption options)
CostHigh upfront (device rental)Pay-as-you-go (based on data processed)Pay-as-you-go (storage + sync operations) Variable depends on transfer method and
IntegrationNoneDeep integration with Azure servicesIntegrates with Windows ServerIntegrates with Azure services
ScalabilityFixed by device capacityHighly scalableScalable with cloud tieringHighly scalable
Management ComplexityMedium to highMediumMediumLow to medium

Conclusion

Selecting the most appropriate Azure service for data transfer involves assessing specific needs around data volume, speed, security, and cost. This guide aims to equip you with the knowledge to make informed decisions, ensuring efficient and secure data transfers within the Azure ecosystem.


Engagement

We encourage readers to share their experiences with Azure's data transfer services or suggest future topics. Your insights are valuable in shaping our content to better meet your needs.

This article aims to serve as a comprehensive guide to understanding and selecting the right Azure service for data transfer needs, ensuring readers are well-equipped to make informed decisions based on their specific requirements.