How to Use Azure OpenAI Embeddings for Document Search — A Real-World Tutorial
In this blog, we will explore the Azure OpenAI Service, how it compares to the OpenAI public API, and walk through a complete tutorial showing how to implement semantic search with embeddings using real legislative data.
If you have used ChatGPT and wondered, Why should I care about Azure OpenAI? — this blog will help you understand the key differences, enterprise benefits, and how to get started. This blog is based on a real spoken walkthrough that demonstrates:
- What embeddings are
- How to set up Azure OpenAI
- How to prepare and search data semantically
The walkthrough focuses on practical application using PowerShell and .NET DataTables, with references to the official Azure OpenAI documentation.
🚀 What is Azure OpenAI Service?
Azure OpenAI provides REST API and SDK access (Python, Java, Go, etc.) to powerful models such as:
- GPT-4, GPT-4 Turbo, GPT-4o, GPT-4o Mini
- GPT-3.5-Turbo
- Embeddings models (like text-embedding-ada-002)
- Vision & Speech models: DALL·E and Whisper
These models can power:
- ✅ Natural language to code
- ✅ Document summarization
- ✅ Semantic search
- ✅ Image understanding
🔍 Model Capabilities
Azure OpenAI supports text, image, and speech functionalities through models like:
- GPT-4, GPT-4 Turbo with Vision, GPT-3.5-Turbo
- GPT-4o, GPT-4o mini
- Embeddings, DALL·E, Whisper (speech-to-text)
🛠️ Common Use Cases
✅ Natural language to code
✅ Document summarization
✅ Semantic search
✅ Image understanding
🤖 How Does This Compare?
| Feature | OpenAI (Public) | Azure OpenAI Service |
|---|---|---|
| Access | ✅ Open to public | ⚠️ Limited access registration |
| Security | ⚠️ Basic API key | ✅ Azure-native security stack |
| Networking | ⚠️ Internet-only | ✅ Private VNet / Private Link |
| Compliance & SLA | ❌ None | ✅ Enterprise-grade SLAs |
| Responsible AI | ⚠️ Basic filters | ✅ Microsoft filters + policy |
| Authentication | ⚠️ OpenAI API key | ✅ Microsoft Entra ID |
🧠 Why Embeddings?
Embeddings allow you to transform words, phrases, or documents into numerical vectors that represent semantic meaning. This enables search that understands meaning, not just keywords.
Think of it like organizing a library not by title, but by what books are about. Books about space go together — even if the words don't match exactly.
You can use this for:
- Vector search
- Question answering
- Document clustering
🔍 Tutorial
This tutorial explores how to set up and use Azure OpenAI Service to enable intelligent document search through embeddings. Rather than keyword matching, you'll leverage semantic understanding using vector representations.
You'll learn to:
- Set up Azure OpenAI and deploy the embedding model
- Preprocess and normalize textual data
- Generate vector embeddings using the text-embedding-ada-002 model
- Perform a cosine similarity-based search to retrieve relevant documents
🧱 What You Need Before You Start
Make sure you have:
- A valid Azure account with OpenAI resource access
- A deployed embedding model like text-embedding-ada-002 (v2) in a supported region
- Python 3.8 or above installed
- Required libraries: openai, pandas, tiktoken, scikit-learn, matplotlib, plotly, scipy, num2words
- Jupyter Notebooks for interactive development
⚙️ Initial Setup
Install the required libraries by running:
pip install openai pandas tiktoken scikit-learn matplotlib plotly scipy num2words
Download the sample dataset using:
curl "https://raw.githubusercontent.com/Azure-Samples/Azure-OpenAI-Docs-Samples/main/Samples/Tutorials/Embeddings/data/bill_sum_data.csv" --output bill_sum_data.csv
This dataset, BillSum, contains summaries of U.S. Congressional bills and is perfect for trying out semantic search.
🔐 Connect to Azure OpenAI
You will need to extract the endpoint and keys from your Azure portal's resource settings. Once noted, add them to your environment:
setx AZURE_OPENAI_API_KEY "<your-key>"
setx AZURE_OPENAI_ENDPOINT "<your-endpoint>"

Note: We recommend storing secrets in Azure Key Vault to enhance security.
📥 Load and Prepare the Data
import os
import pandas as pd
import re

df = pd.read_csv("bill_sum_data.csv")
df_bills = df[['text', 'summary', 'title']]

def normalize_text(text):
    text = re.sub(r'\s+', ' ', text).strip()
    text = re.sub(r"\. ,", "", text)
    return text.replace("..", ".").replace(". .", ".")

df_bills['text'] = df_bills['text'].apply(normalize_text)
✂️ Token Count Filtering
import tiktoken
tokenizer = tiktoken.get_encoding("cl100k_base")
df_bills['n_tokens'] = df_bills['text'].apply(lambda x: len(tokenizer.encode(x)))
df_bills = df_bills[df_bills.n_tokens < 8192]
This ensures your document size stays within the model's max token limit.
🧠 Embedding Creation
from openai import AzureOpenAI
import numpy as np

client = AzureOpenAI(
  api_key=os.getenv("AZURE_OPENAI_API_KEY"),
  api_version="2024-02-01",
  azure_endpoint=os.getenv("AZURE_OPENAI_ENDPOINT")
)

def generate_embeddings(text):
    return client.embeddings.create(input=[text], model="text-embedding-ada-002").data[0].embedding

df_bills['embedding'] = df_bills['text'].apply(generate_embeddings)
🔍 Semantic Search in Action
Now that embeddings are ready, define similarity logic:
def cosine_similarity(a, b):
    return np.dot(a, b) / (np.linalg.norm(a) * np.linalg.norm(b))

def search_docs(df, query, top_n=3):
    query_embed = generate_embeddings(query)
    df['similarity'] = df['embedding'].apply(lambda x: cosine_similarity(x, query_embed))
    return df.sort_values('similarity', ascending=False).head(top_n)

results = search_docs(df_bills, "Tax on cable company revenue")
results[['title', 'summary']]
This finds the most contextually relevant bills.
✅ Real Output Example
print(results['summary'].iloc[0])
“Taxpayer's Right to View Act of 1993 - Prevents cable providers from charging extra for events held in venues built or maintained with tax dollars...”
✅ Complete Code:
import os
import re
import requests
import sys
from num2words import num2words
import os
import pandas as pd
import numpy as np
import tiktoken
from openai import AzureOpenAI

df=pd.read_csv(os.path.join(os.getcwd(),'bill_sum_data.csv'))
df

df_bills = df[['text', 'summary', 'title']]
df_bills

pd.options.mode.chained_assignment = None

# s is input text
def normalize_text(s, sep_token = " \n "):
    s = re.sub(r'\s+',  ' ', s).strip()
    s = re.sub(r". ,","",s)
    # remove all instances of multiple spaces
    s = s.replace("..",".")
    s = s.replace(". .",".")
    s = s.replace("\n", "")
    s = s.strip()

    return s

df_bills['text']= df_bills["text"].apply(lambda x : normalize_text(x))

tokenizer = tiktoken.get_encoding("cl100k_base")
df_bills['n_tokens'] = df_bills["text"].apply(lambda x: len(tokenizer.encode(x)))
df_bills = df_bills[df_bills.n_tokens<8192]
len(df_bills)

df_bills

sample_encode = tokenizer.encode(df_bills.text[0])
decode = tokenizer.decode_tokens_bytes(sample_encode)
decode

len(decode)

client = AzureOpenAI(
  api_key = os.getenv("AZURE_OPENAI_API_KEY"),
  api_version = "2024-02-01",
  azure_endpoint = os.getenv("AZURE_OPENAI_ENDPOINT")
)

def generate_embeddings(text, model="text-embedding-ada-002"): # model = "deployment_name"
    return client.embeddings.create(input = [text], model=model).data[0].embedding

df_bills['ada_v2'] = df_bills["text"].apply(lambda x : generate_embeddings (x, model = 'text-embedding-ada-002'))

df_bills

def cosine_similarity(a, b):
    return np.dot(a, b) / (np.linalg.norm(a) * np.linalg.norm(b))

def get_embedding(text, model="text-embedding-ada-002"): # model = "deployment_name"
    return client.embeddings.create(input = [text], model=model).data[0].embedding

def search_docs(df, user_query, top_n=4, to_print=True):
    embedding = get_embedding(
        user_query,
        model="text-embedding-ada-002"
    )
    df["similarities"] = df.ada_v2.apply(lambda x: cosine_similarity(x, embedding))

    res = (
        df.sort_values("similarities", ascending=False)
        .head(top_n)
    )
    if to_print:
        display(res)
    return res


res = search_docs(df_bills, "Can I get information on cable company tax revenue?", top_n=4)

res["summary"][9]
📈 Monitoring Usage and Performance
Once your Azure OpenAI model is deployed and you're actively using embeddings or completions, it's important to monitor both performance and cost.
You can access monitoring insights through the Azure Portal under your resource group:
📊 View Metrics
- Go to your Azure resource group.
- Open the OpenAI resource you've deployed.
- In the Overview section, select Monitoring and then Metrics.
- Here, you can review charts and data such as:
- Total request counts (
OpenAI SDP requests) - Time-to-first-byte and time-between-tokens (useful for latency analysis)
- Token usage over time
- Total request counts (
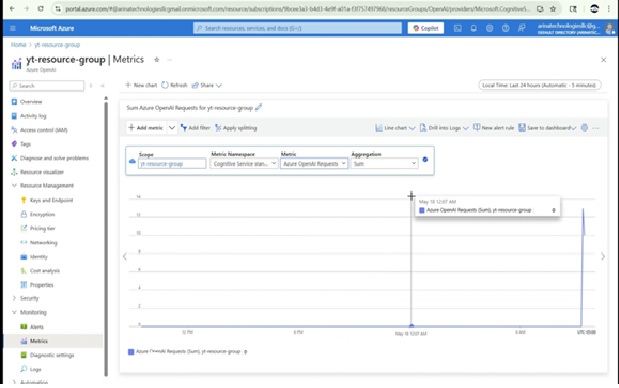
Note: You can choose different metrics from the dropdown and visualize performance and request throughput to understand model behavior.
🔔 Create Alerts
- To proactively manage anomalies or over-usage, set up alert rules.
- Click Create Alert Rule under Monitoring > Alerts.
- You can define conditions like "Requests > 1000 in 1 hour" and choose your preferred notification method.
🪵 Enable Diagnostic Logging
- Navigate to Diagnostic settings.
- Click Add diagnostic setting and provide a name.
- Choose what to log: audit logs, request logs, latency metrics, etc.
- Send logs to:
- Azure Storage Account (for long-term archival)
- Log Analytics Workspace (for Kusto queries)
- Event Hub (for real-time streaming)
🔍 Example Use Case
Let's say you want to investigate a drop in model accuracy. You could:
- Check latency spikes in metrics.
- View the number of requests hitting your embedding model.
- Correlate this with recent changes in input data or prompt structure.
Azure Monitor provides all the tools needed to gain this visibility without external integrations.
🧹 Resource Cleanup
Once your testing or experimentation is done, it's important to clean up your Azure resources to avoid unnecessary charges — especially since deployed models can incur costs even when idle.
🔽 Step-by-step Cleanup
-
Navigate to Azure AI Studio / Azure OpenAI in the Azure Portal
Go to the resource you created earlier. You'll need to delete both the deployed model and the resource group itself. -
Delete the Deployed Model
- In the Azure AI Foundry portal or your resource's Deployments tab, locate the deployed model (e.g.,
text-embedding-ada-002). - Click on the deployment entry, then choose Delete.
- Confirm the deletion. This stops the model from incurring compute charges.
- In the Azure AI Foundry portal or your resource's Deployments tab, locate the deployed model (e.g.,
-
Delete the Azure OpenAI Resource
- After the model is removed, go back to your Resource Group in Azure (e.g.,
yt-research-group). - Click the Delete button.
- Confirm your selection. This ensures you're not billed for any associated services.
- After the model is removed, go back to your Resource Group in Azure (e.g.,
-
Stop Local Resources (Optional) If you ran a Jupyter Notebook or local development server (e.g., WSL, Ubuntu), you can safely terminate those now.
-
Use Azure Monitor for Visibility (Optional but Recommended)
- While in the portal, head to Monitoring → Metrics under your Azure OpenAI resource.
- You can inspect logs for token usage, latency (e.g., time to first byte), and total requests.
- Set up Alerts or enable Diagnostic Settings to forward logs to Log Analytics or Azure Storage.
💡 Deleting unused resources helps manage cost, prevents service sprawl, and ensures security hygiene.
🔗 Related Resources
🔚 Call to Action
Choosing the right platform depends on your organizations needs. For more insights, subscribe to our newsletter for insights on cloud computing, tips, and the latest trends in technology. or follow our video series on cloud comparisons.
Need help launching your app on AWS? Visit arinatechnologies.com for expert help in cloud architecture.
Interested in having your organization setup on cloud? If yes, please contact us and we'll be more than glad to help you embark on cloud journey.
💬 Drop a comment below if you'd like to see part 2 (add maps, filters, and REST APIs!)